
Dictation guide
Everything you need to start dictating on iPhone: installing the keyboard, turning it on, and using it in any app.
Update Letterly to the latest version before you start.
Install Letterly
Get Letterly from the App Store. Full details: Download & install.
Sign in
Open the app and sign in with Google, Apple, or your email. See Onboarding.
If you already have a subscription, sign in with the email you bought it with. Otherwise you start on the Free plan.
Learn more about plans →Open Dictation
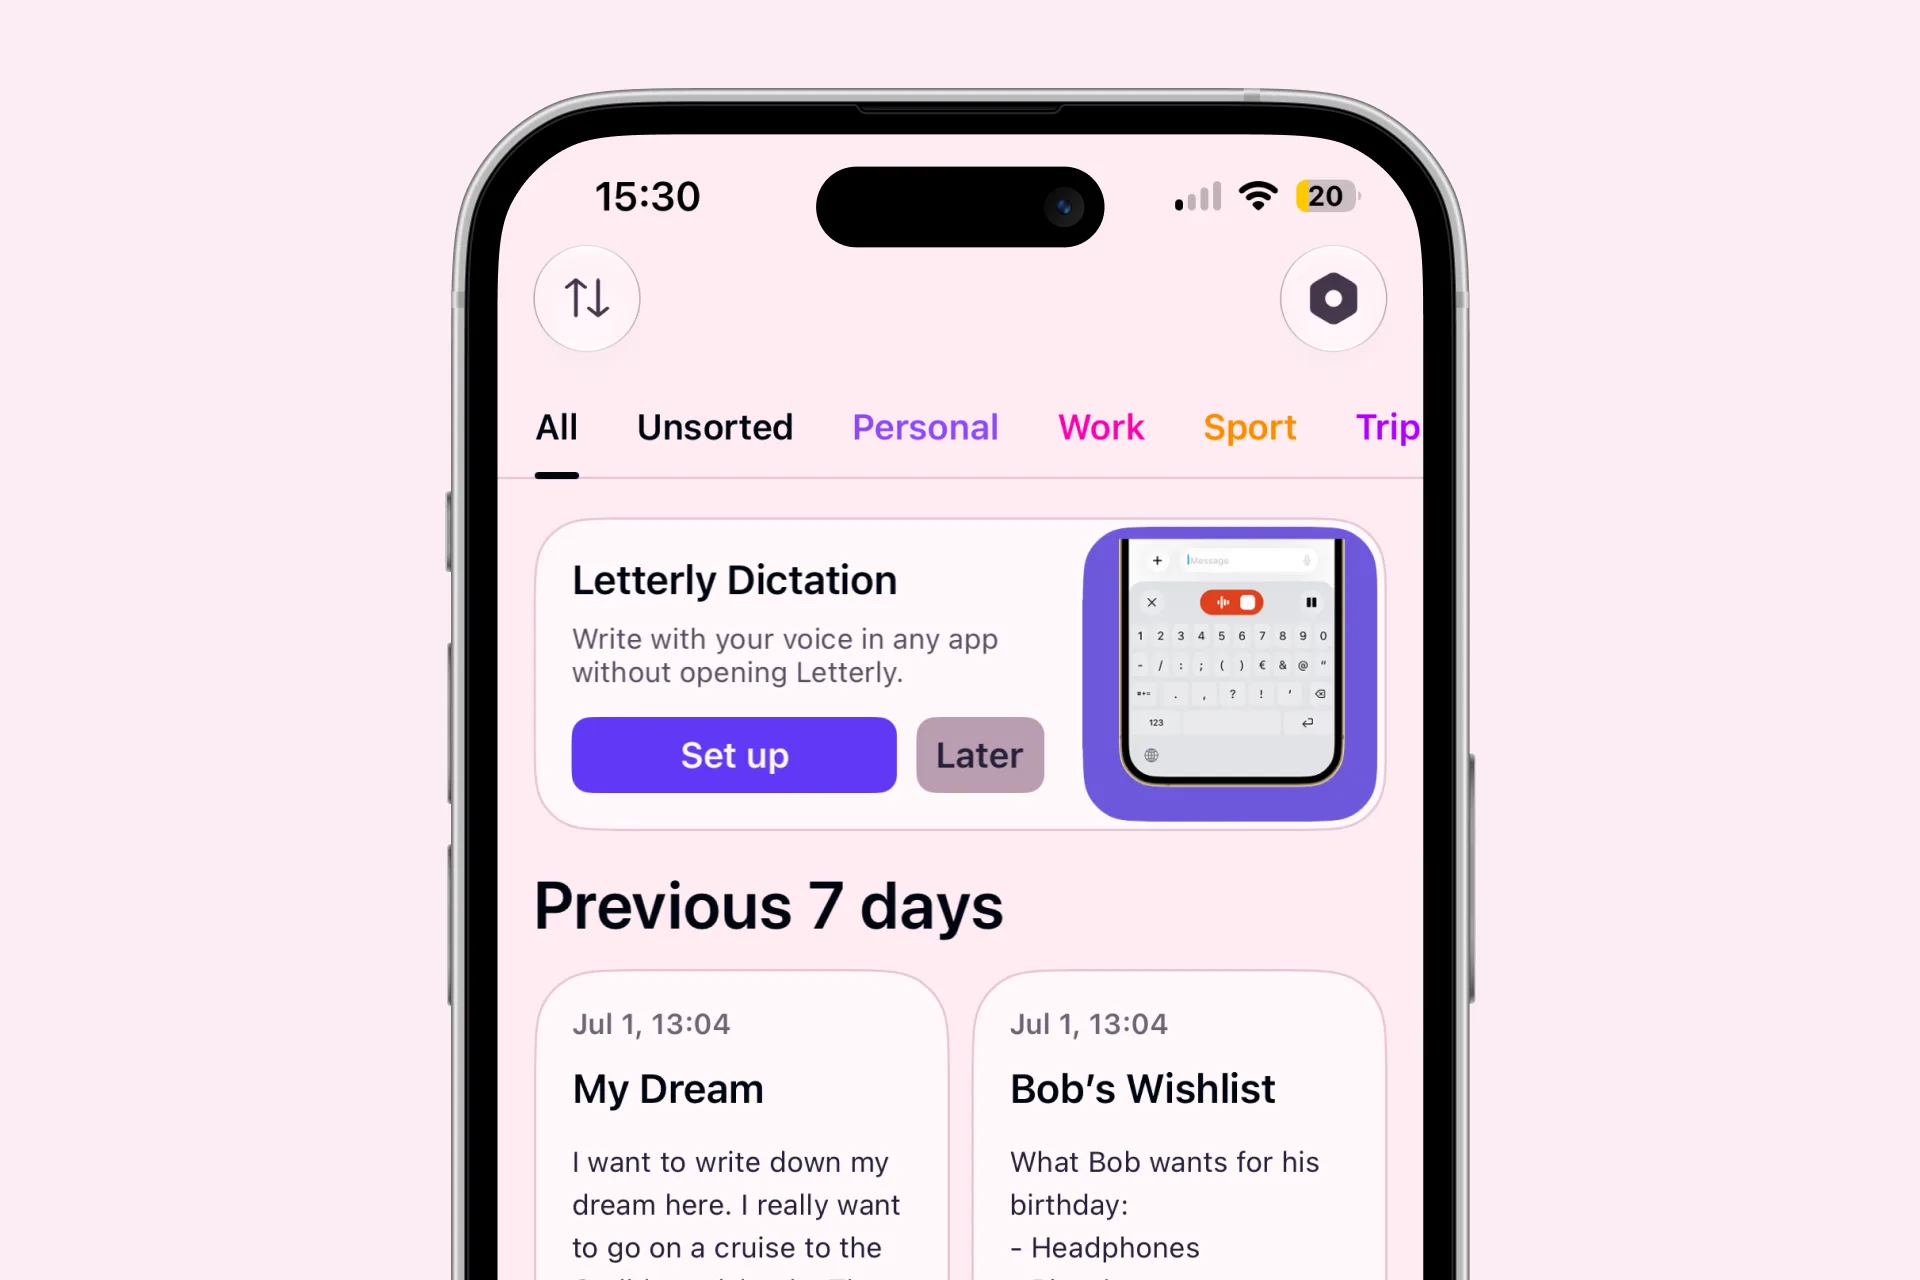
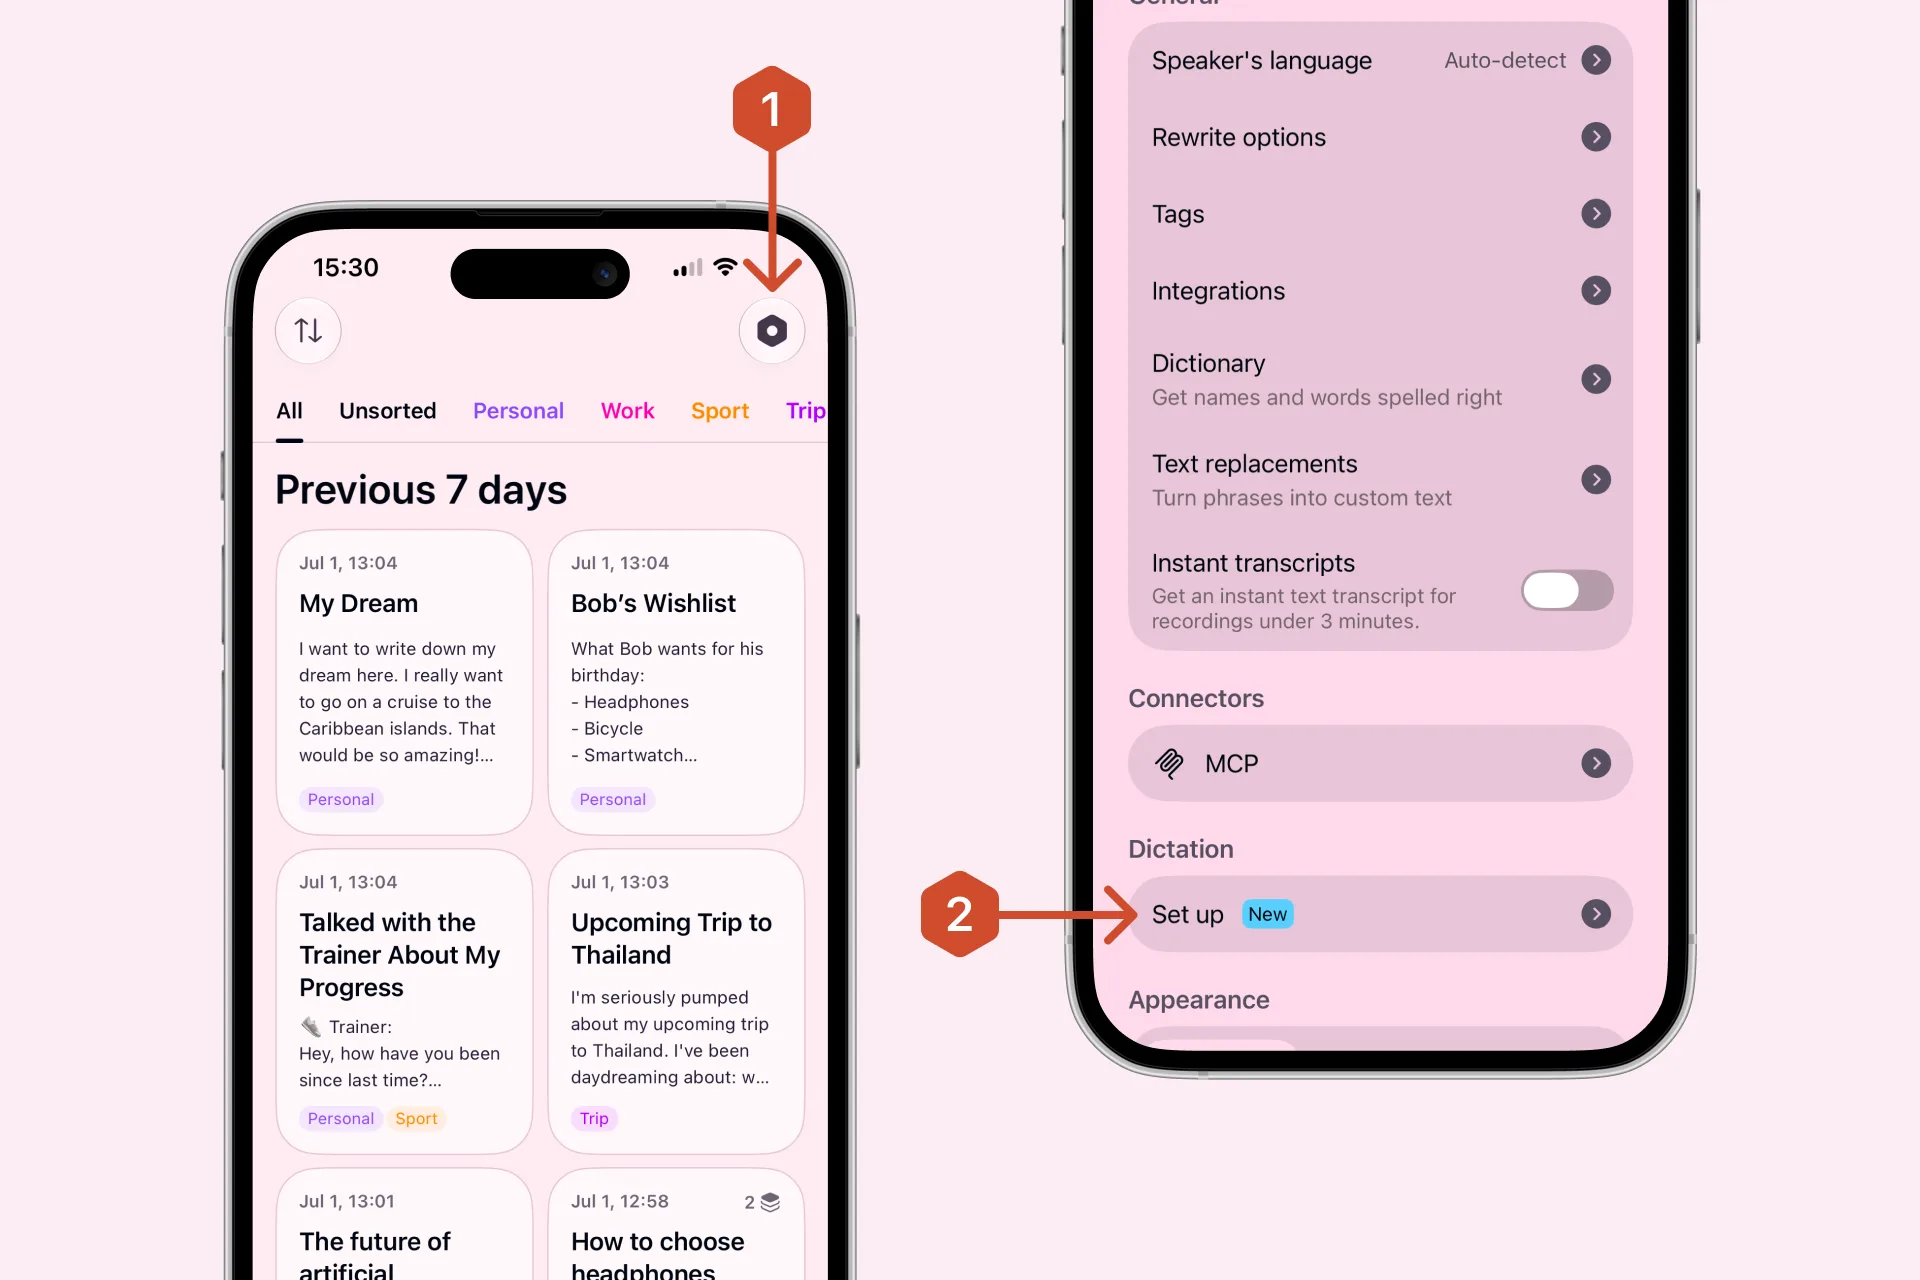
On the Home screen, tap Set up on the Letterly Dictation banner. If you tapped Later before, open Settings → Dictation and tap Set up there.
Allow permissions
Add the Letterly Keyboard
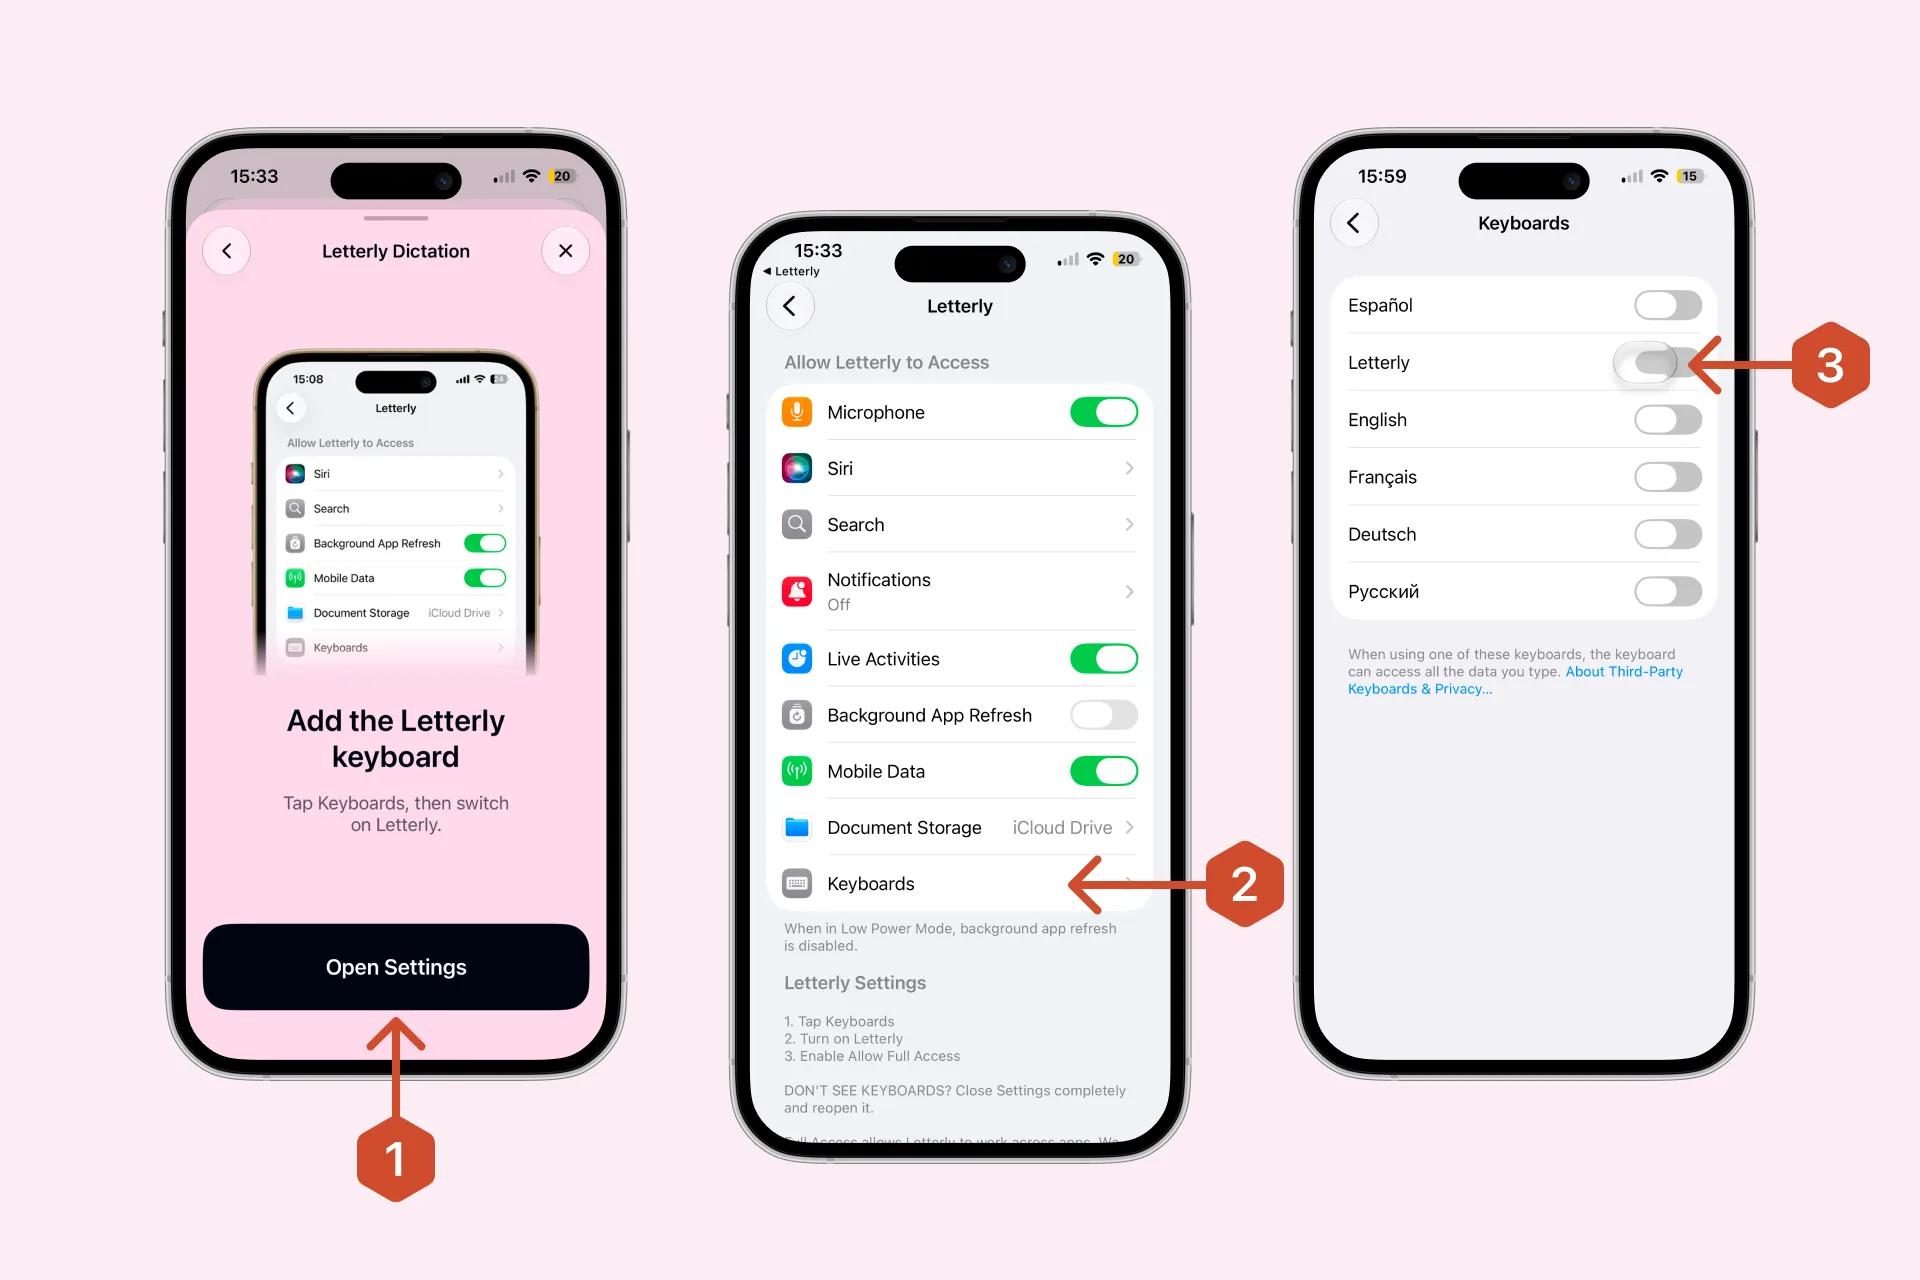
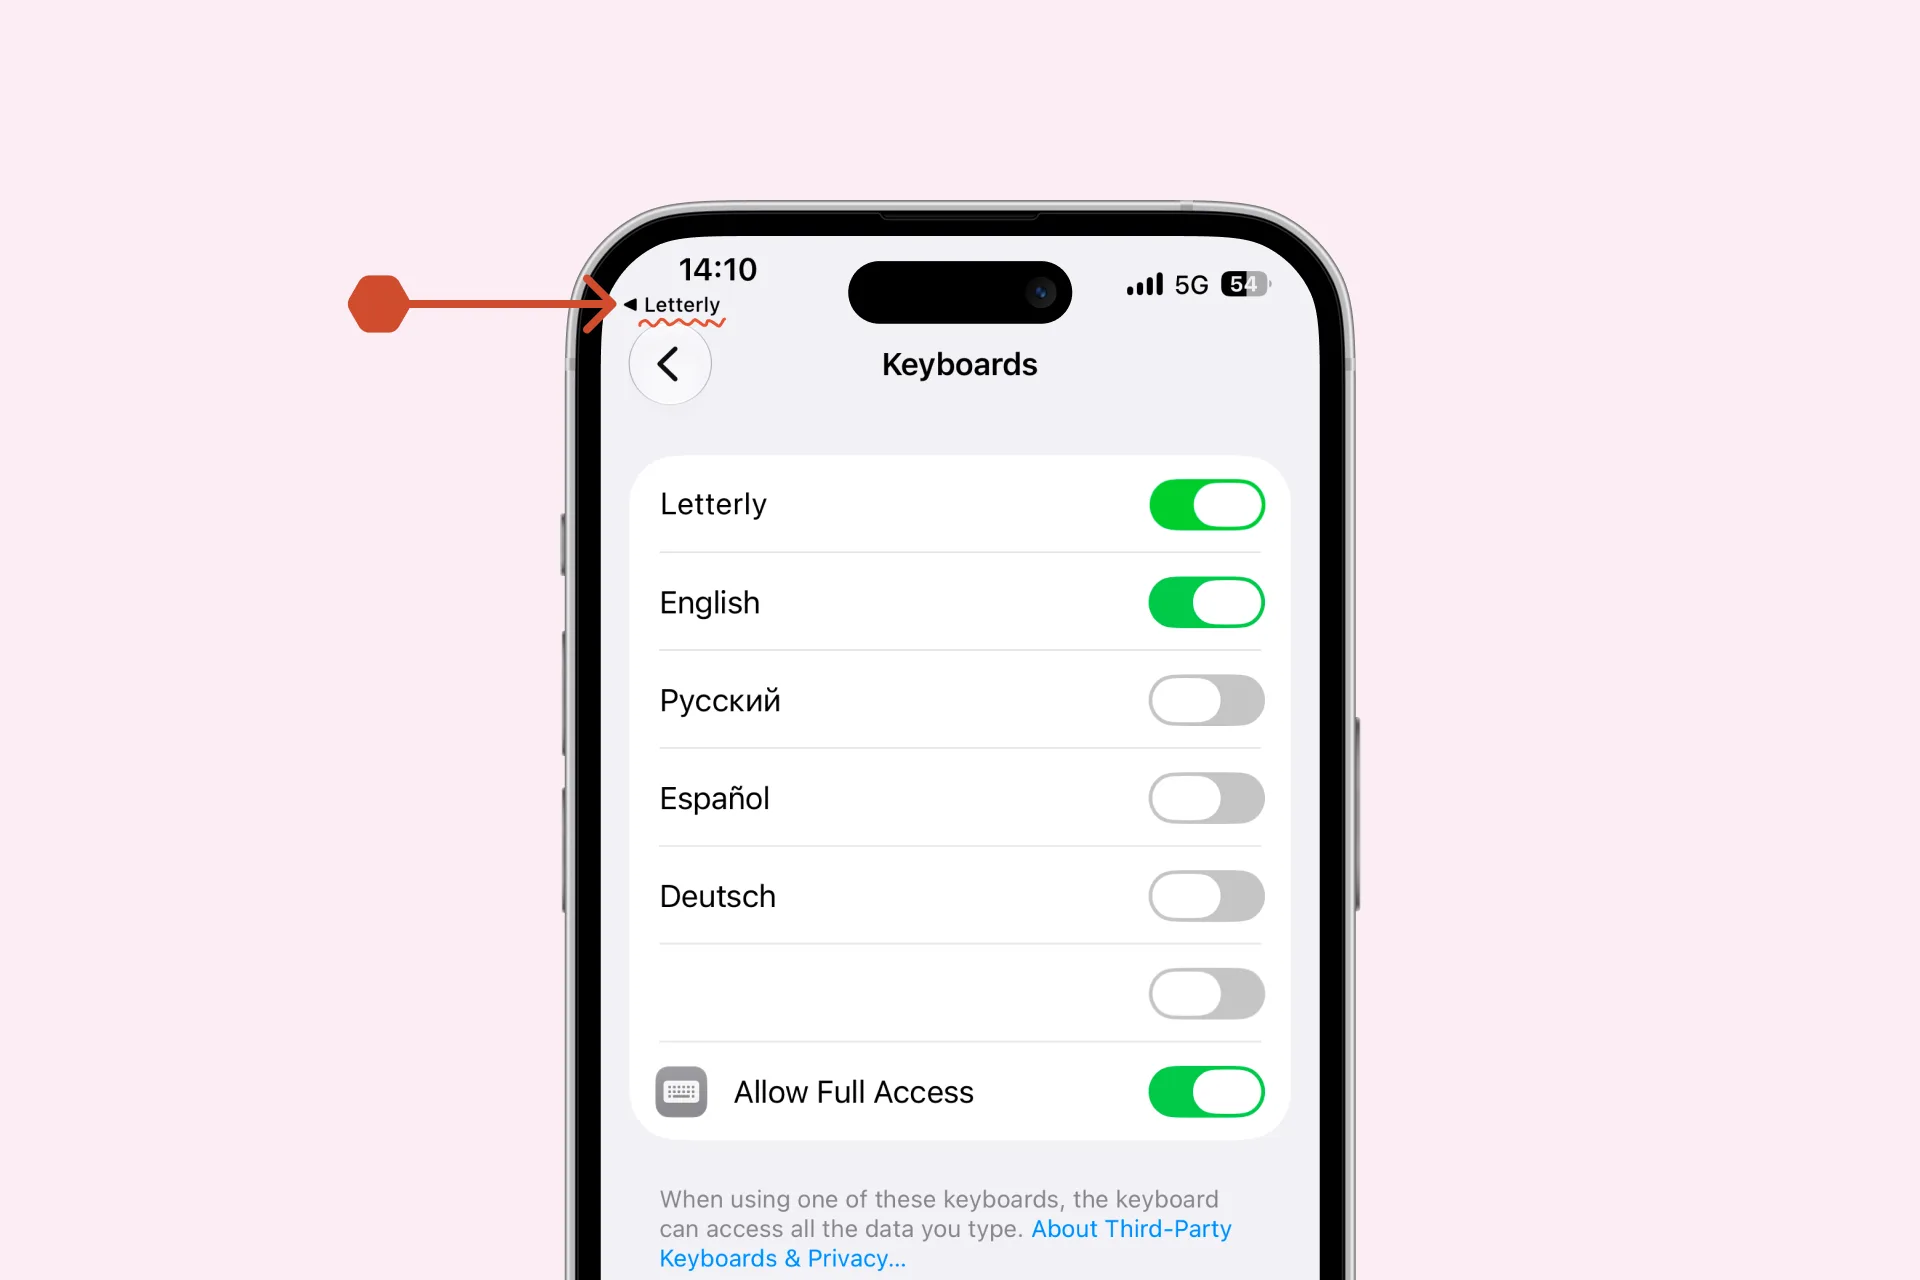
- In Letterly, tap Open Settings.
- In your iPhone settings, tap Keyboards.
- Turn on Letterly.
New to Letterly? If you are prompted, allow microphone access before you start dictating.
Enable Full Access
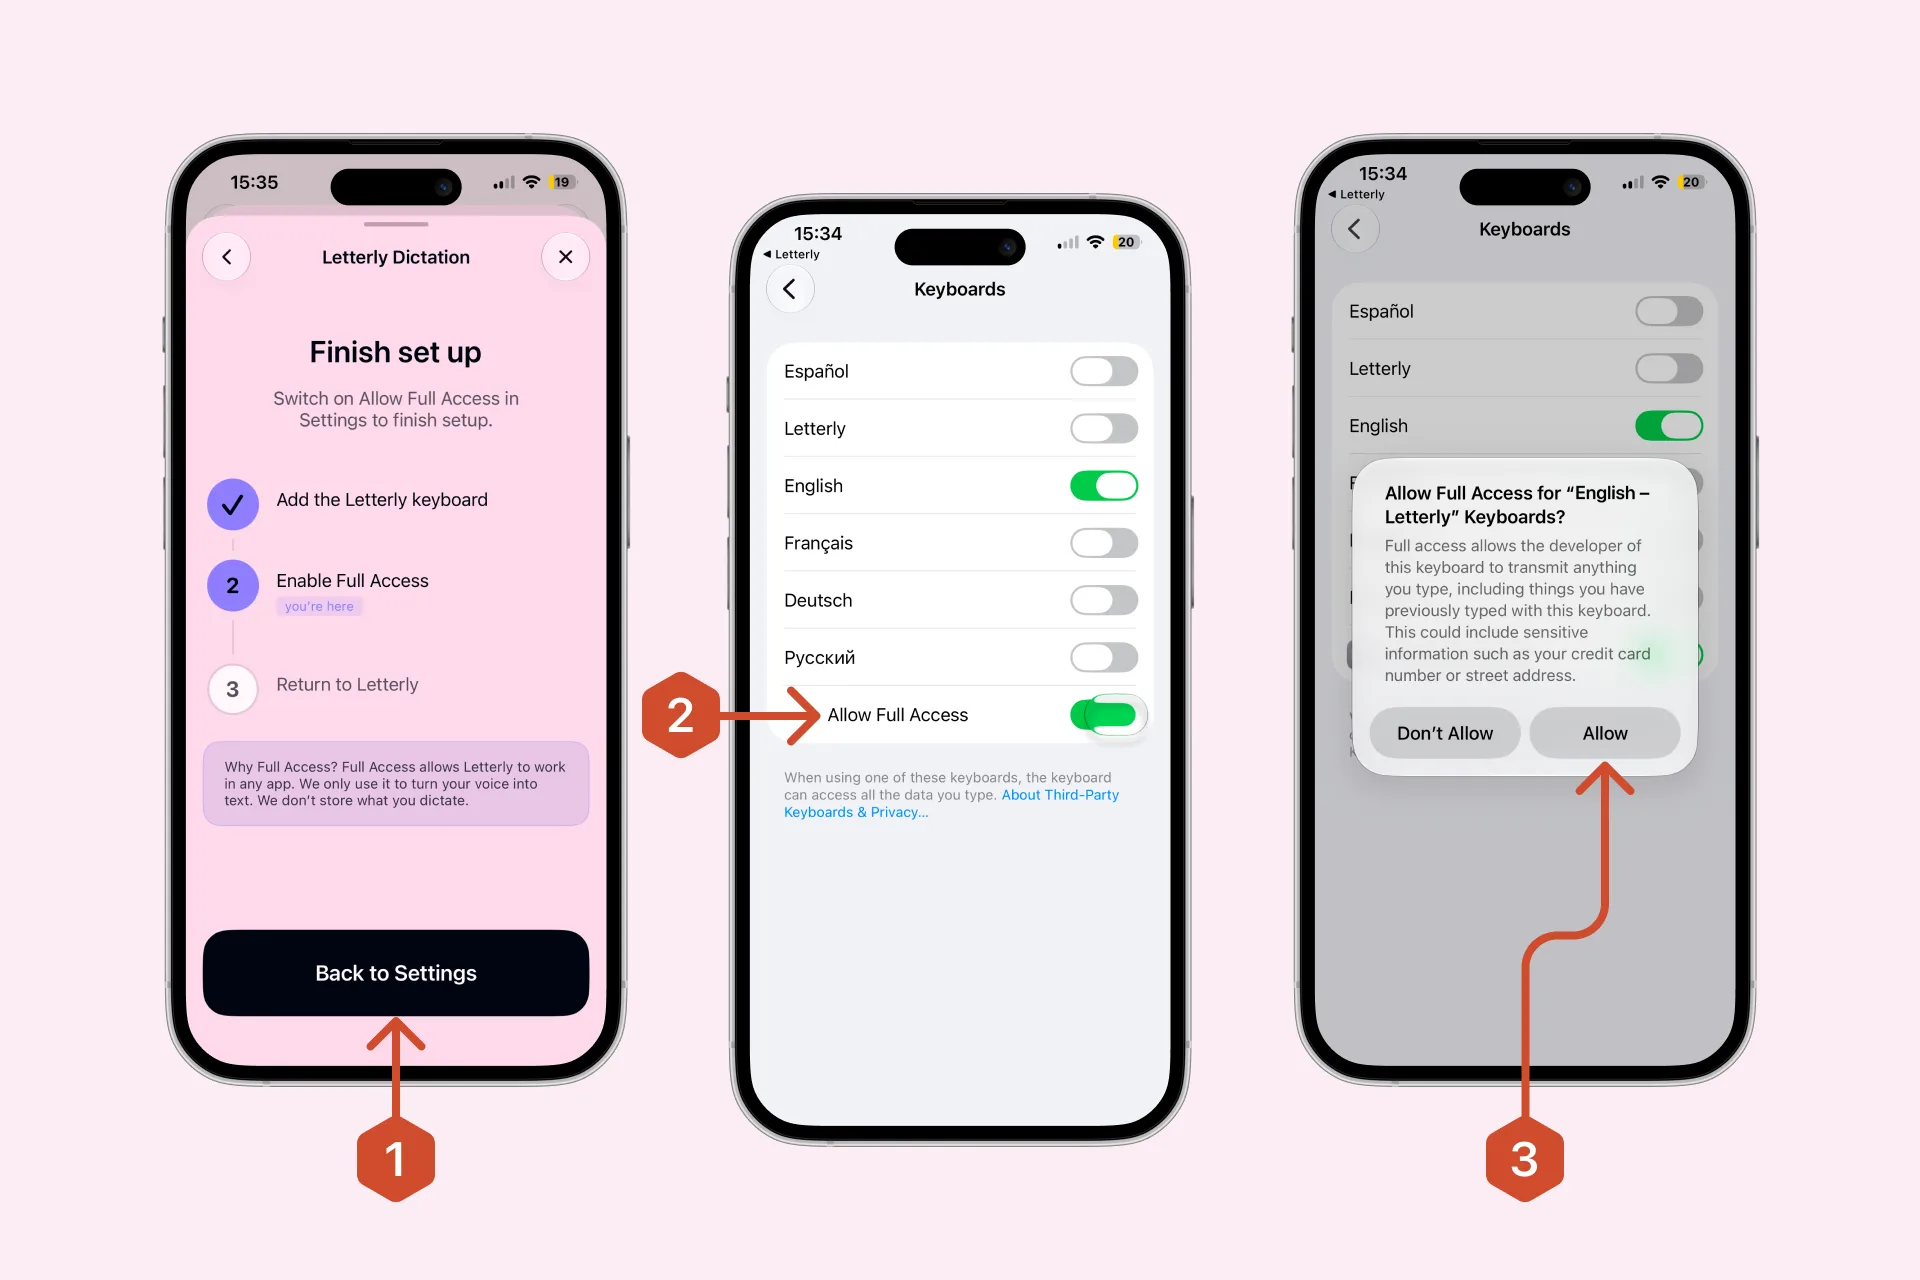
After you turn on the Letterly Keyboard, the Allow Full Access option appears below it on the same screen. Turn it on.
Full Access is a technical requirement that allows the keyboard to process your dictation and return the finished text. Without this permission, Dictation cannot work. Apple shows a standard warning for every third-party keyboard that uses Full Access — it describes what the permission technically allows, not how Letterly handles your data.
Letterly does not misuse, sell, or share your data. Your Dictation History is stored locally on your device, and no one on the Letterly team has direct access to your personal notes or dictated content.
Return to Letterly
After you turn on Allow Full Access, tap Letterly in the top-left corner to return to the app and complete the setup. You can now dictate in Messages, Mail, Notes, WhatsApp, ChatGPT, and other apps.
Use Dictation
Open the Letterly Keyboard
Tap any text field, then use the globe icon to switch to the Letterly Keyboard.
Start dictating
Tap the microphone button. Recording begins immediately — there is no extra confirmation step.
When you start Dictation from another app, iOS briefly opens Letterly and then returns you to the app you were typing in. iOS requires this switch — see Dictation switches to Letterly.
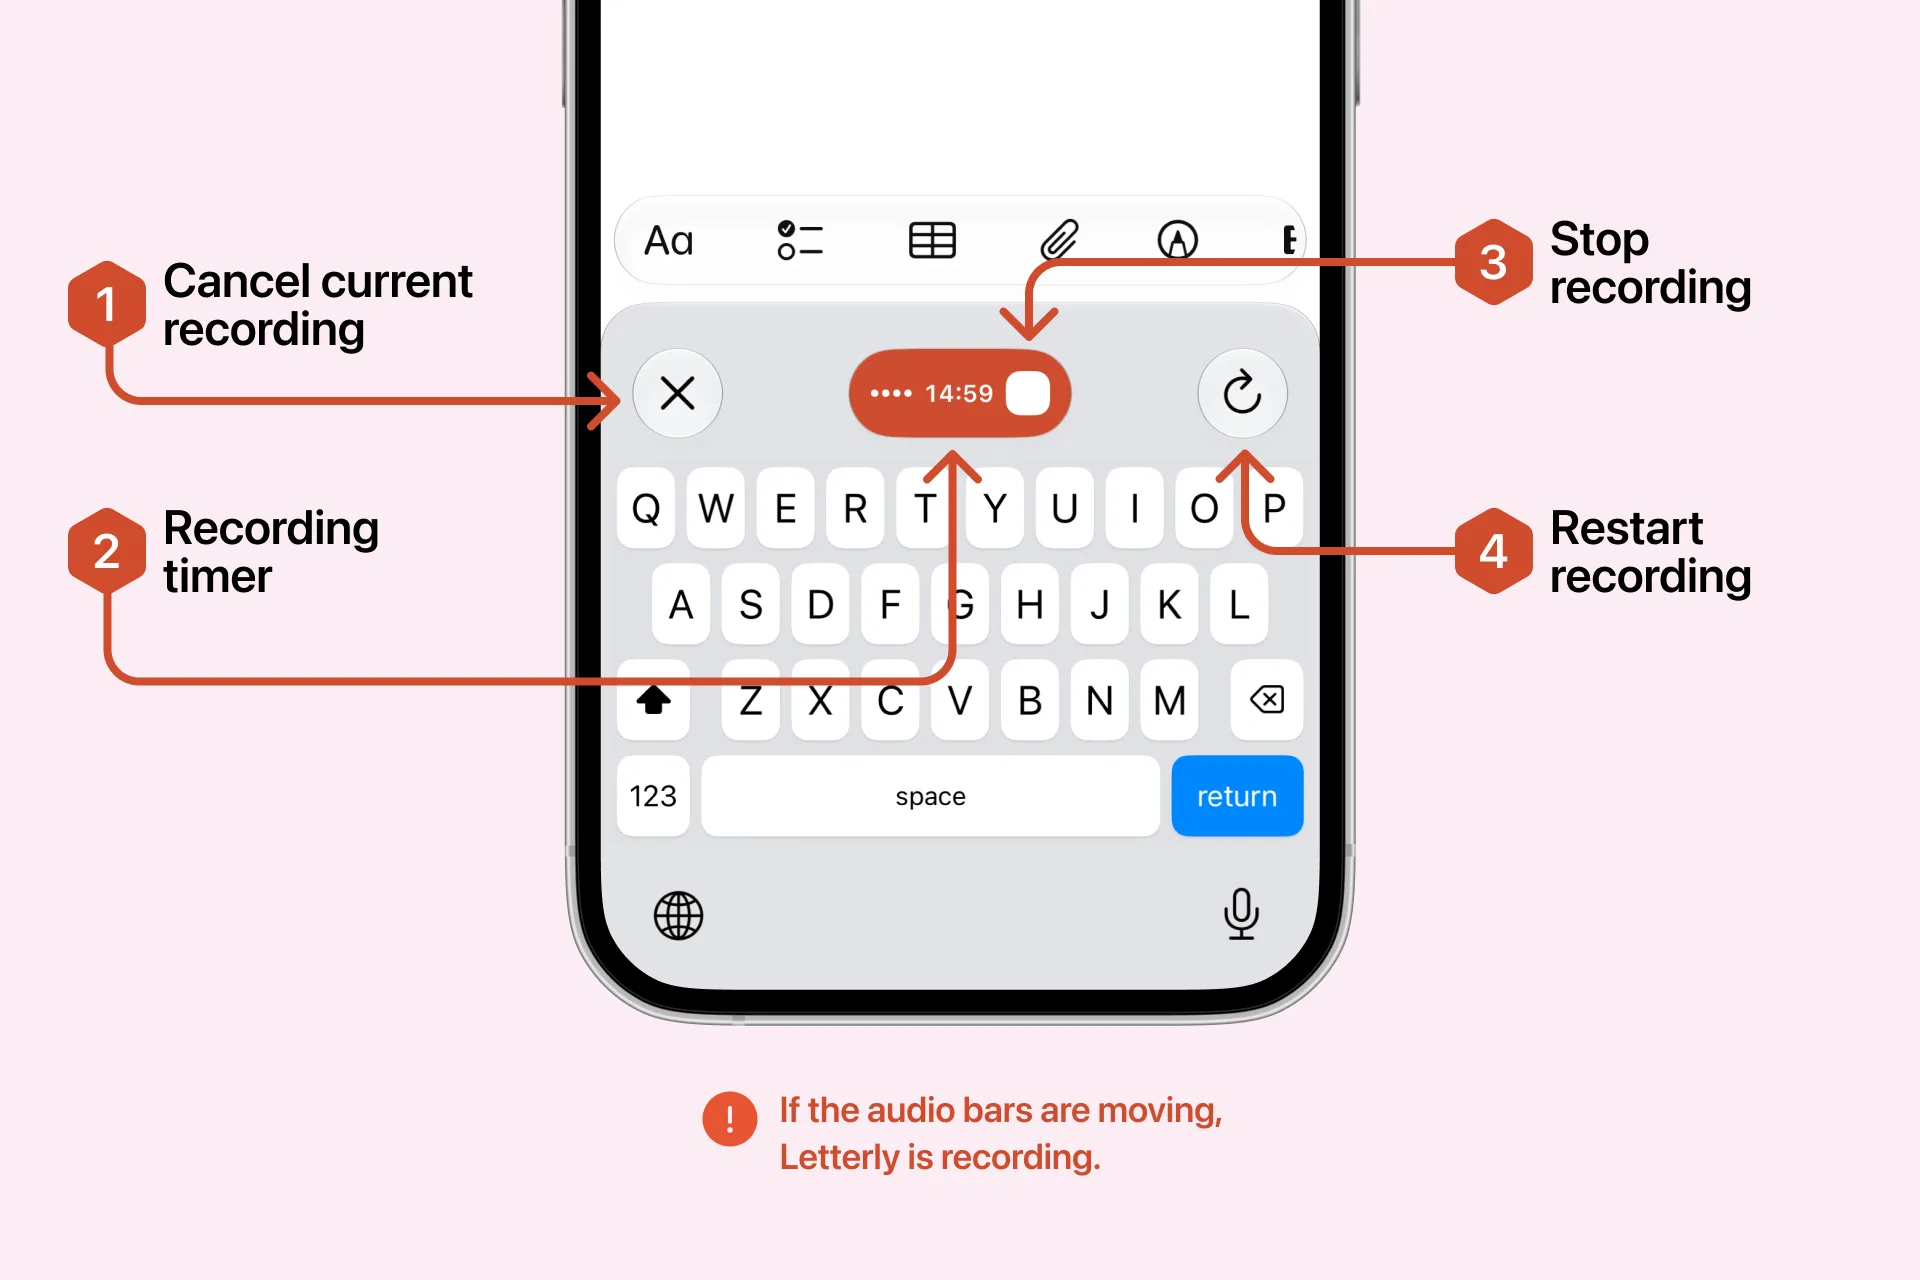
| Control | What it does |
|---|---|
| X | Cancels and discards the current recording |
| Timer | Shows how much time you have left |
| Stop (red button) | Finishes the recording and inserts the text |
| Restart | Discards the recording and starts again |
A single dictation can be up to 15 minutes. Need longer? Record a note in the app instead — up to 90 minutes.
Rewrite the text
The Rewrite button appears when Letterly has just inserted your dictated text, or when you select existing text. Tap it to choose an option such as Magic, List, Structured or Journal Entry.
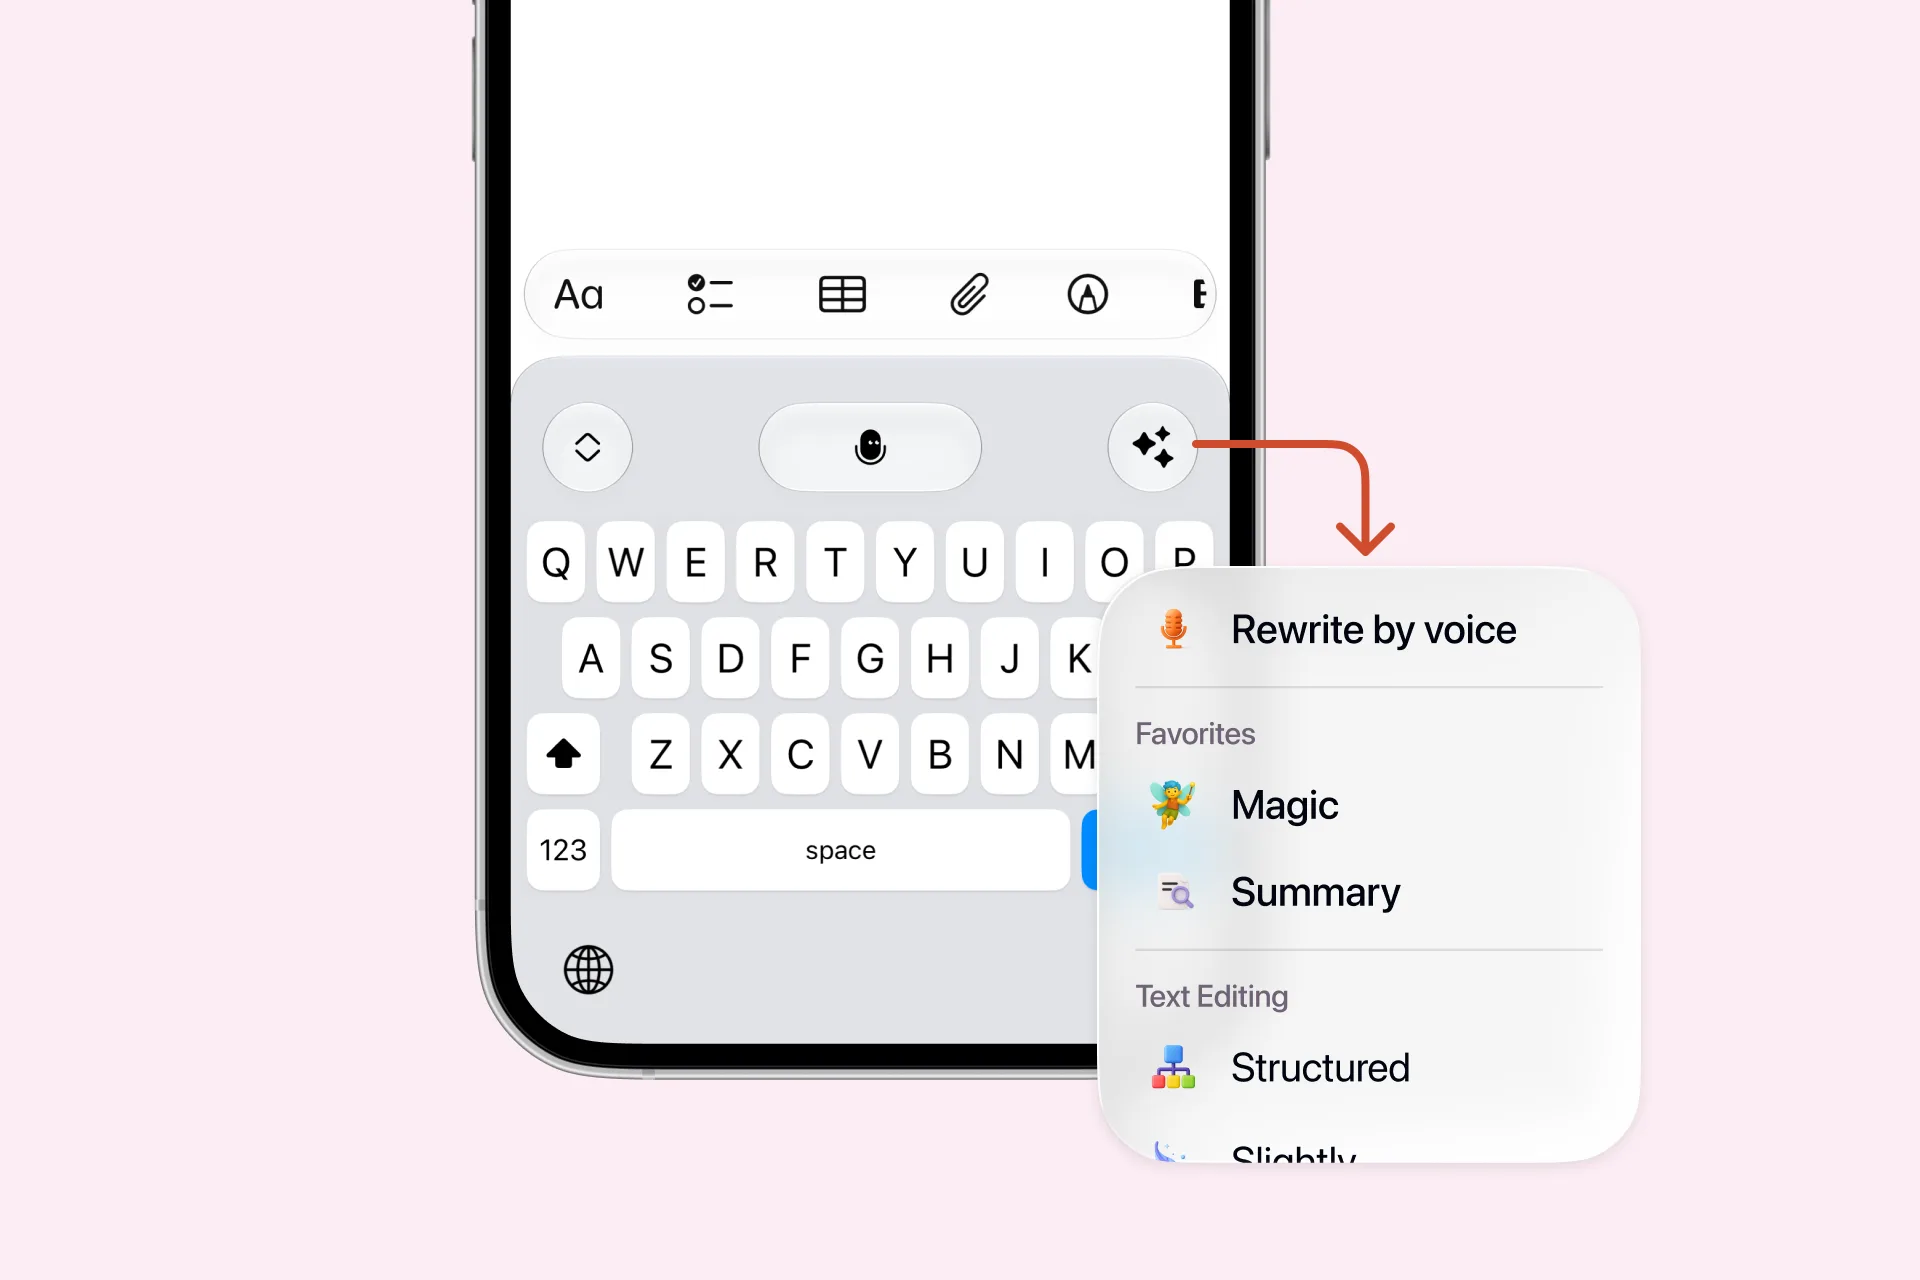
- Rewrite by voice — say how you want to change the text, or correct mistakes out loud.
- Favorites — the options you pinned, at the top of the menu.
- Text Editing — the ready-made options from Letterly.
The button disappears when you change the text — select the text again to rewrite it.
Use the keyboard menu
Tap the menu button on the left for extra actions.
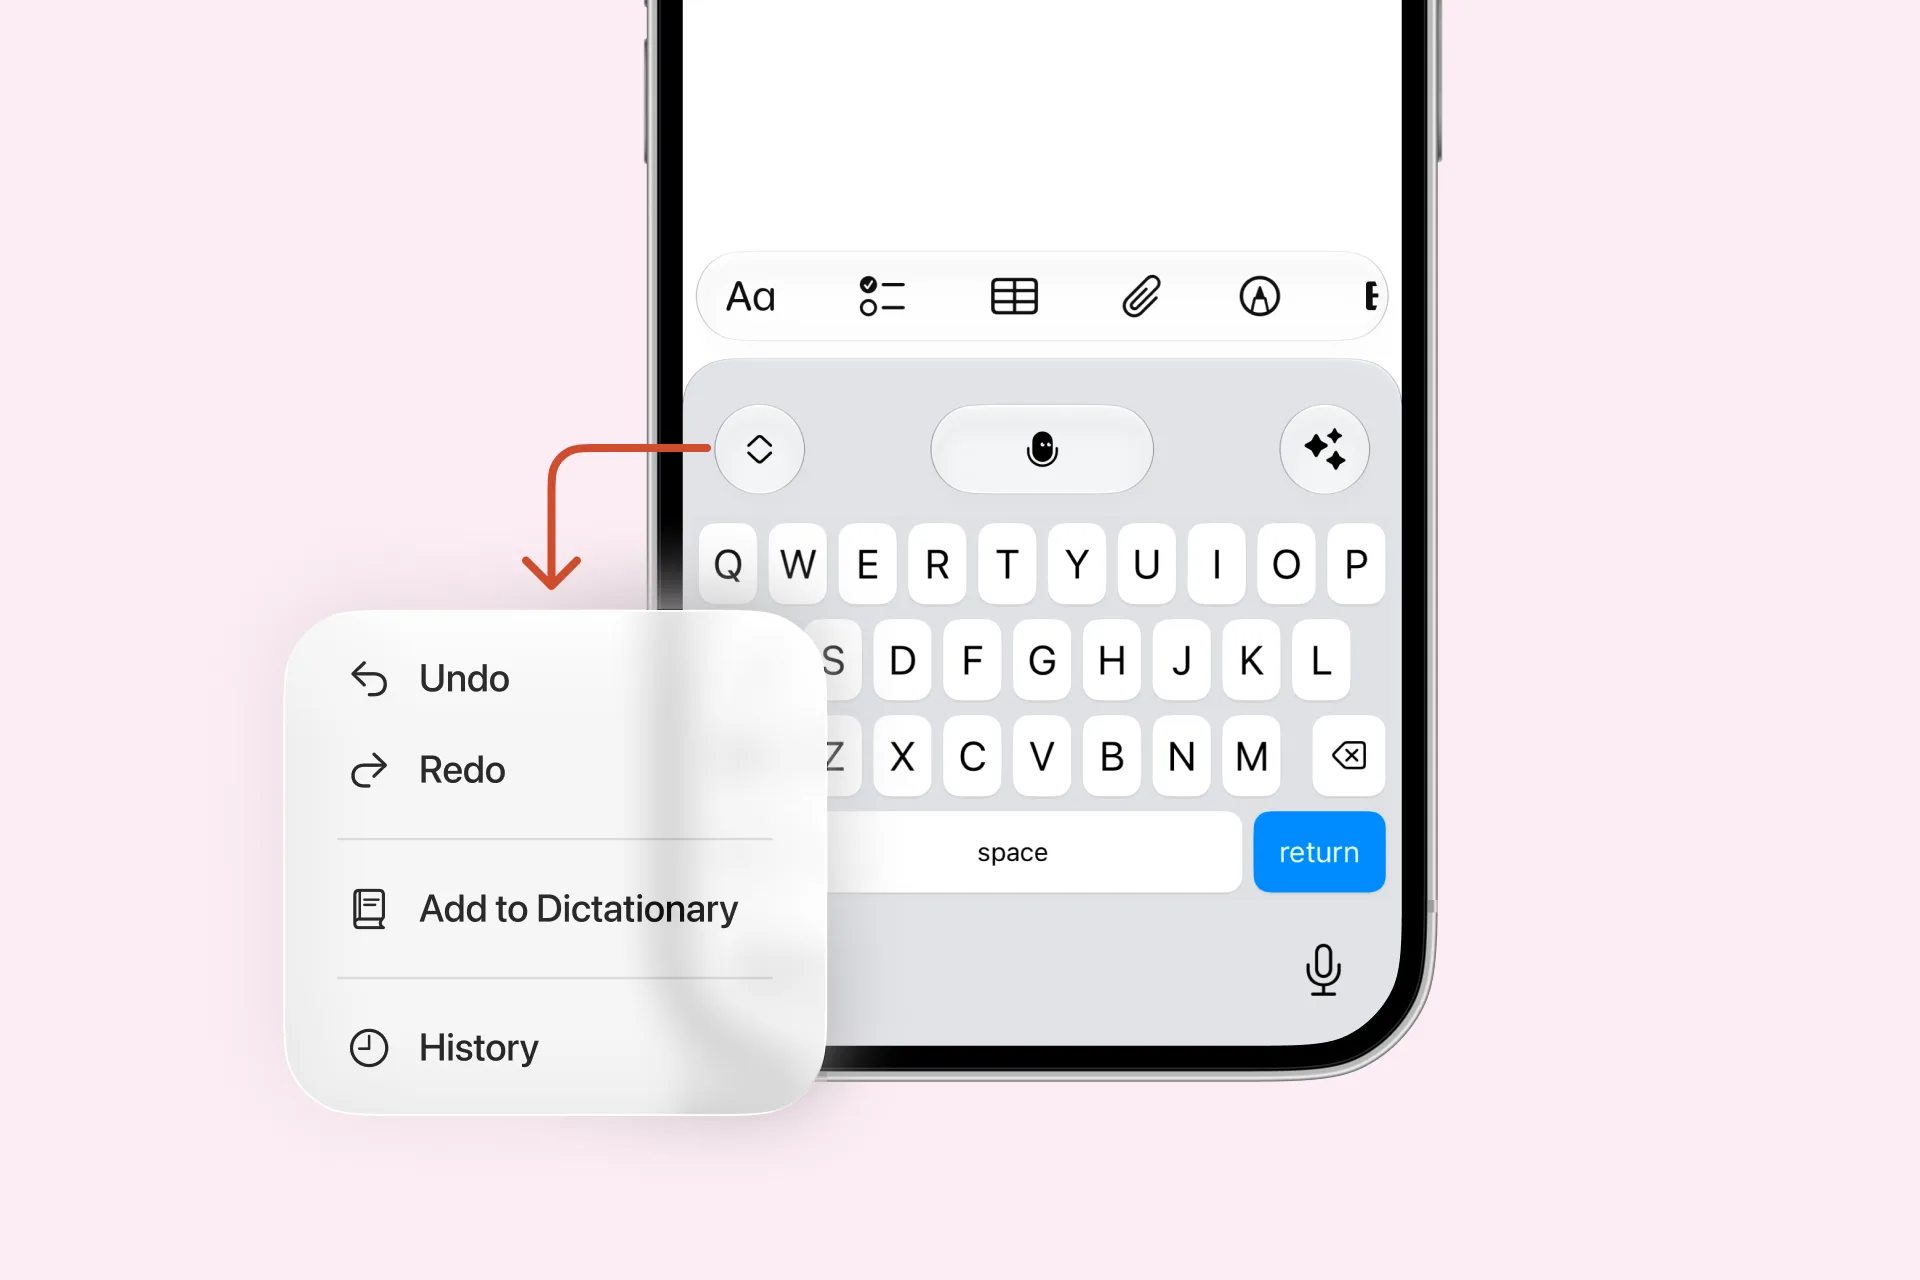
| Action | What it does |
|---|---|
| Undo | Removes the text Letterly just inserted |
| Redo | Restores the text removed with Undo |
| Add to Dictionary | Adds a word to your Dictionary so Letterly spells it correctly next time |
| History | Opens your Dictation History in Letterly |
Turn Dictation off
On the Letterly Home screen, tap the power icon next to Dictation. You can also do it from the Lock Screen — tap the power icon in the Letterly widget without unlocking your iPhone.
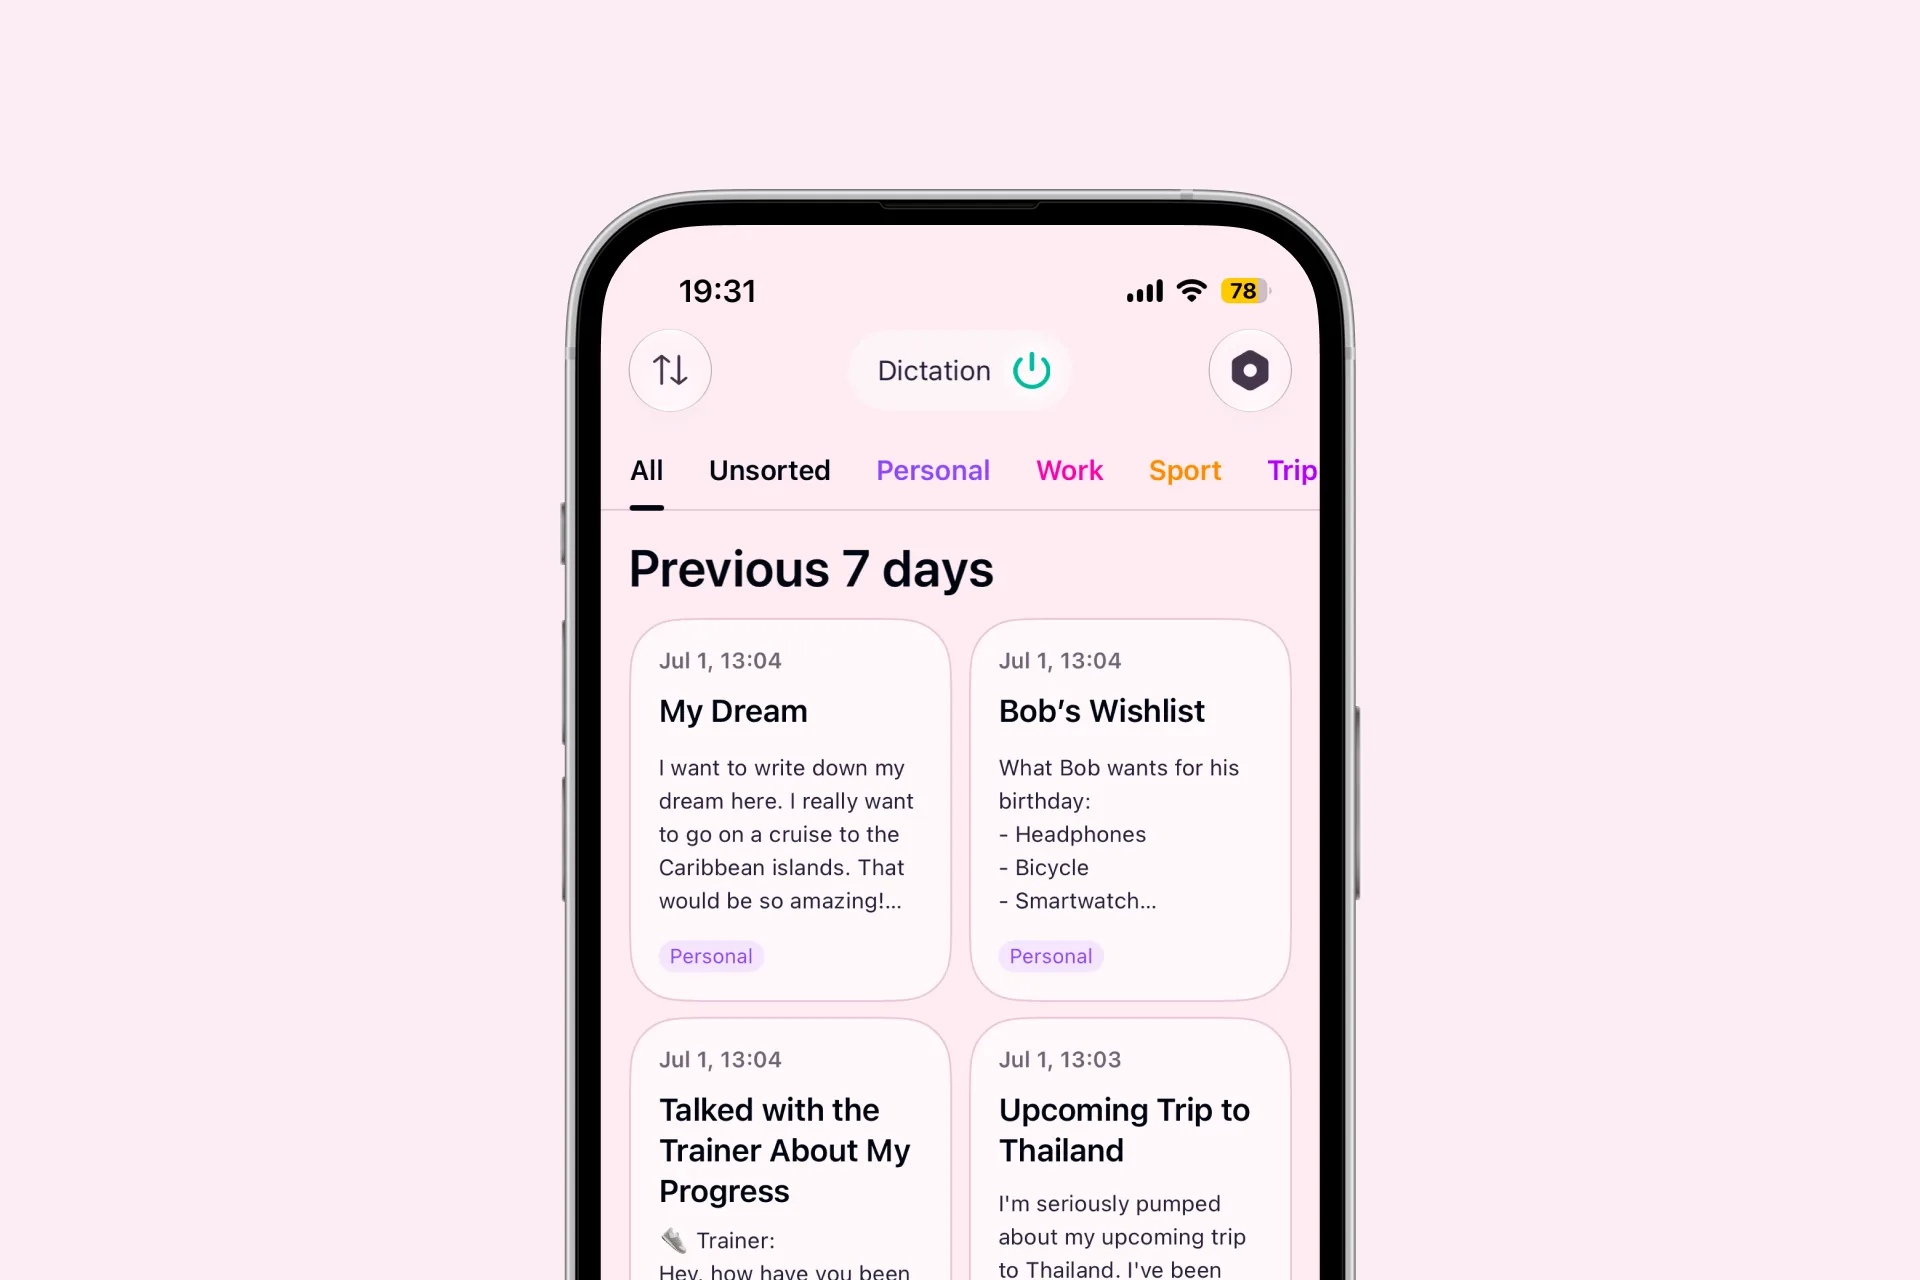
Dictation history
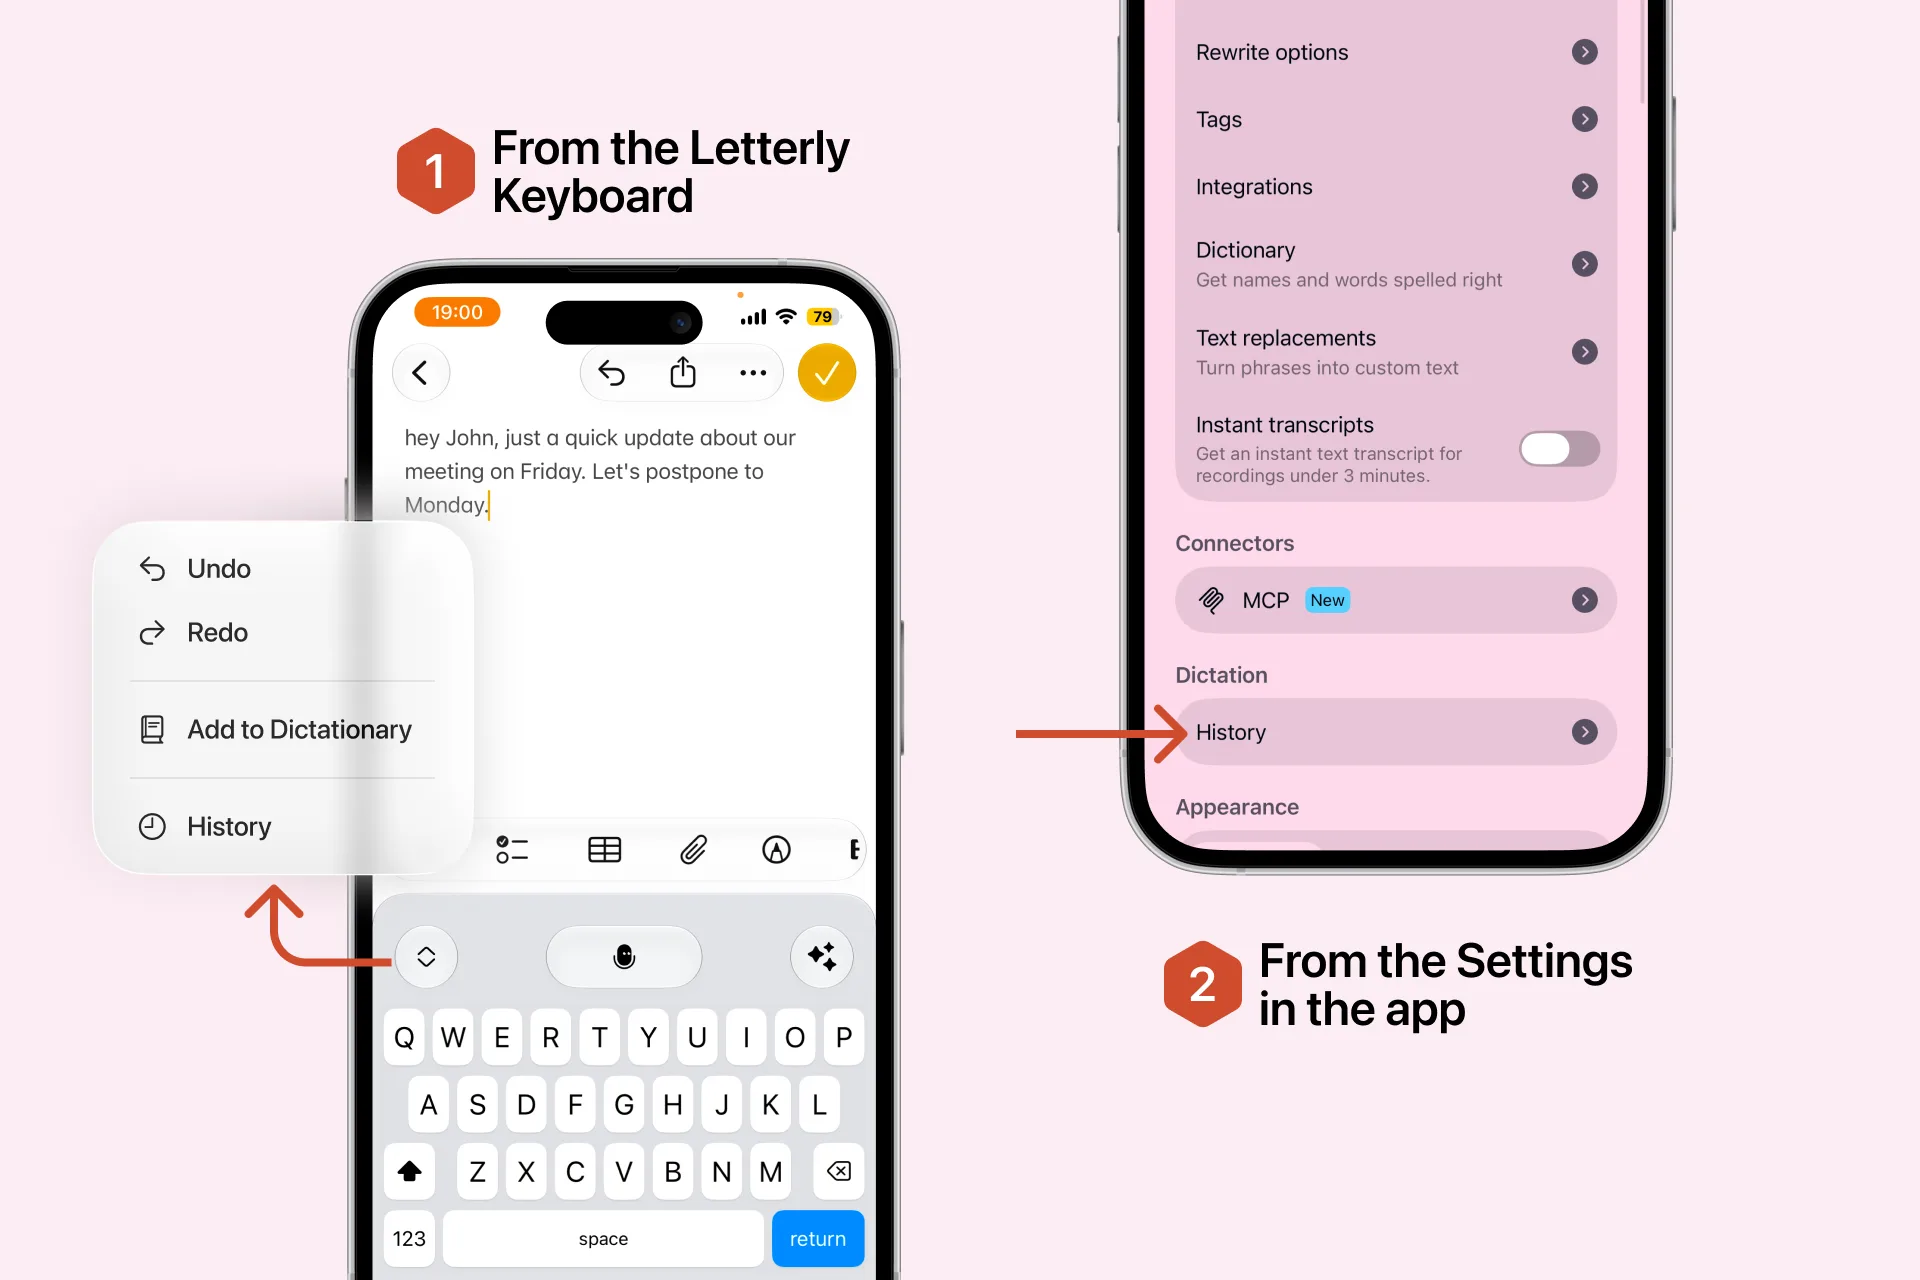
Letterly saves every completed dictation in History, grouped by date. Open it from the keyboard menu, or in the app under Settings → History.
Press and hold a dictation, or swipe left on it, to see the actions.
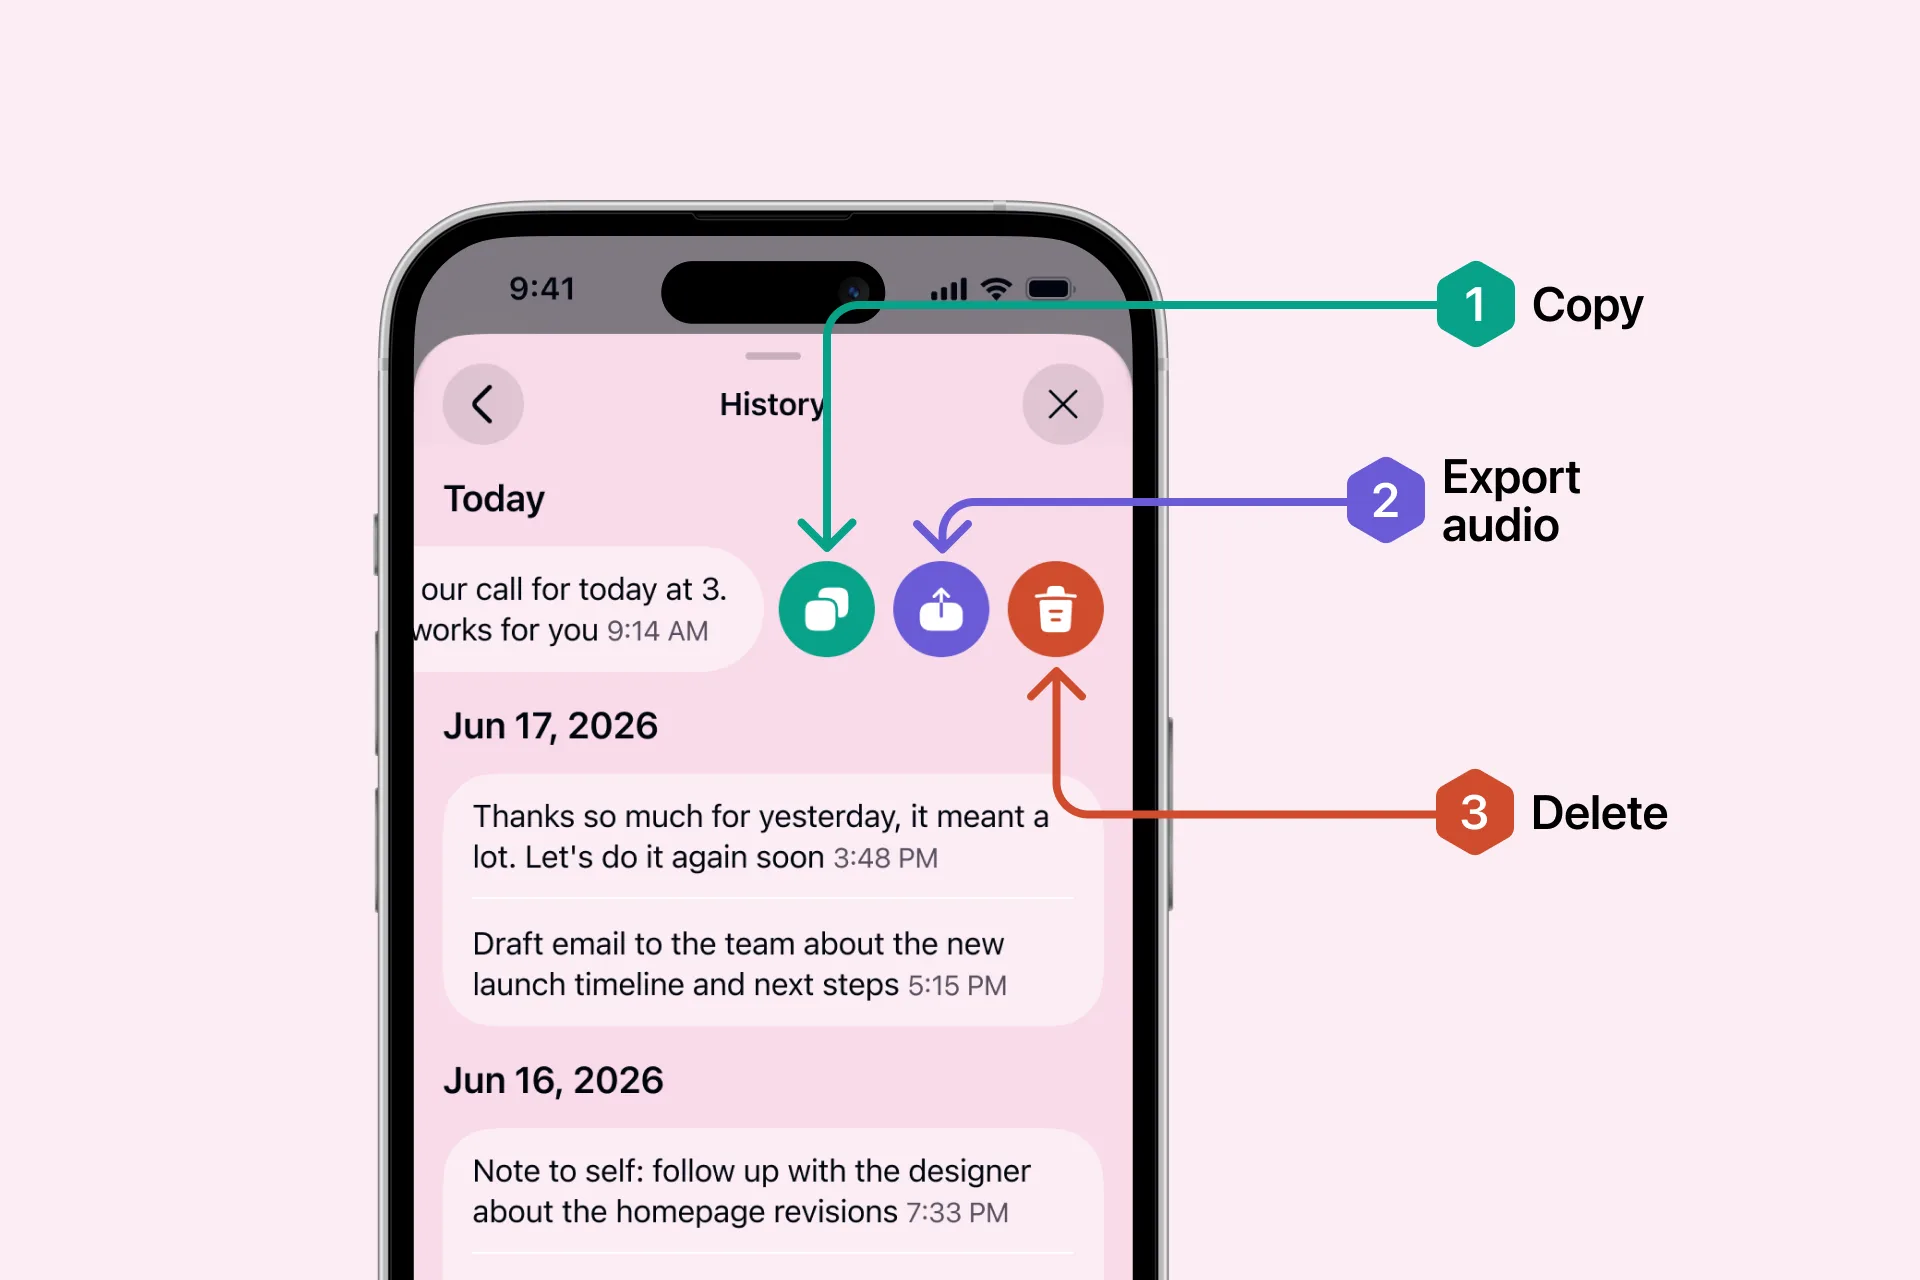
| Action | What it does |
|---|---|
| Copy | Copies the dictation text to your clipboard |
| Export audio | Saves or shares the original recording as an audio file |
| Delete | Permanently removes the dictation from History |
Letterly asks you to confirm before deleting. Once deleted, a dictation cannot be restored.
Dictation History stays on the device where it was created and does not sync to your other devices.
Learn more about Dictation History →Letterly can clean up your text automatically after every dictation, and keep your favourite rewrite options at the top of the keyboard menu. Set both in the app — see Dictation output and Favorite rewrite options.
This guide takes you from nothing to your first dictation on Android, and then through everything the Dictation Bubble can do.
Update Letterly to the latest version before you start.
Install Letterly
Get Letterly from Google Play. Full details: Download & install.
Sign in
Open the app and sign in with Google, Apple, or your email. See Onboarding.
If you already have a subscription, sign in with the email you bought it with. Otherwise you start on the Free plan.
Learn more about plans →Open Dictation
On the Home screen, tap Set up on the Letterly Dictation banner. If you tapped Later before, open Settings → Dictation and tap Set up there.
Allow permissions
You will grant two permissions: Display over other apps, so the Bubble can appear, and Accessibility, so Letterly can insert your text.
Allow the Bubble to appear over other apps
Tap Continue next to Show the Dictation Bubble, then tap Open Settings.
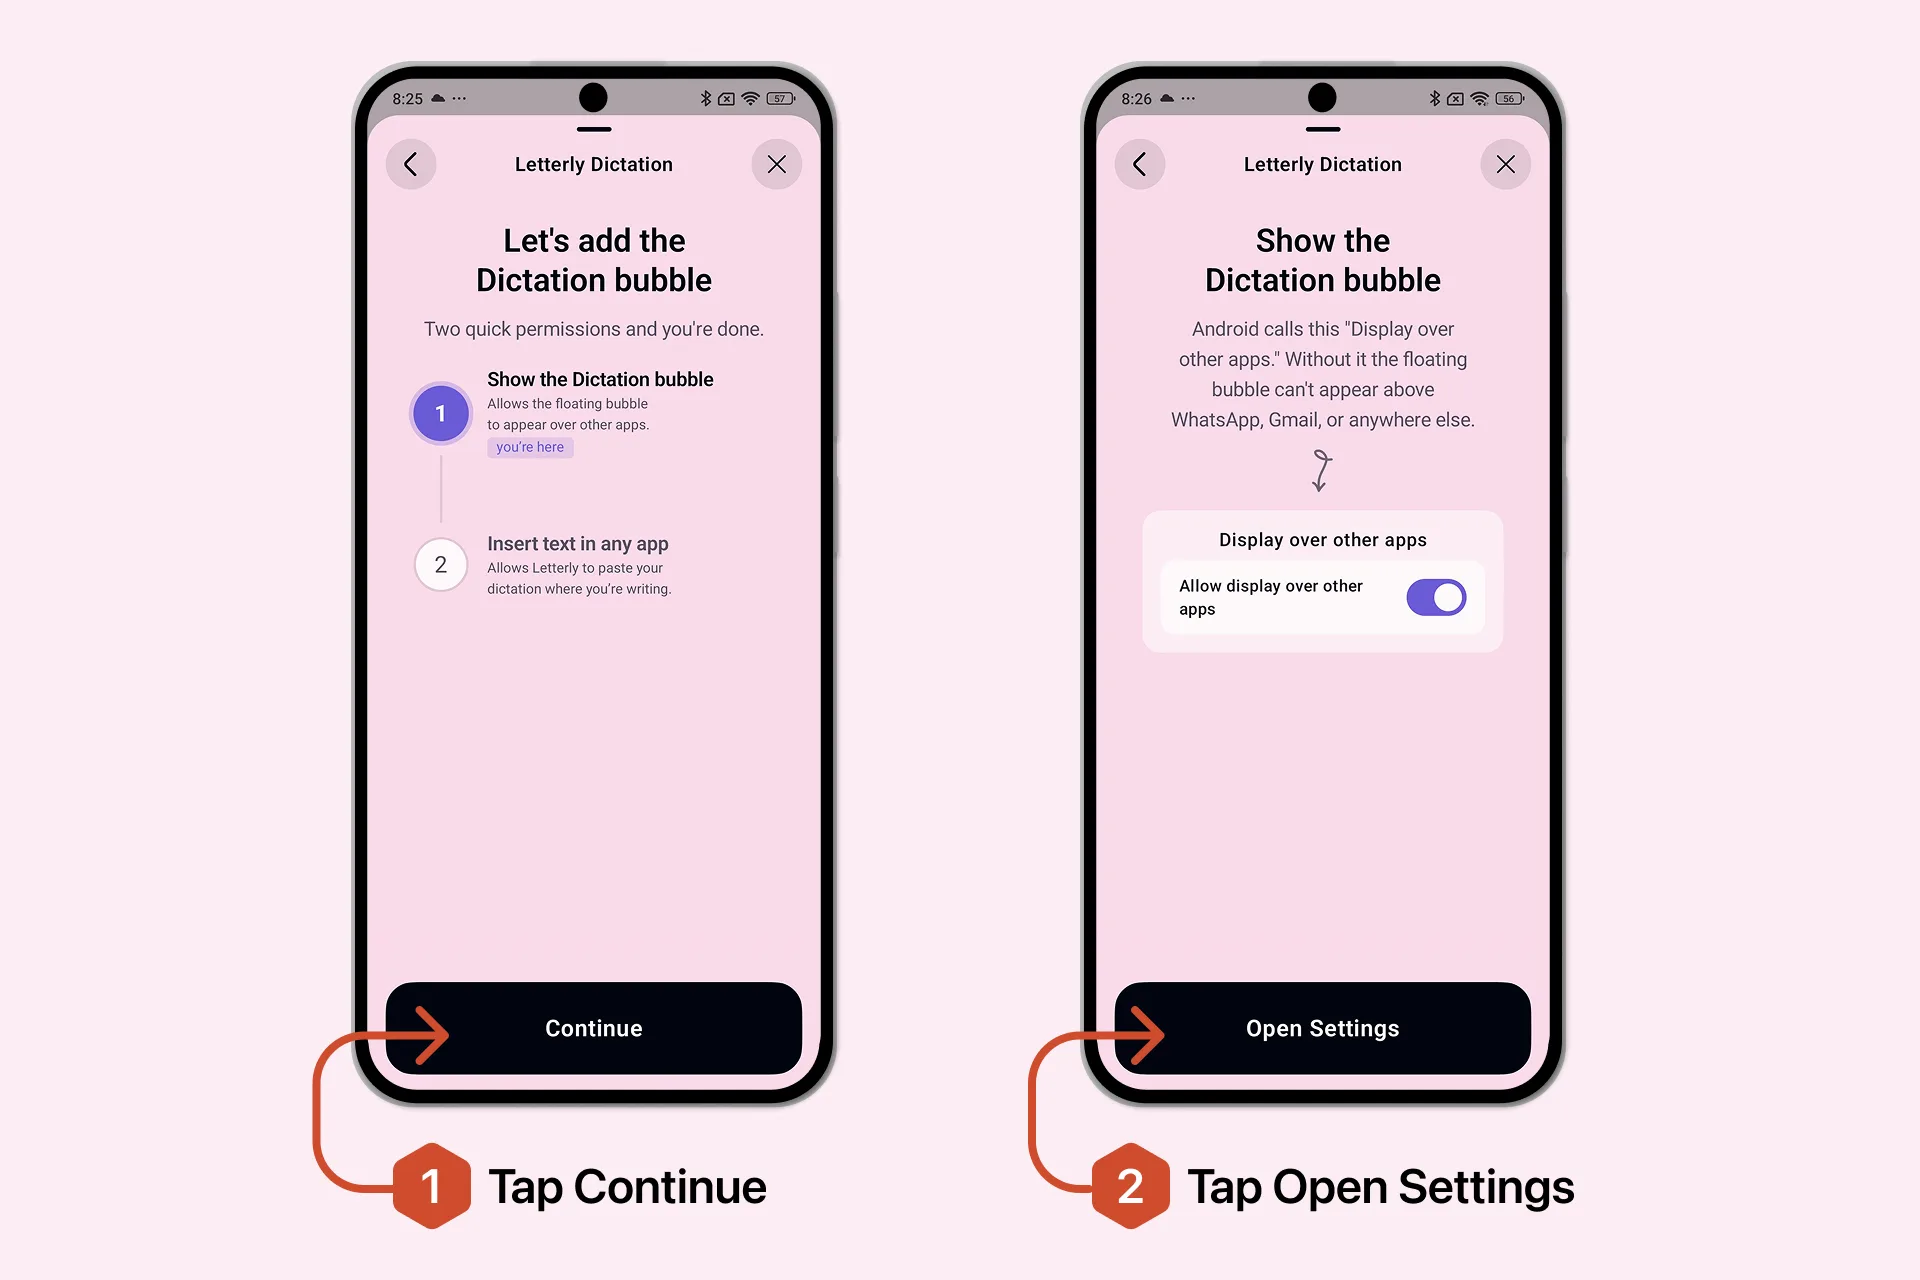
- Find and tap Letterly.
- Turn on Allow display over other apps.
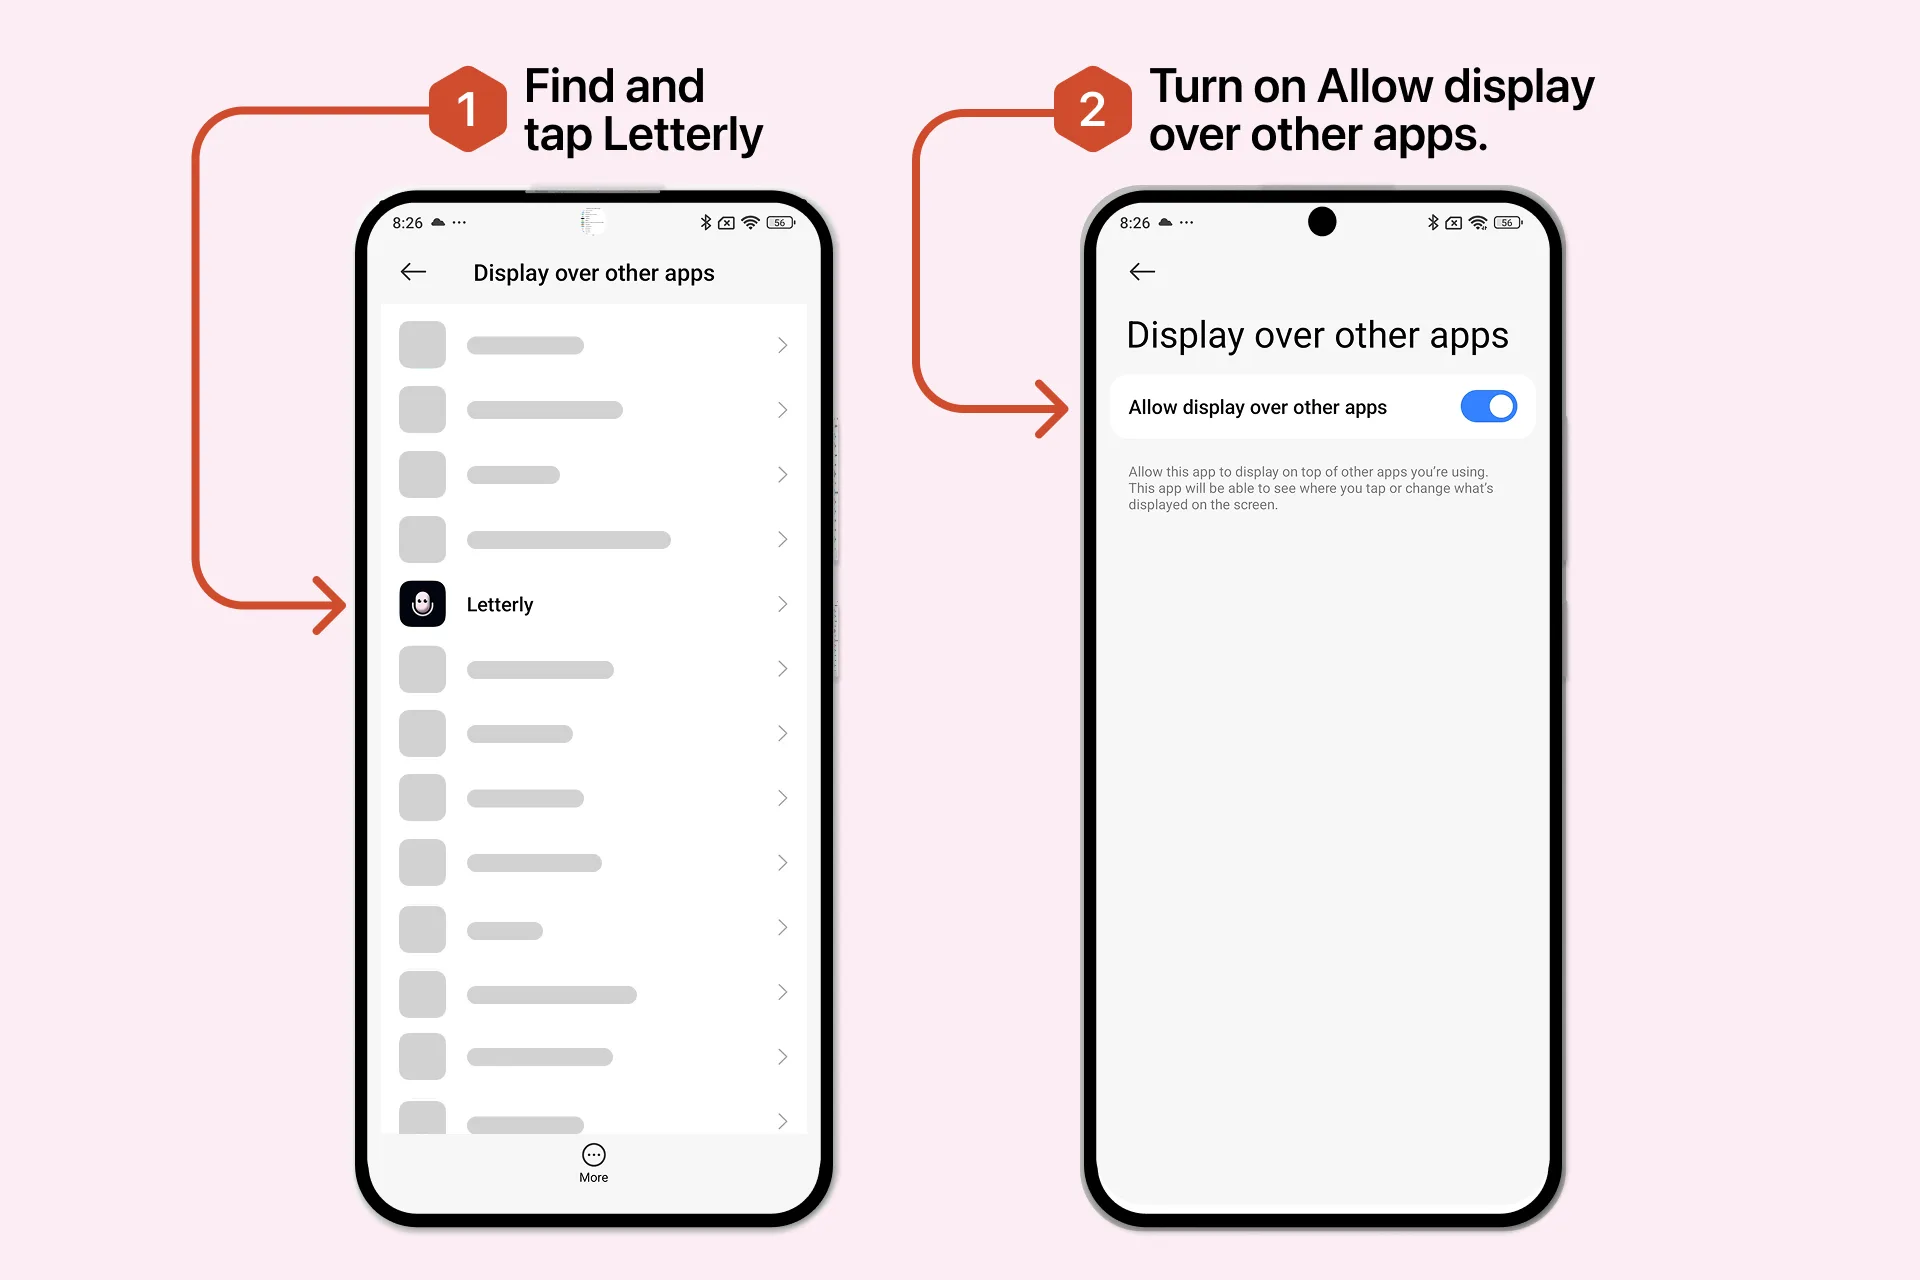
It allows the Bubble to appear above WhatsApp, Gmail, Messages, ChatGPT and other apps. Without it, the Bubble cannot appear outside Letterly.
Allow Letterly to insert text
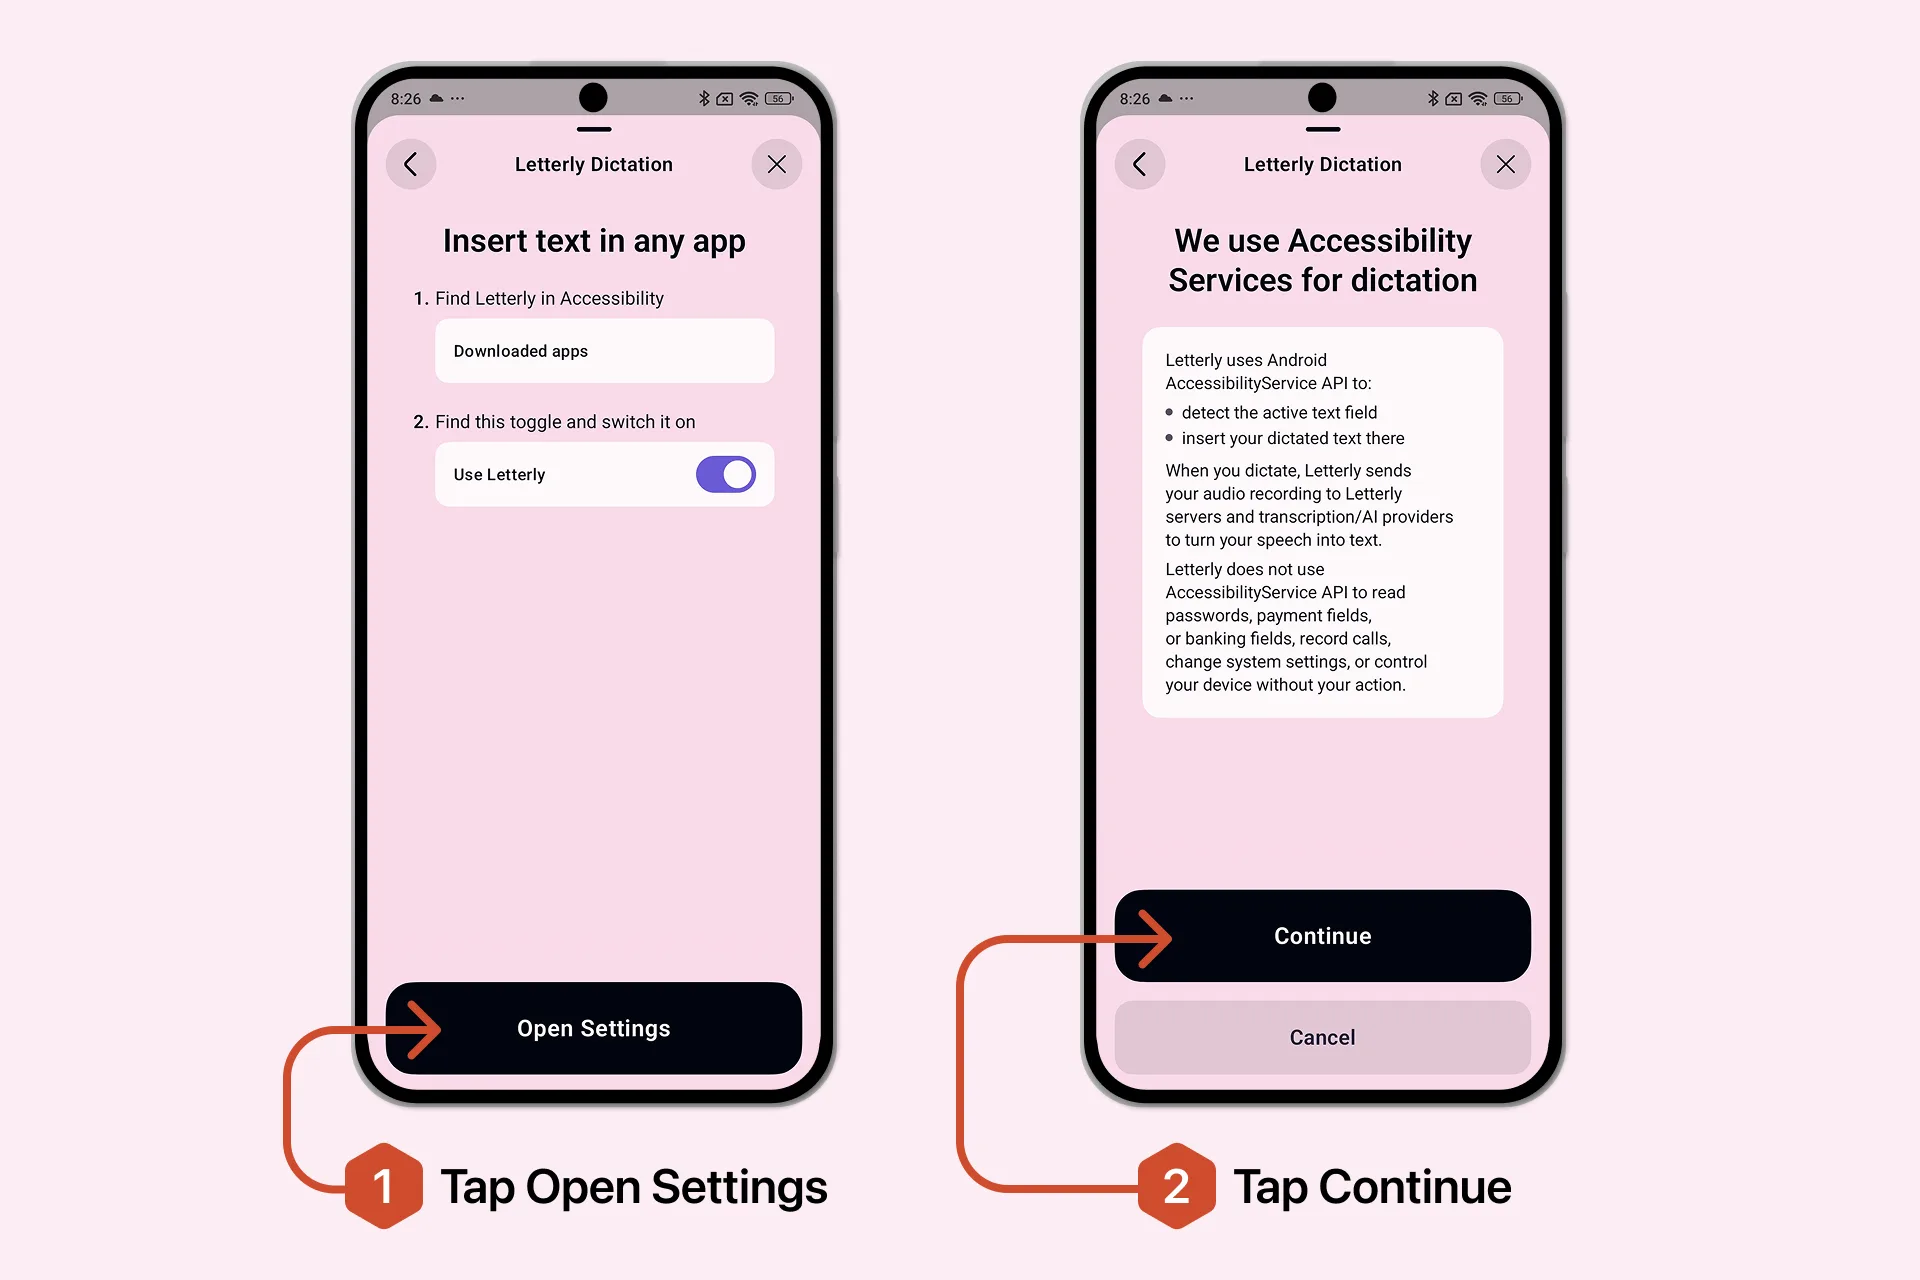
Tap Open Settings next to Insert text in any app. Letterly explains how it uses Accessibility Services — review it and tap Continue.
Letterly uses Android's AccessibilityService API only to detect the active text field and insert your dictated text. It does not read passwords, payment or banking fields, record calls, change system settings, or control your device without your action.
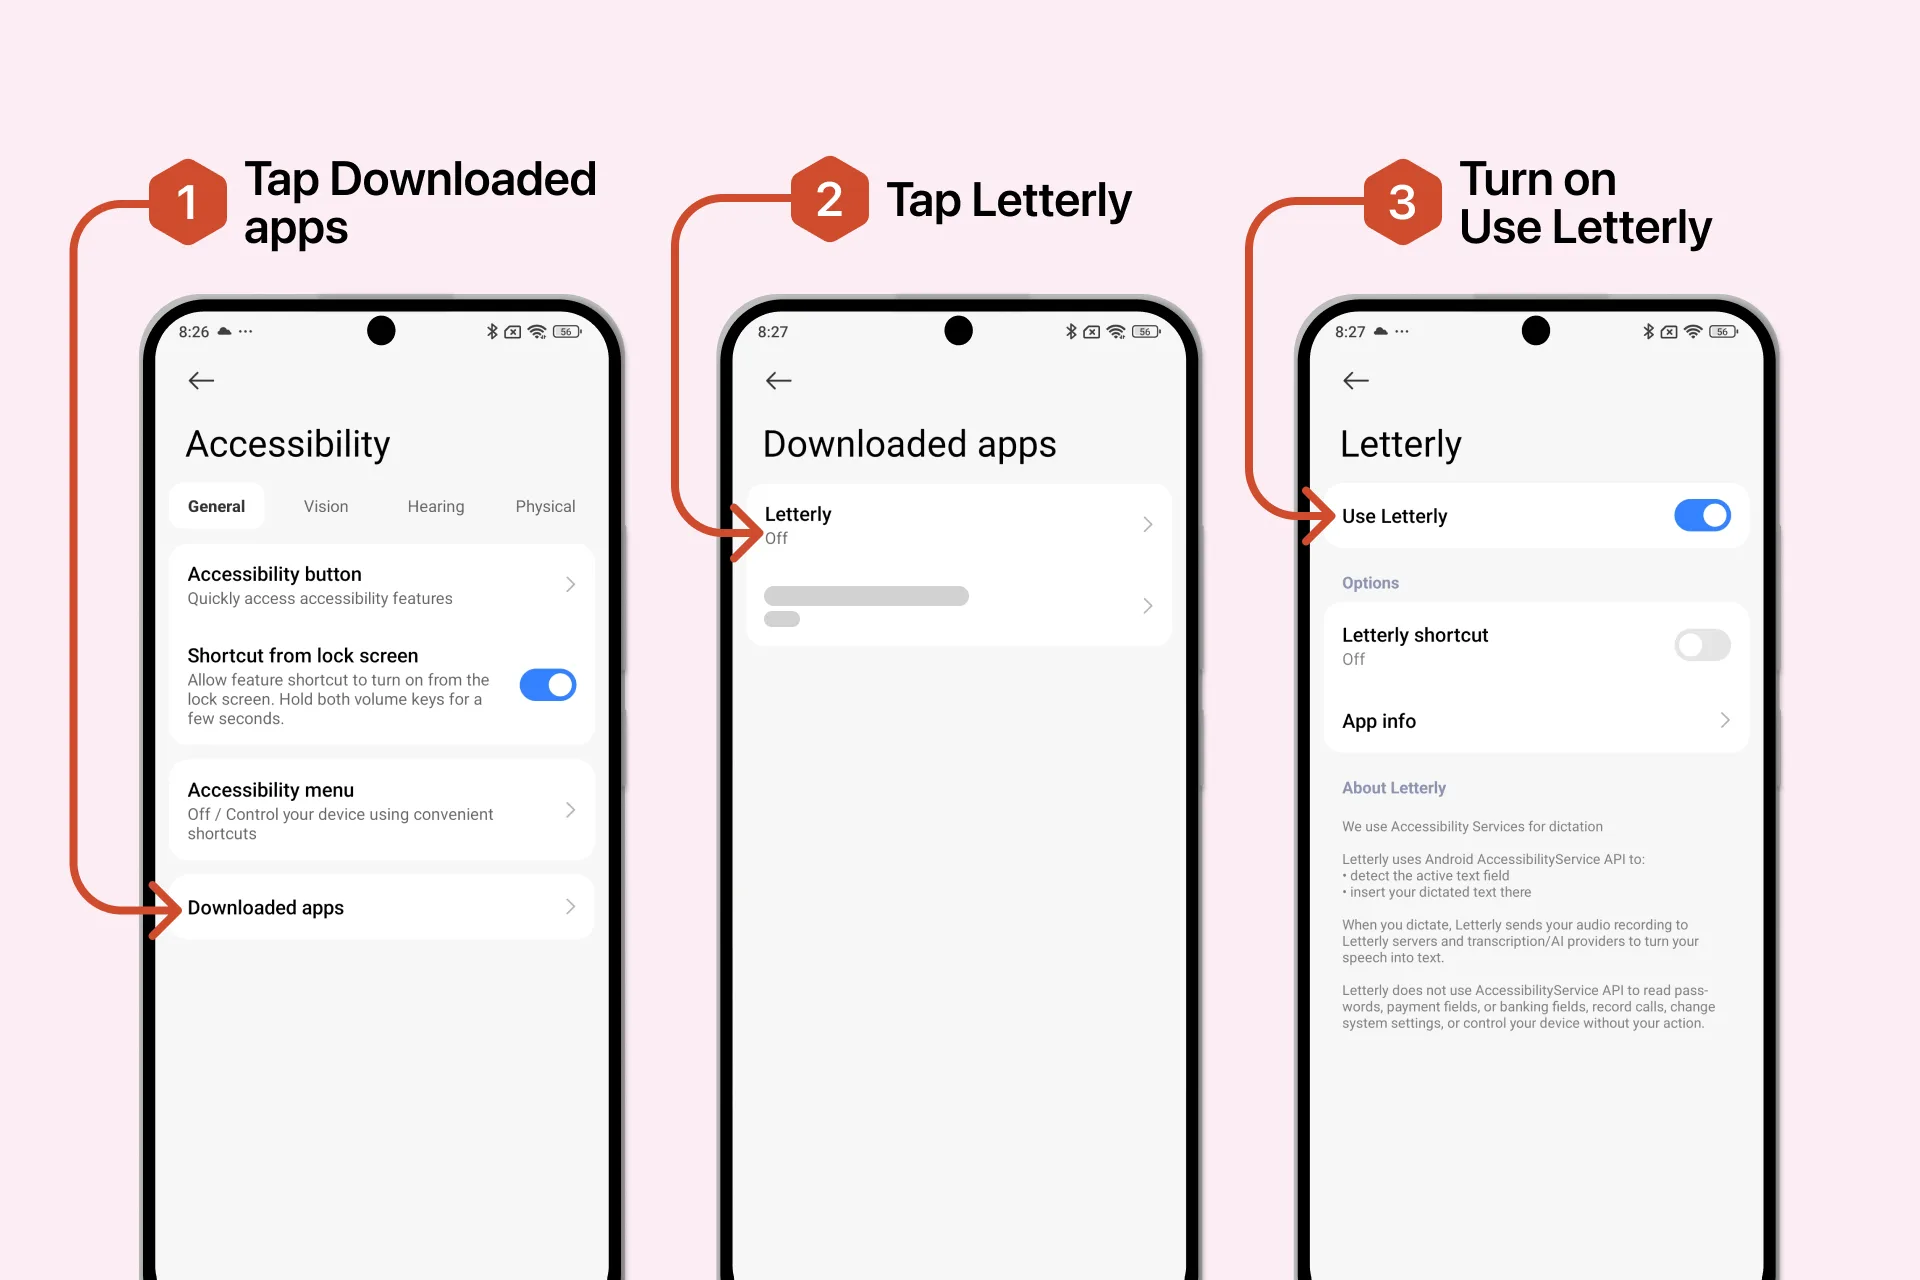
- Tap Downloaded apps.
- Tap Letterly.
- Turn on Use Letterly.
Confirm the Android warning
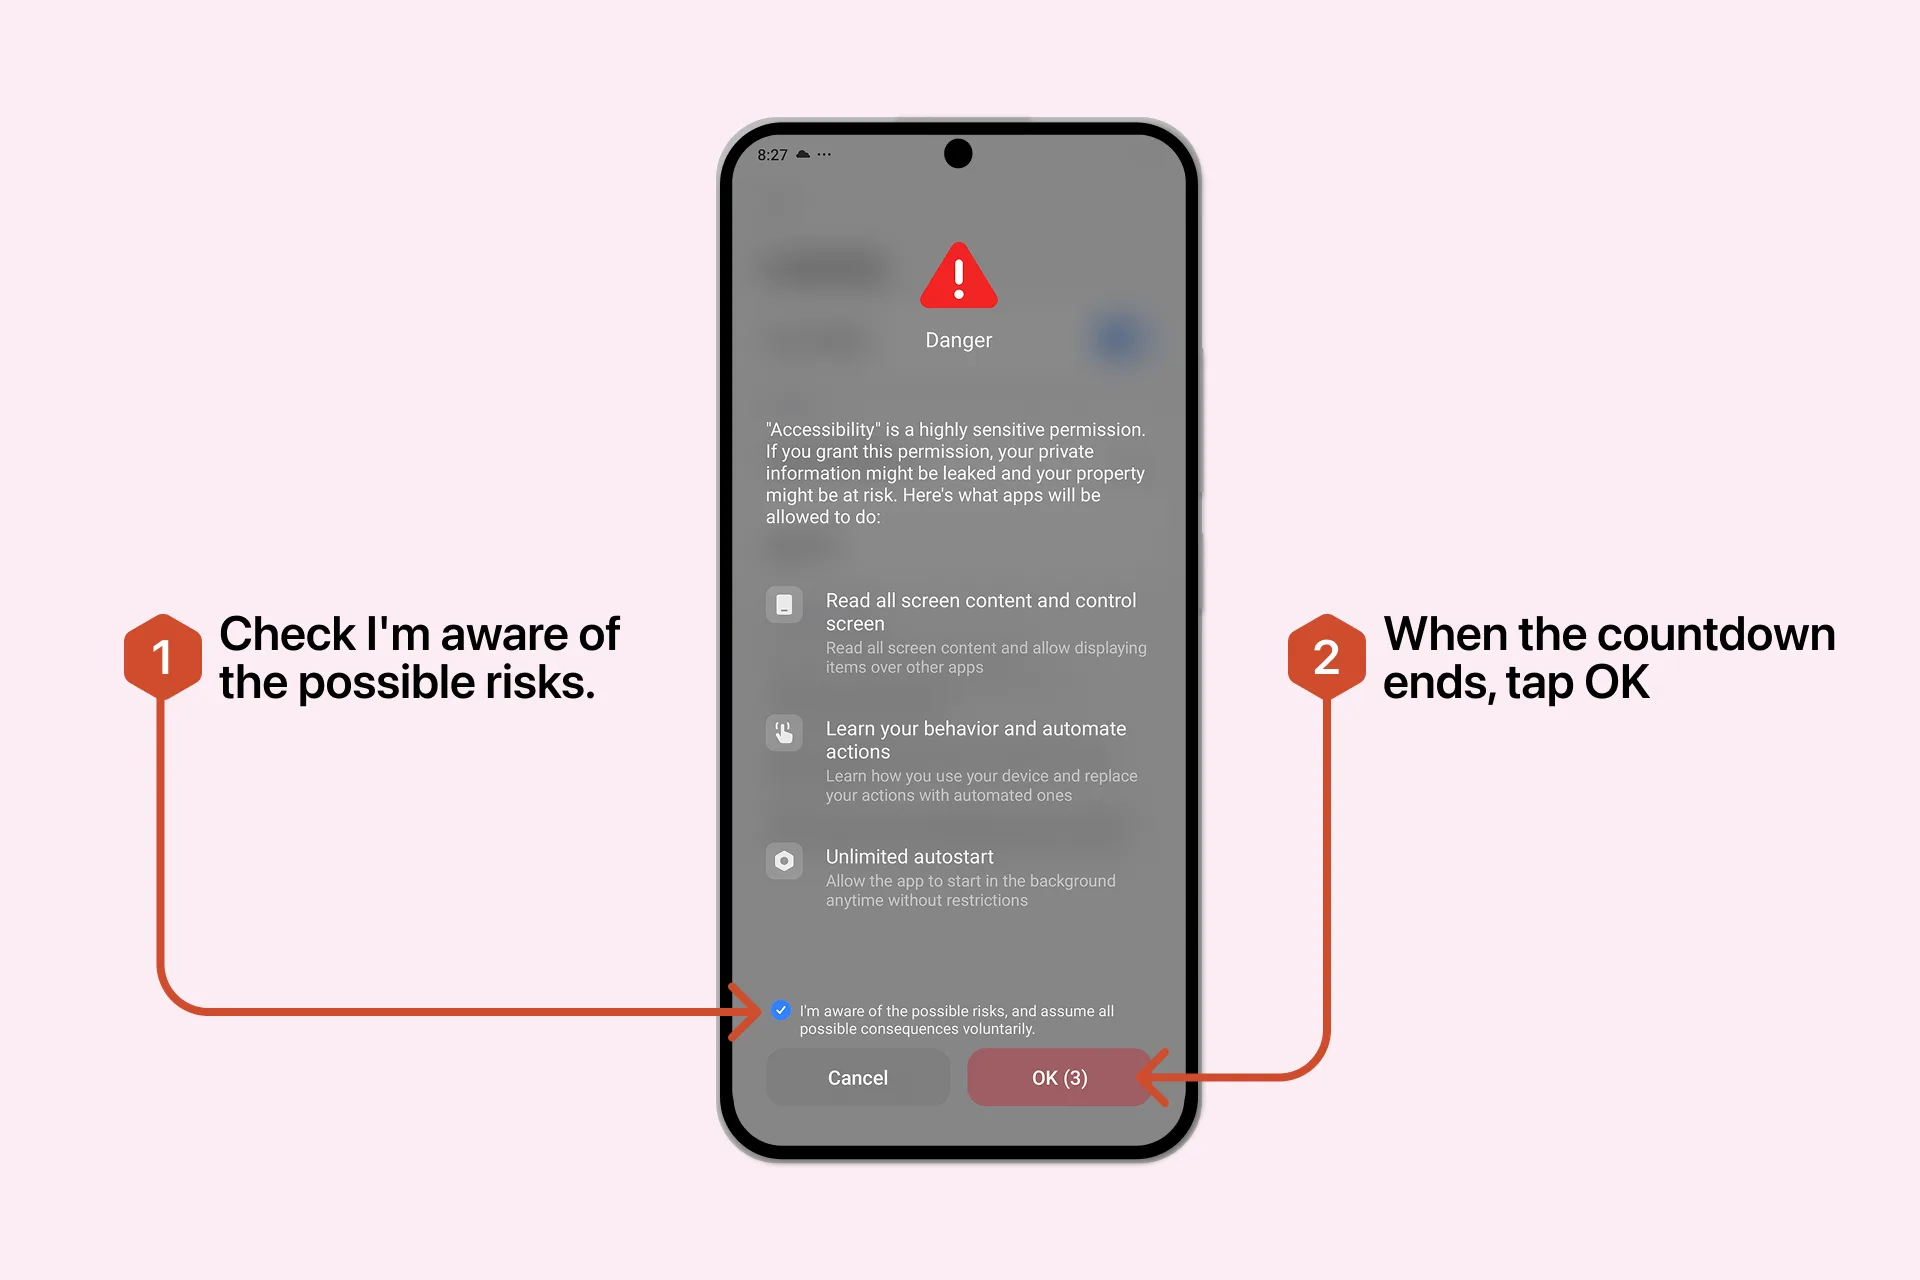
Some devices show an extra system warning, because Accessibility is a sensitive permission. Android shows it for any app that uses Accessibility Services.
This is a standard system notice. It does not describe Letterly's privacy practices — we do not sell your data, share it with third parties for their own use, or use it to train AI models.
- Wait for the countdown to finish, if one appears.
- Select I'm aware of the possible risks.
- Tap OK, then return to Letterly.
Use Dictation
Select where the text should appear
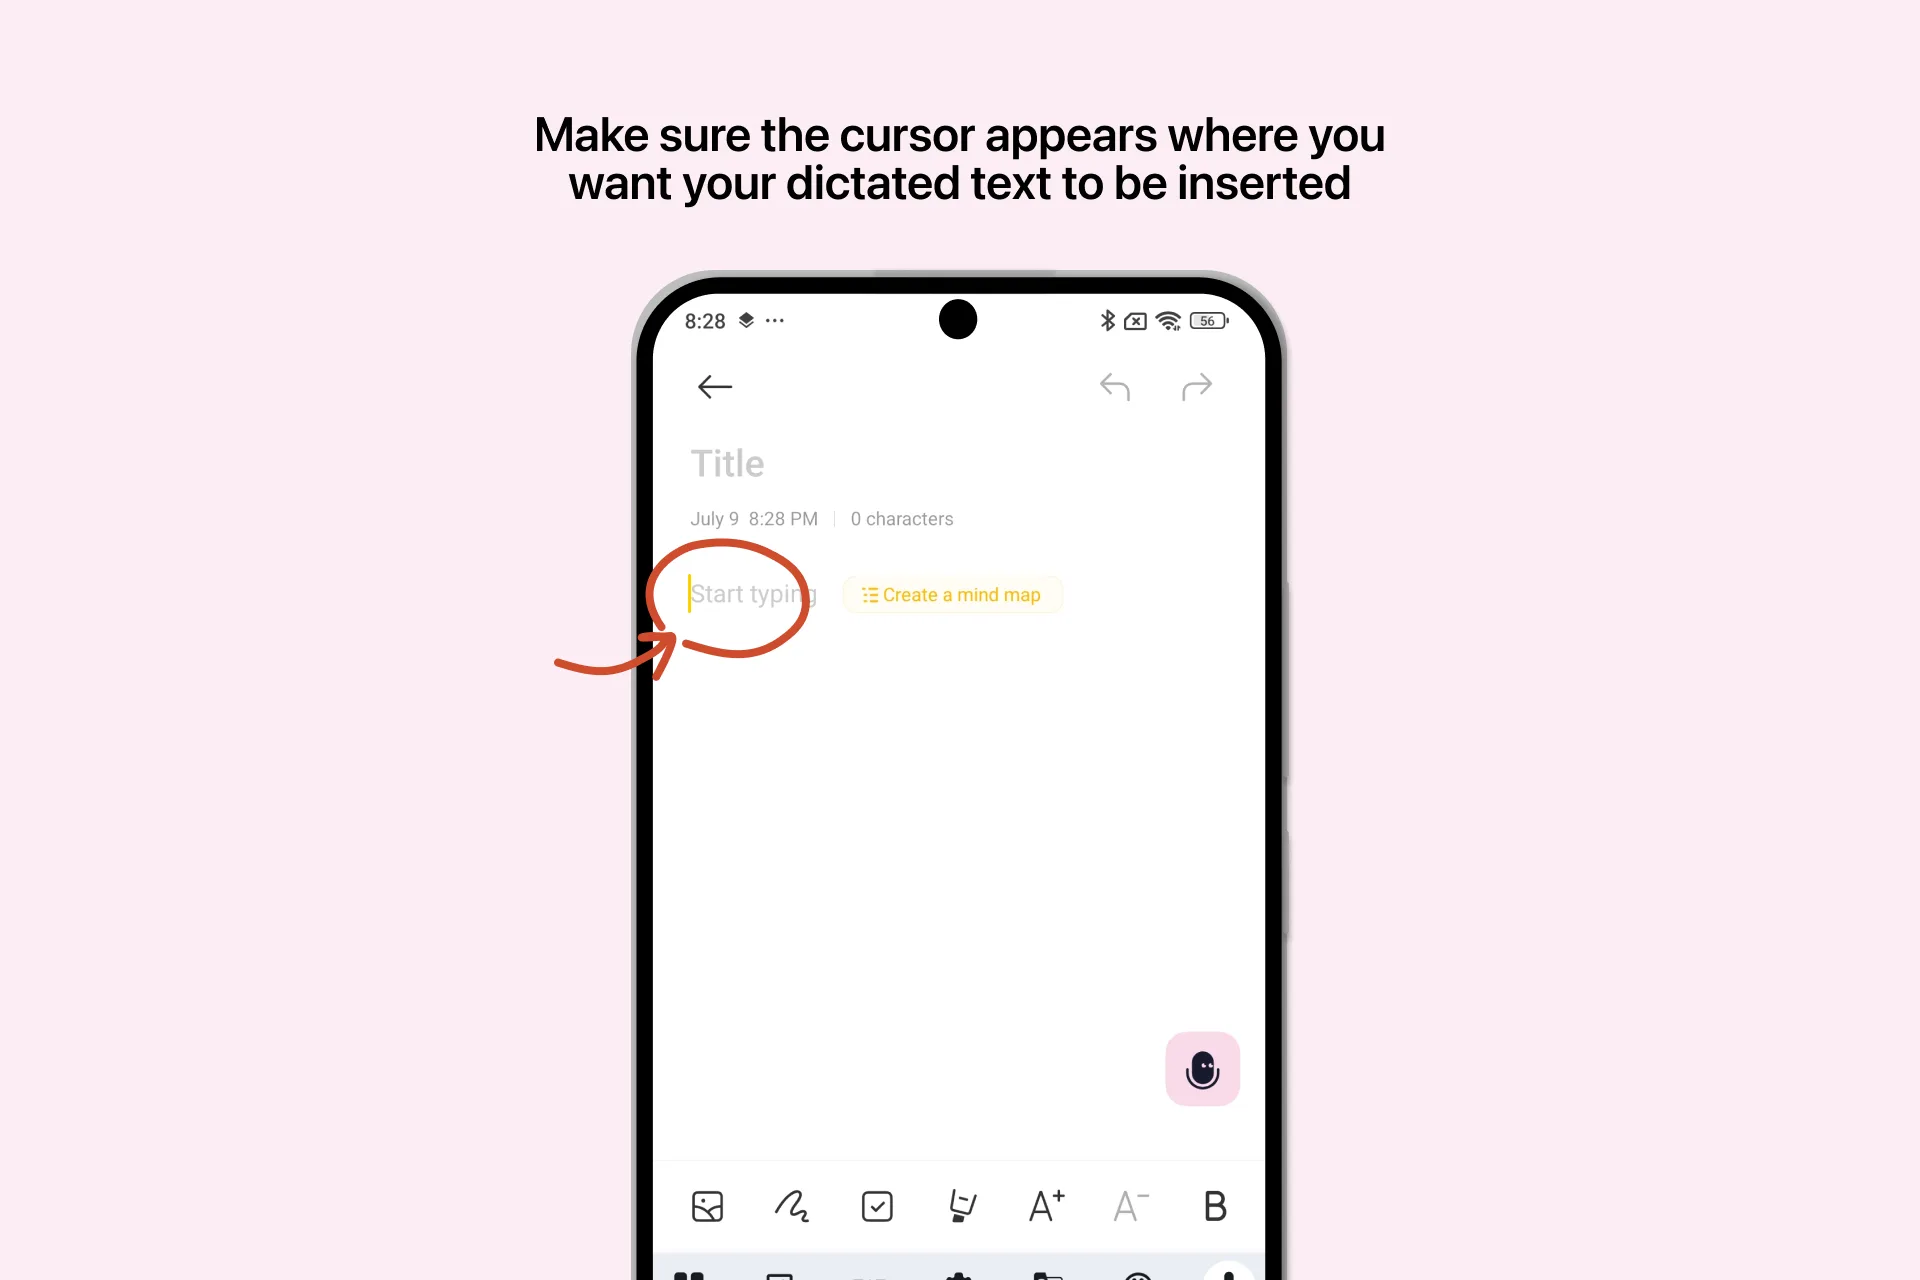
Open the app where you want to write and tap the text field to place your cursor.
Start dictating
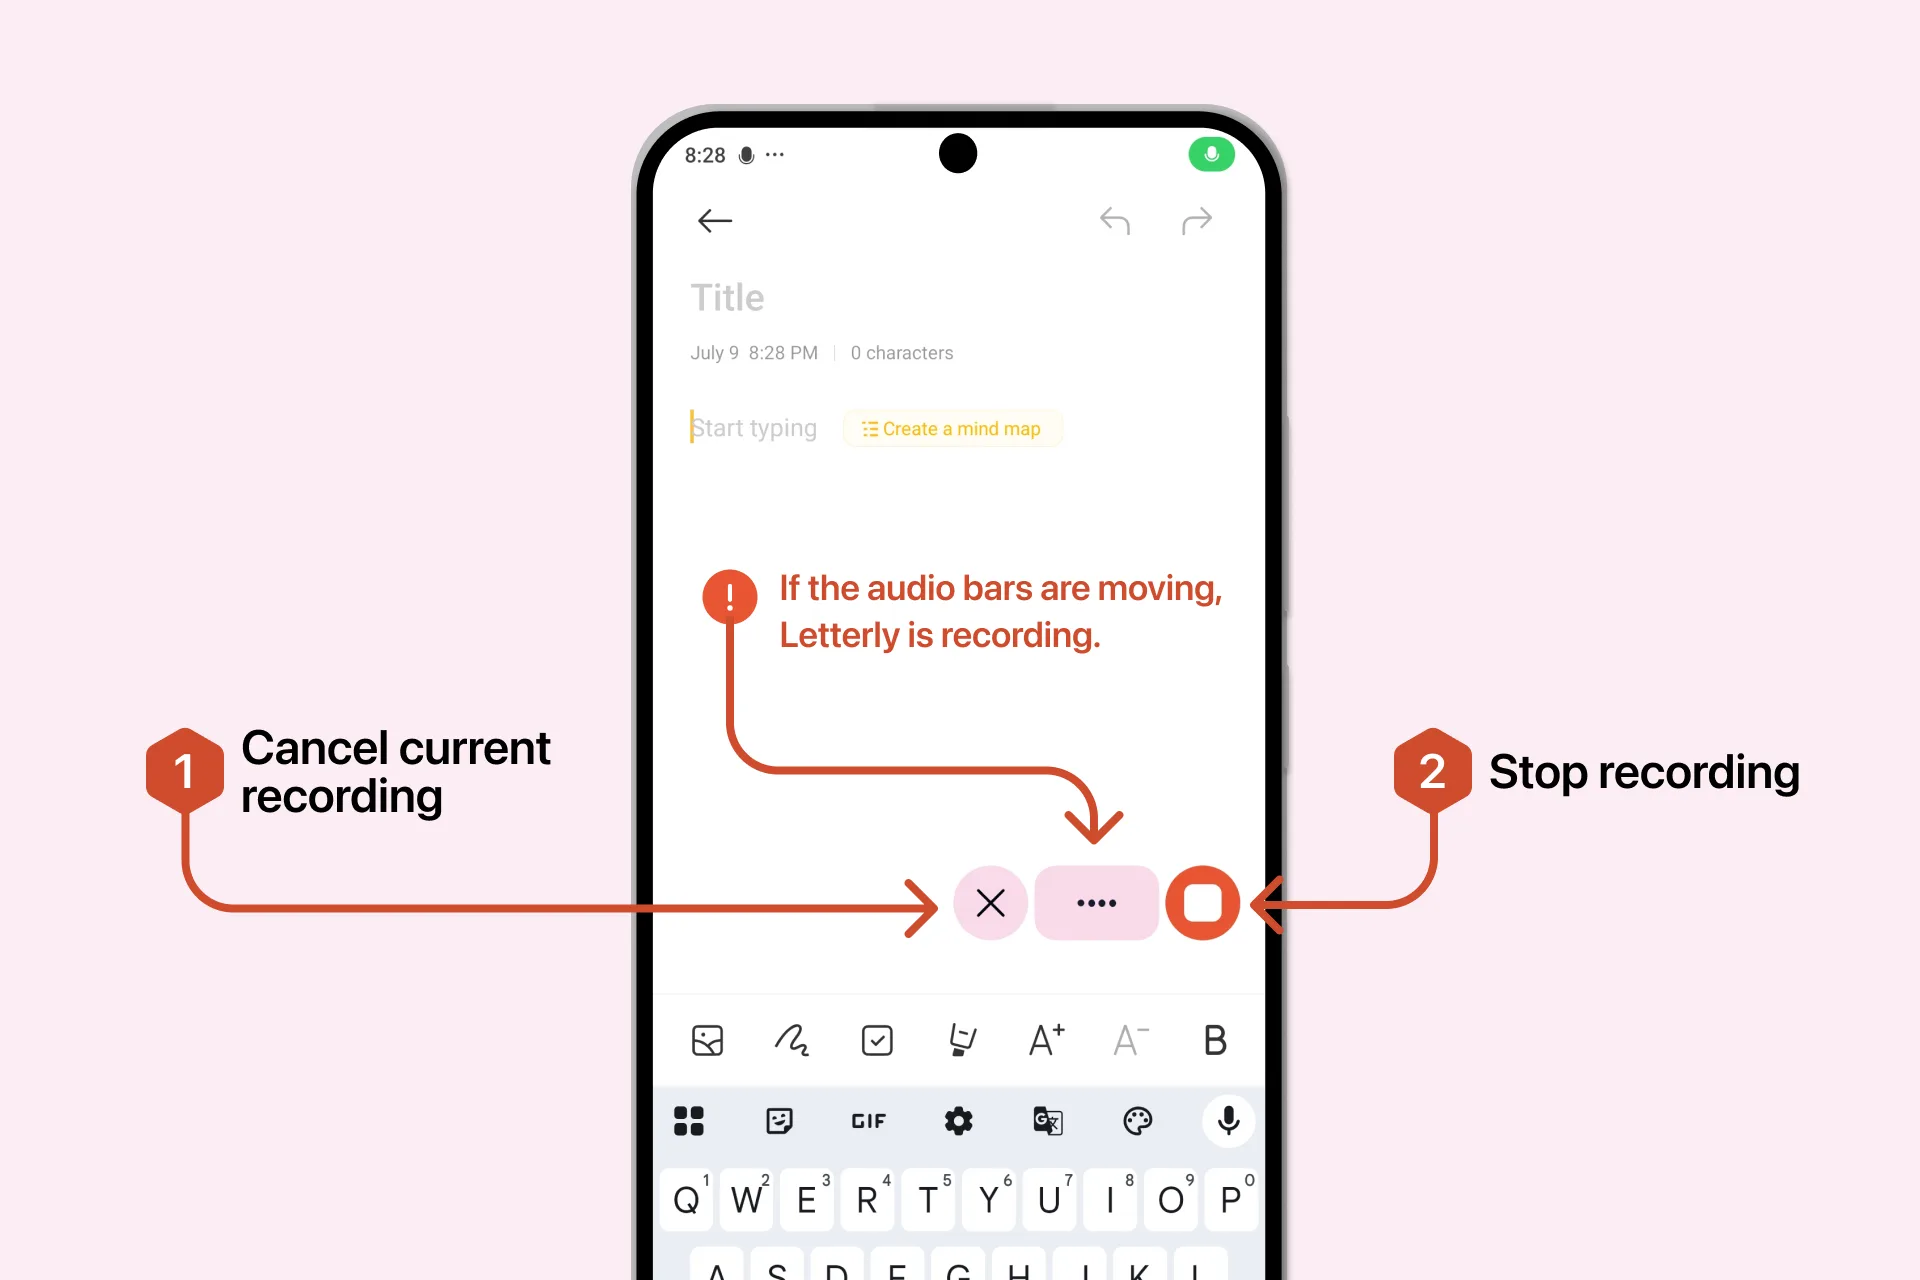
Tap the Letterly Bubble. Recording begins immediately, so you can start speaking right away.
| Control | What it does |
|---|---|
| X | Cancels and discards the current recording |
| Stop (red button) | Finishes the recording and inserts the text |
A single dictation can be up to 15 minutes. Need longer? Record a note in the app instead — up to 90 minutes.
If the audio bars are moving, Letterly is listening. If they stay still while you speak, check that Letterly has microphone permission.
Keep the app and the text field open while Letterly processes your dictation. If the field closes, the text cannot be inserted.
Hide the Bubble for a while
Drag the Bubble to the Snooze area at the bottom of the screen. It disappears for 10 minutes and comes back on its own — to bring it back sooner, unlock your phone and shake it.
Dictation history
Letterly saves every completed dictation. Open Settings → History — dictations are grouped by date, just like your notes.
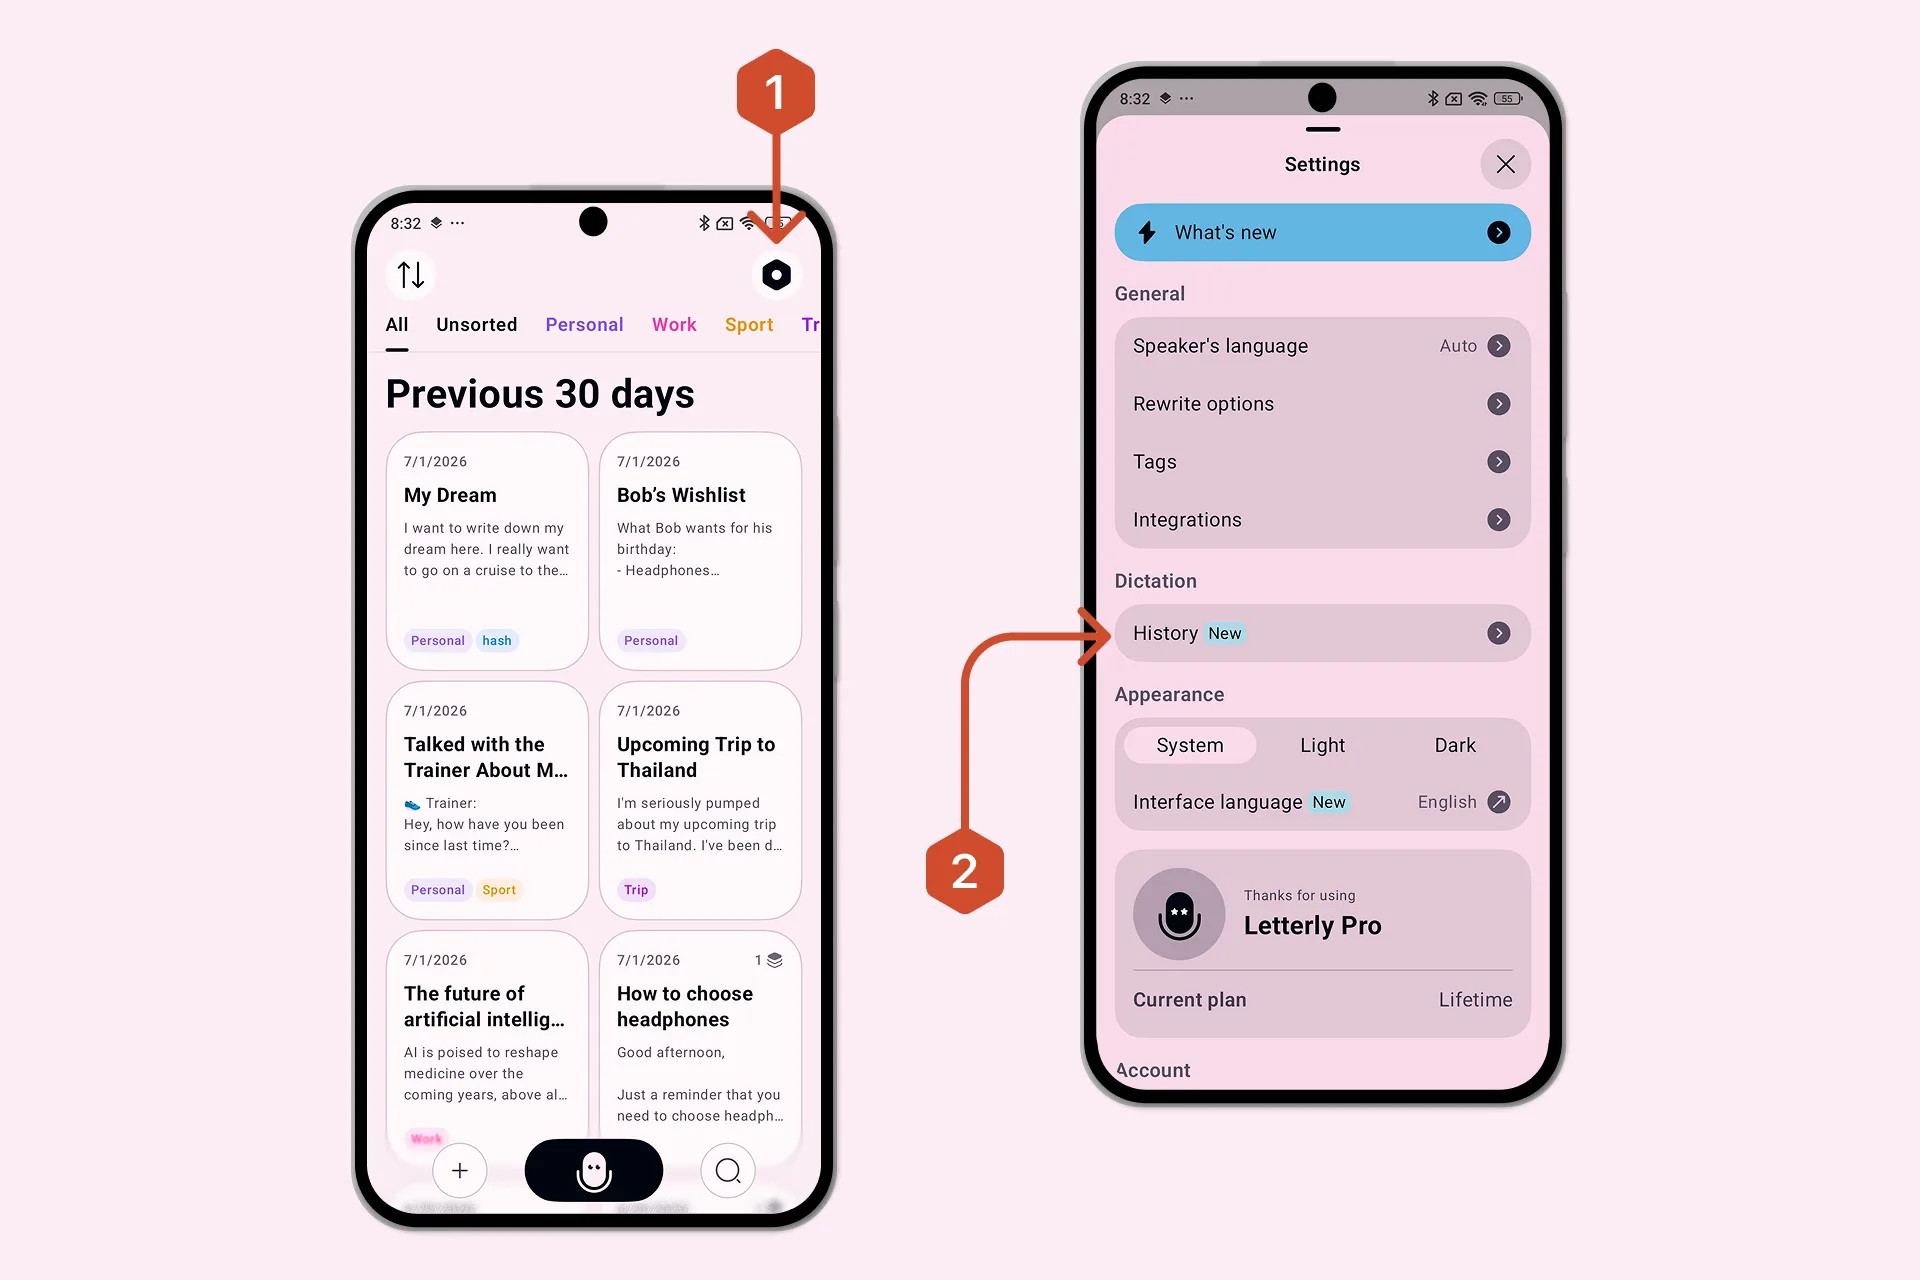
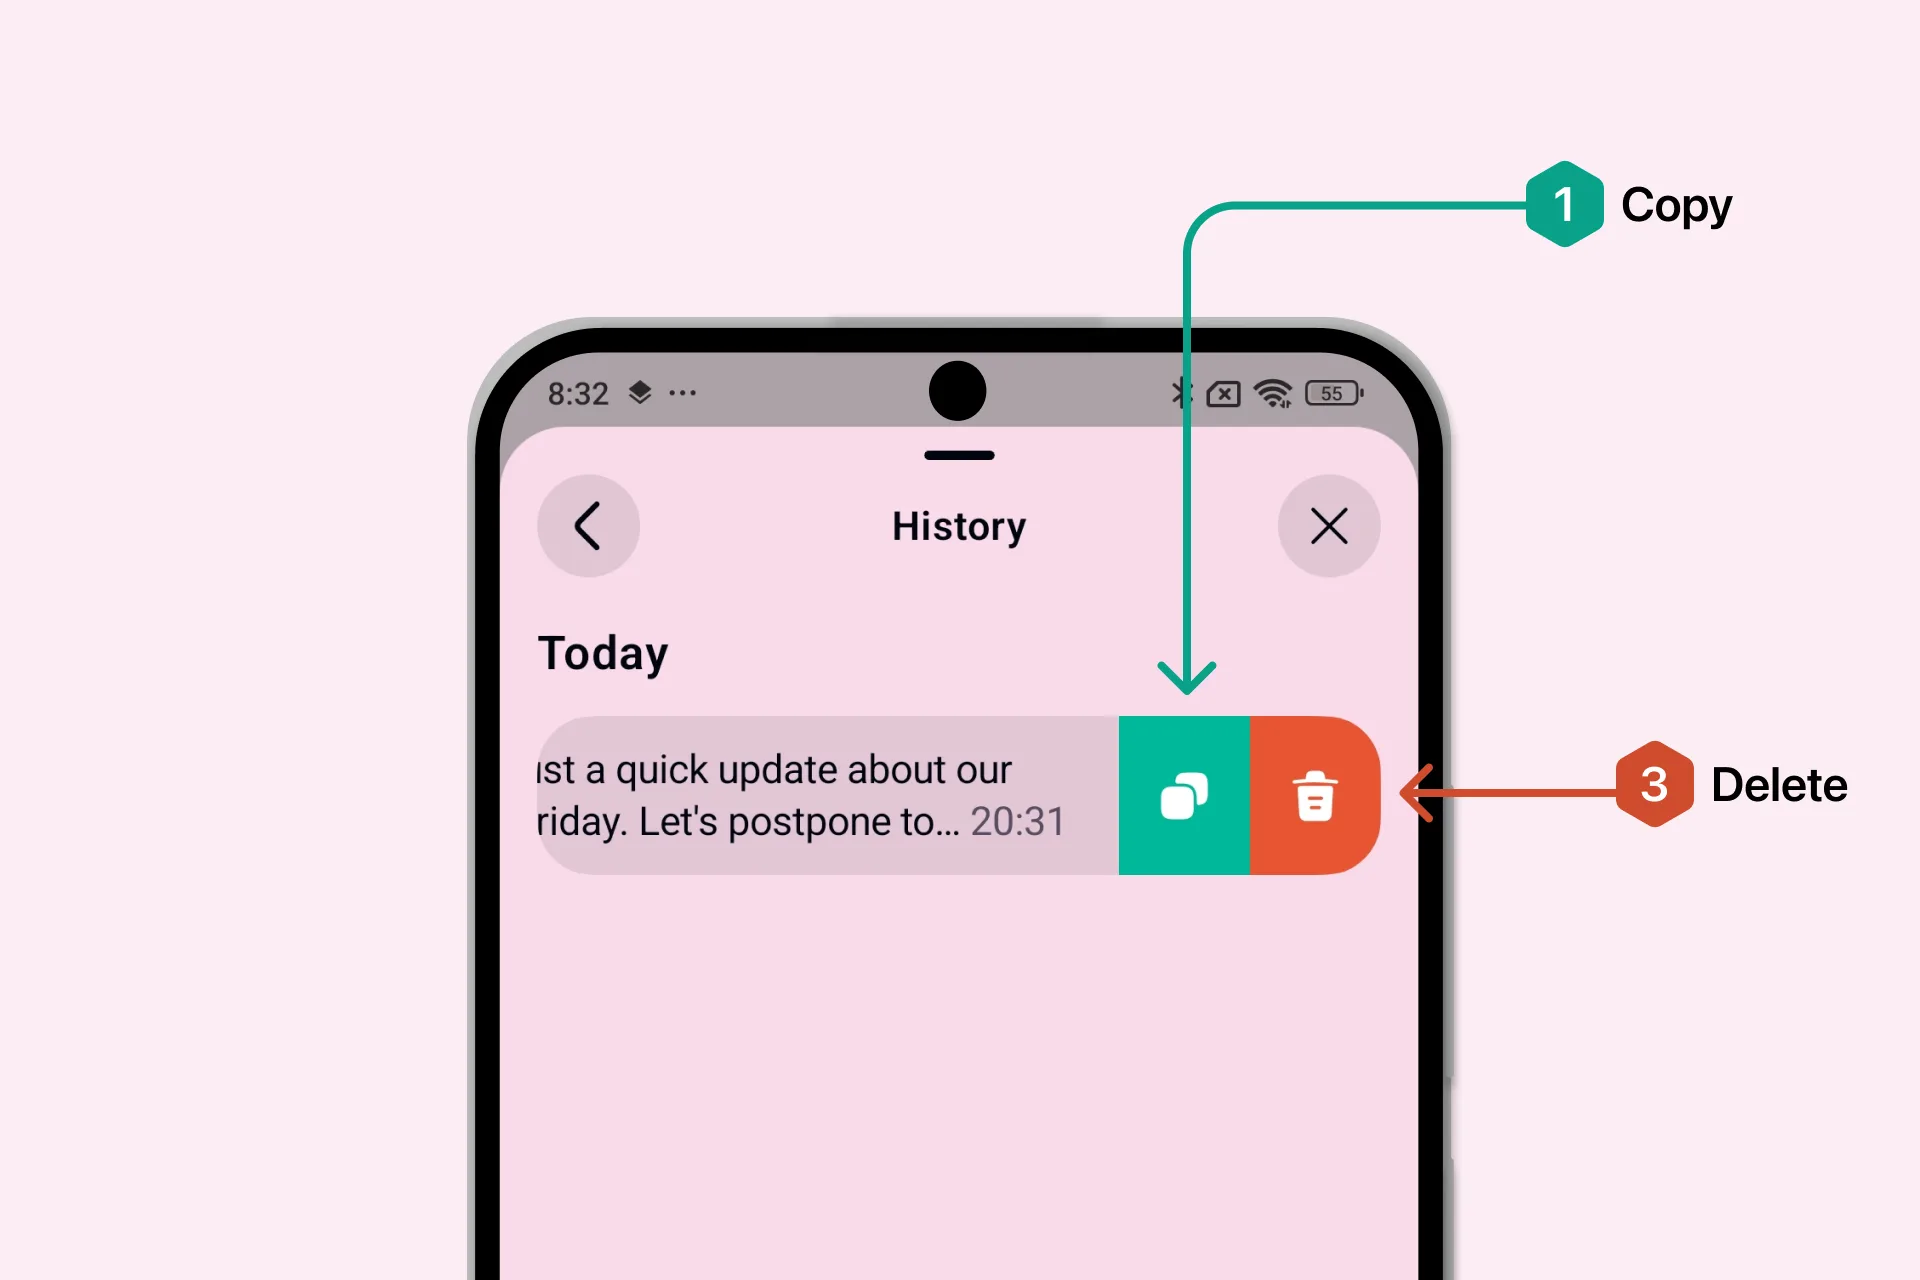
Press and hold a dictation, or swipe left on it, to see the actions.
| Action | What it does |
|---|---|
| Copy | Copies the dictation text to your clipboard |
| Delete | Permanently removes the dictation from History |
Letterly asks you to confirm before deleting. Once deleted, a dictation cannot be restored.
Dictation History stays on the device where it was created and does not sync to your other devices.
Learn more about Dictation History →Letterly can clean up your text automatically after every dictation — choose how in Dictation output. You can also drag the Bubble anywhere on screen, to whichever side is easiest to reach.
This guide takes you from nothing to your first dictation on Mac, and then through the settings that shape the text you get.
Install Letterly
Get Letterly from the Mac App Store and open it. Full details: Download & install.
Sign in
Sign in with Google, Apple, or your email. See Onboarding.
If you already have a subscription, sign in with the email you bought it with. Otherwise you start on the Free plan.
Learn more about plans →Open Dictation
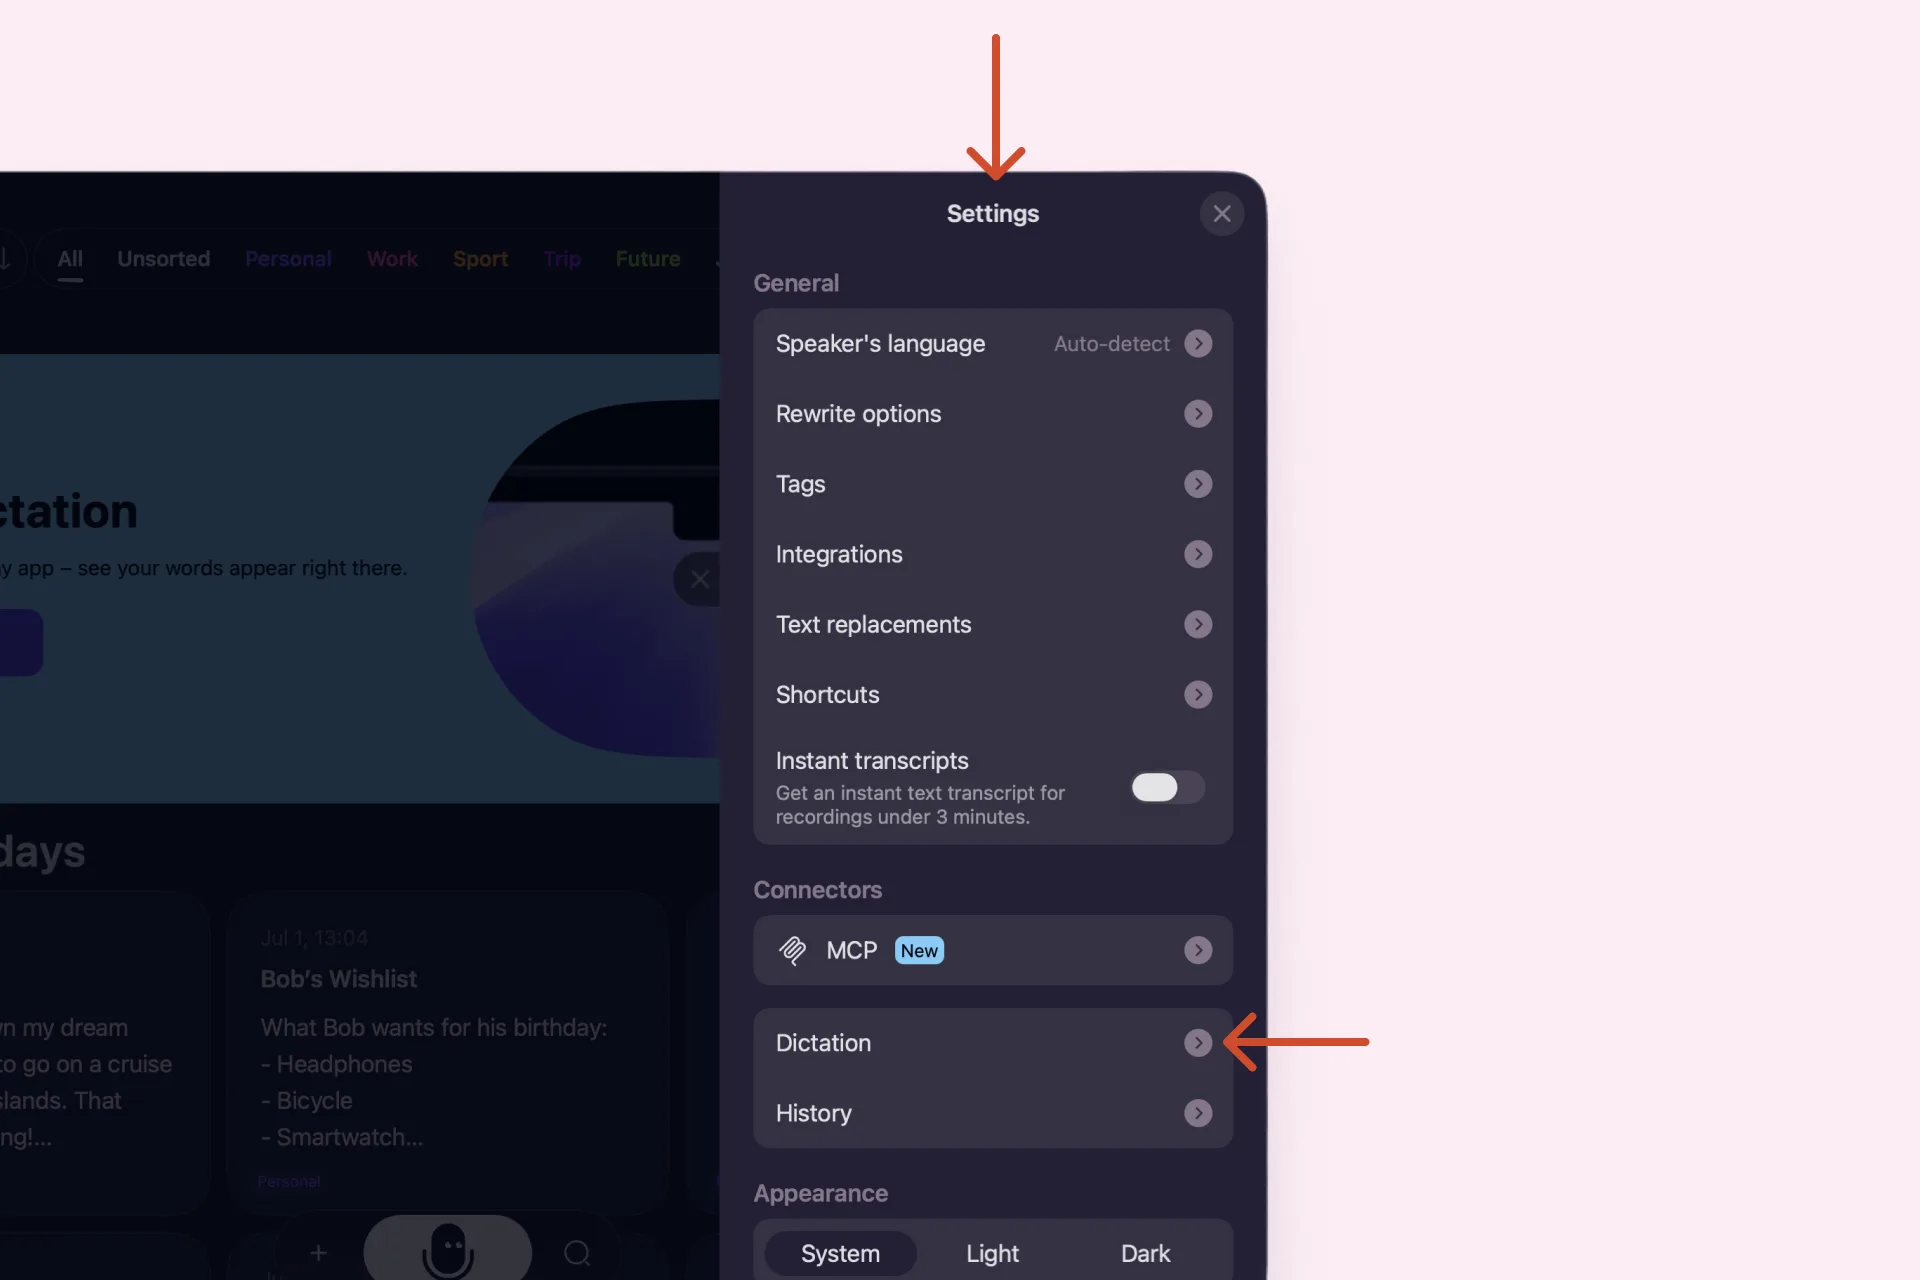
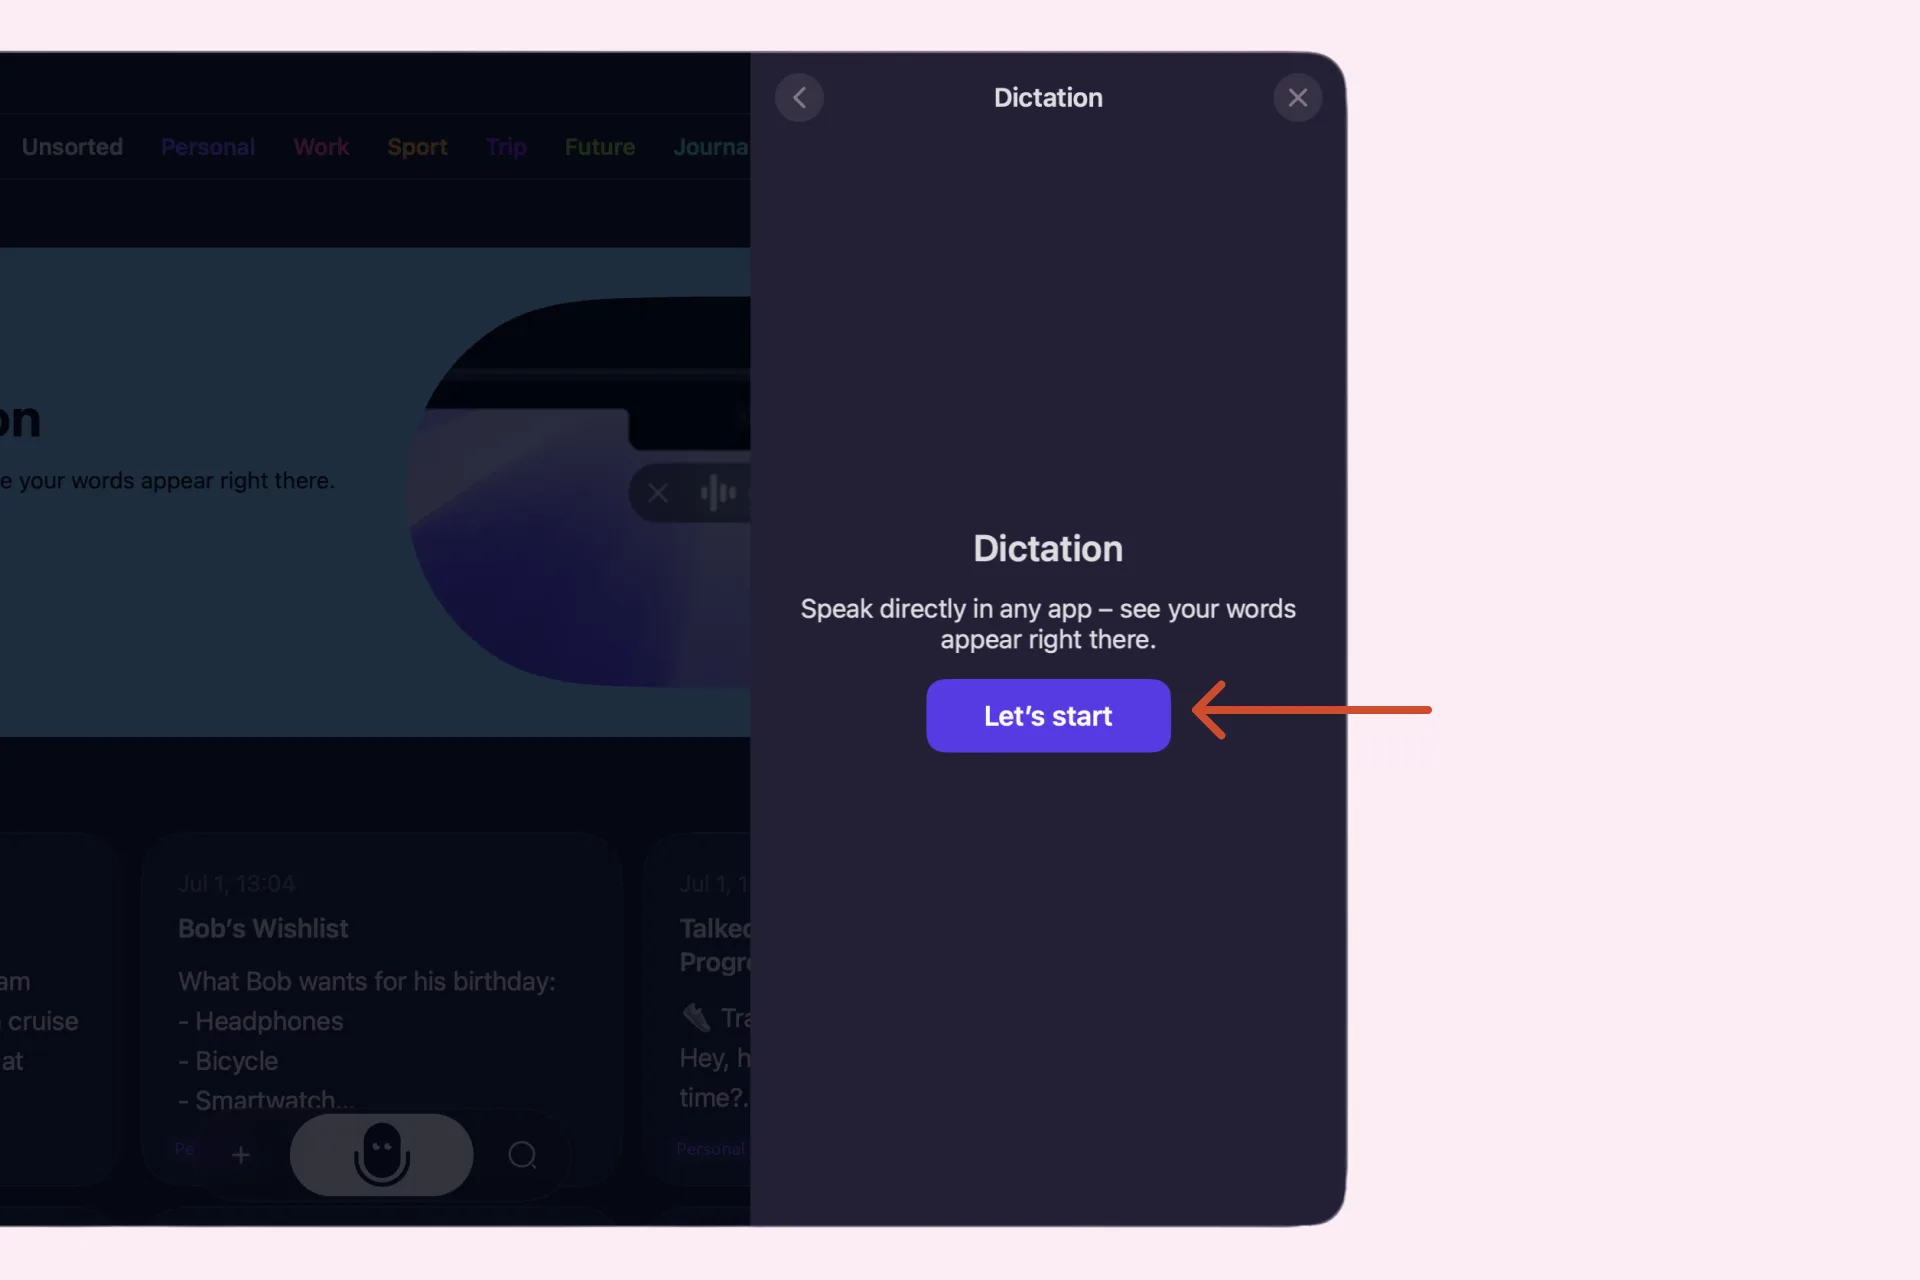
In Settings, open the Dictation section.
Allow permissions
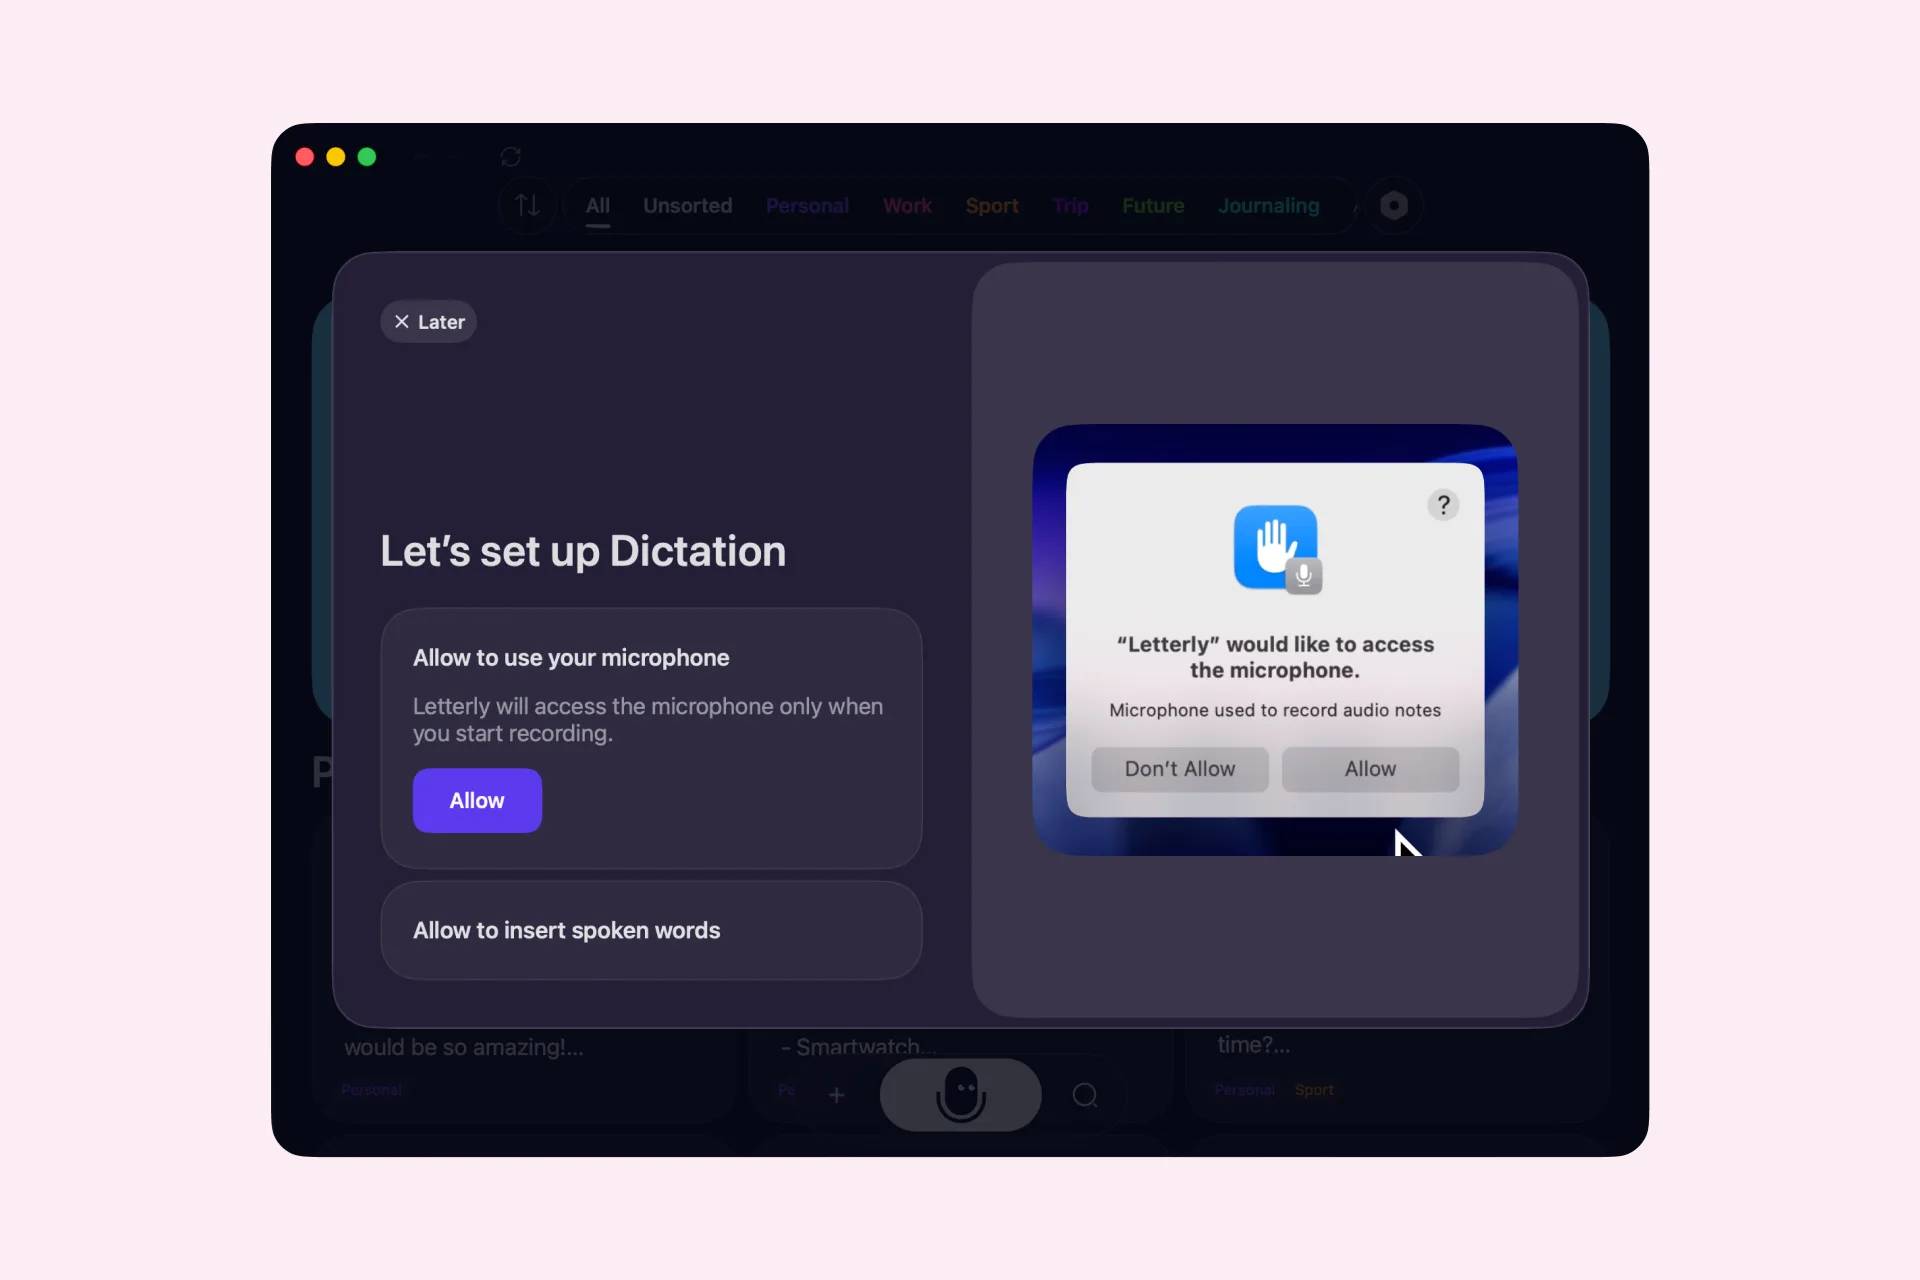
Letterly guides you through two permissions: Microphone, so it can hear what you dictate, and Accessibility, so it can insert the finished text into the active field.
If you have used Letterly before, microphone access may already be enabled — that step is skipped automatically.
- Click Allow in Letterly.
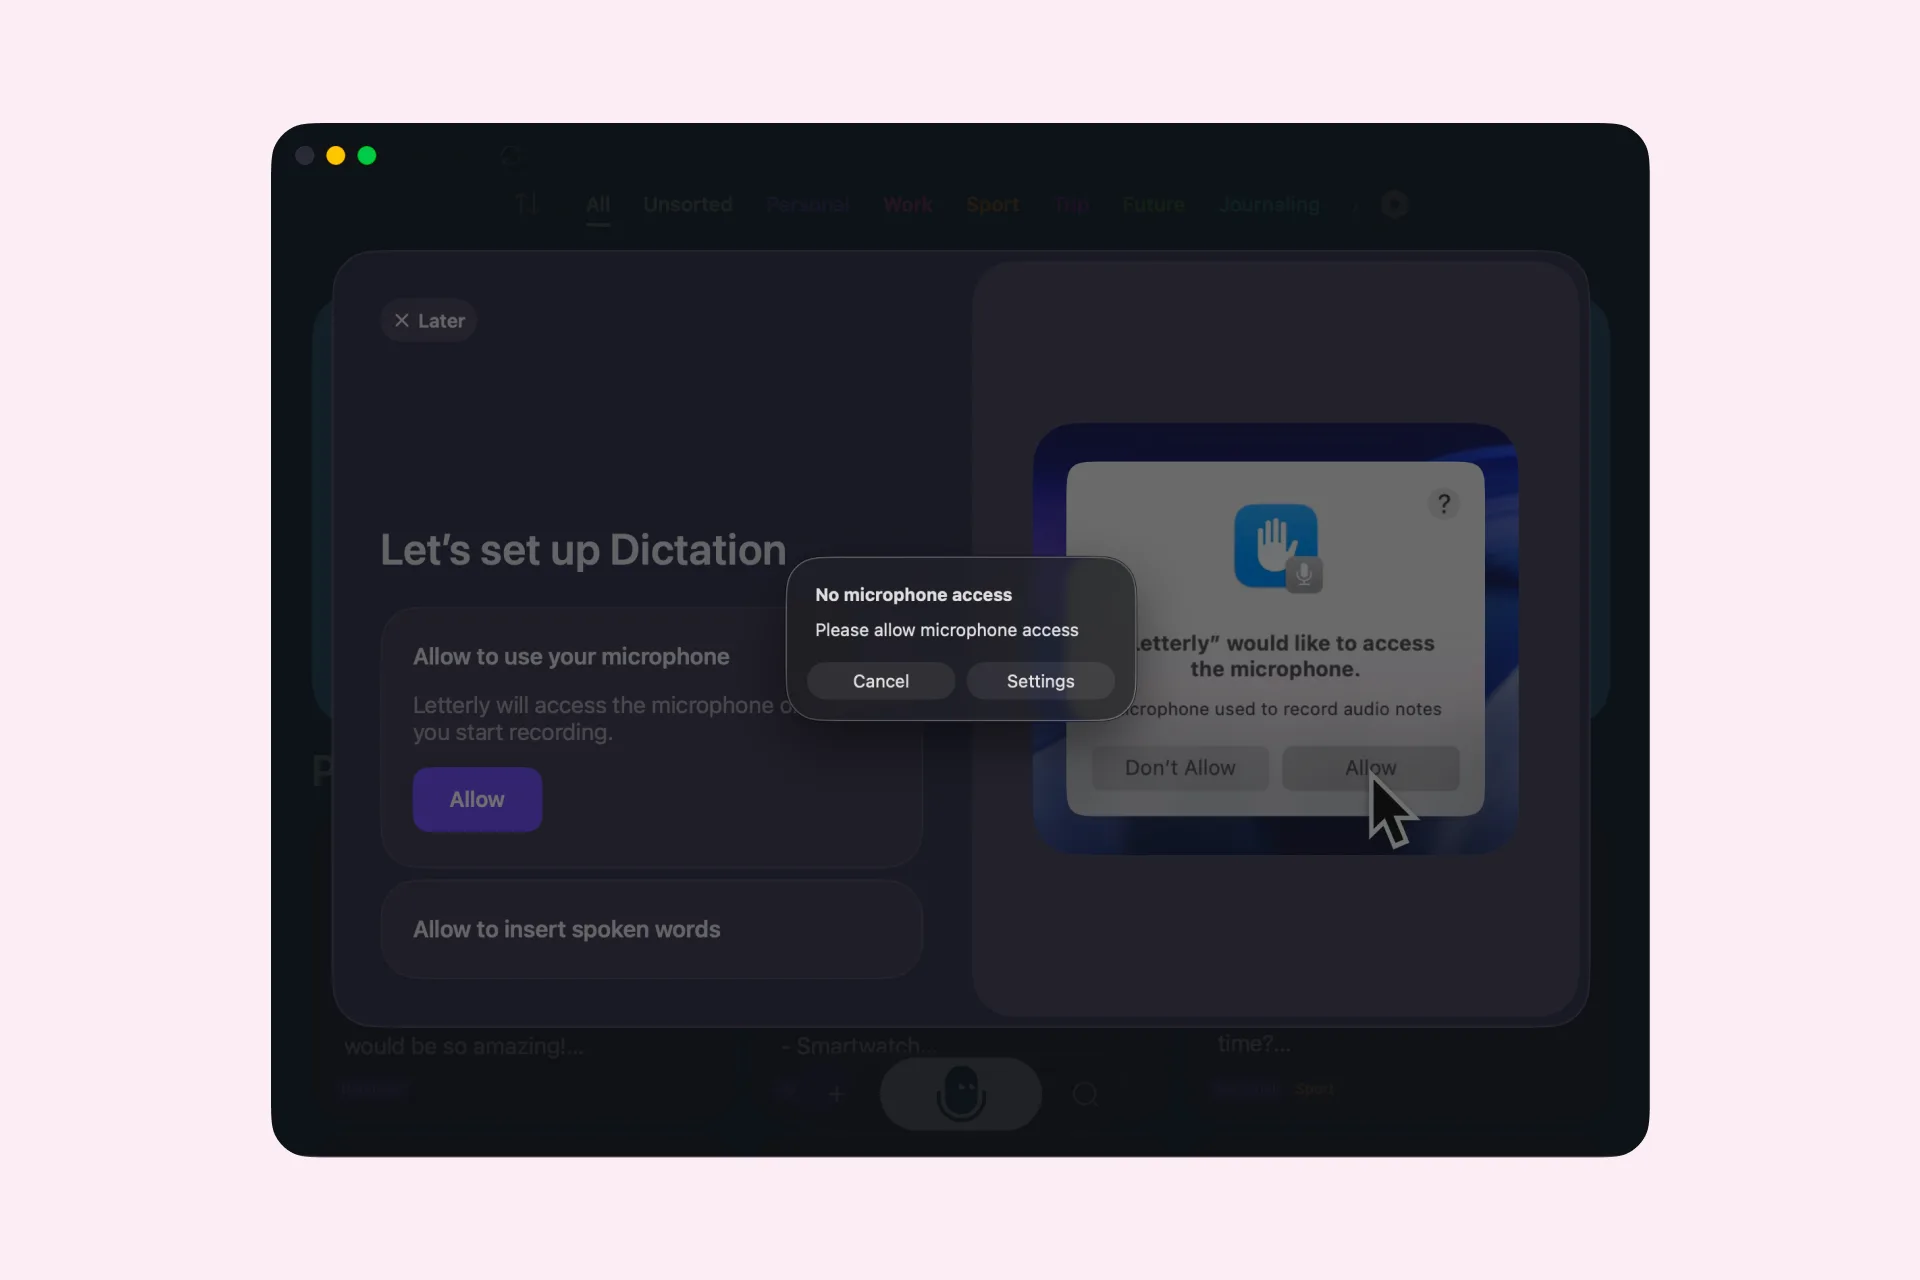
- When the No microphone access message appears, click Settings.
- Enable Letterly under Microphone, then return to Letterly.
- Click Allow again and enable Letterly under Accessibility.
- If macOS asks you to, quit and reopen Letterly.
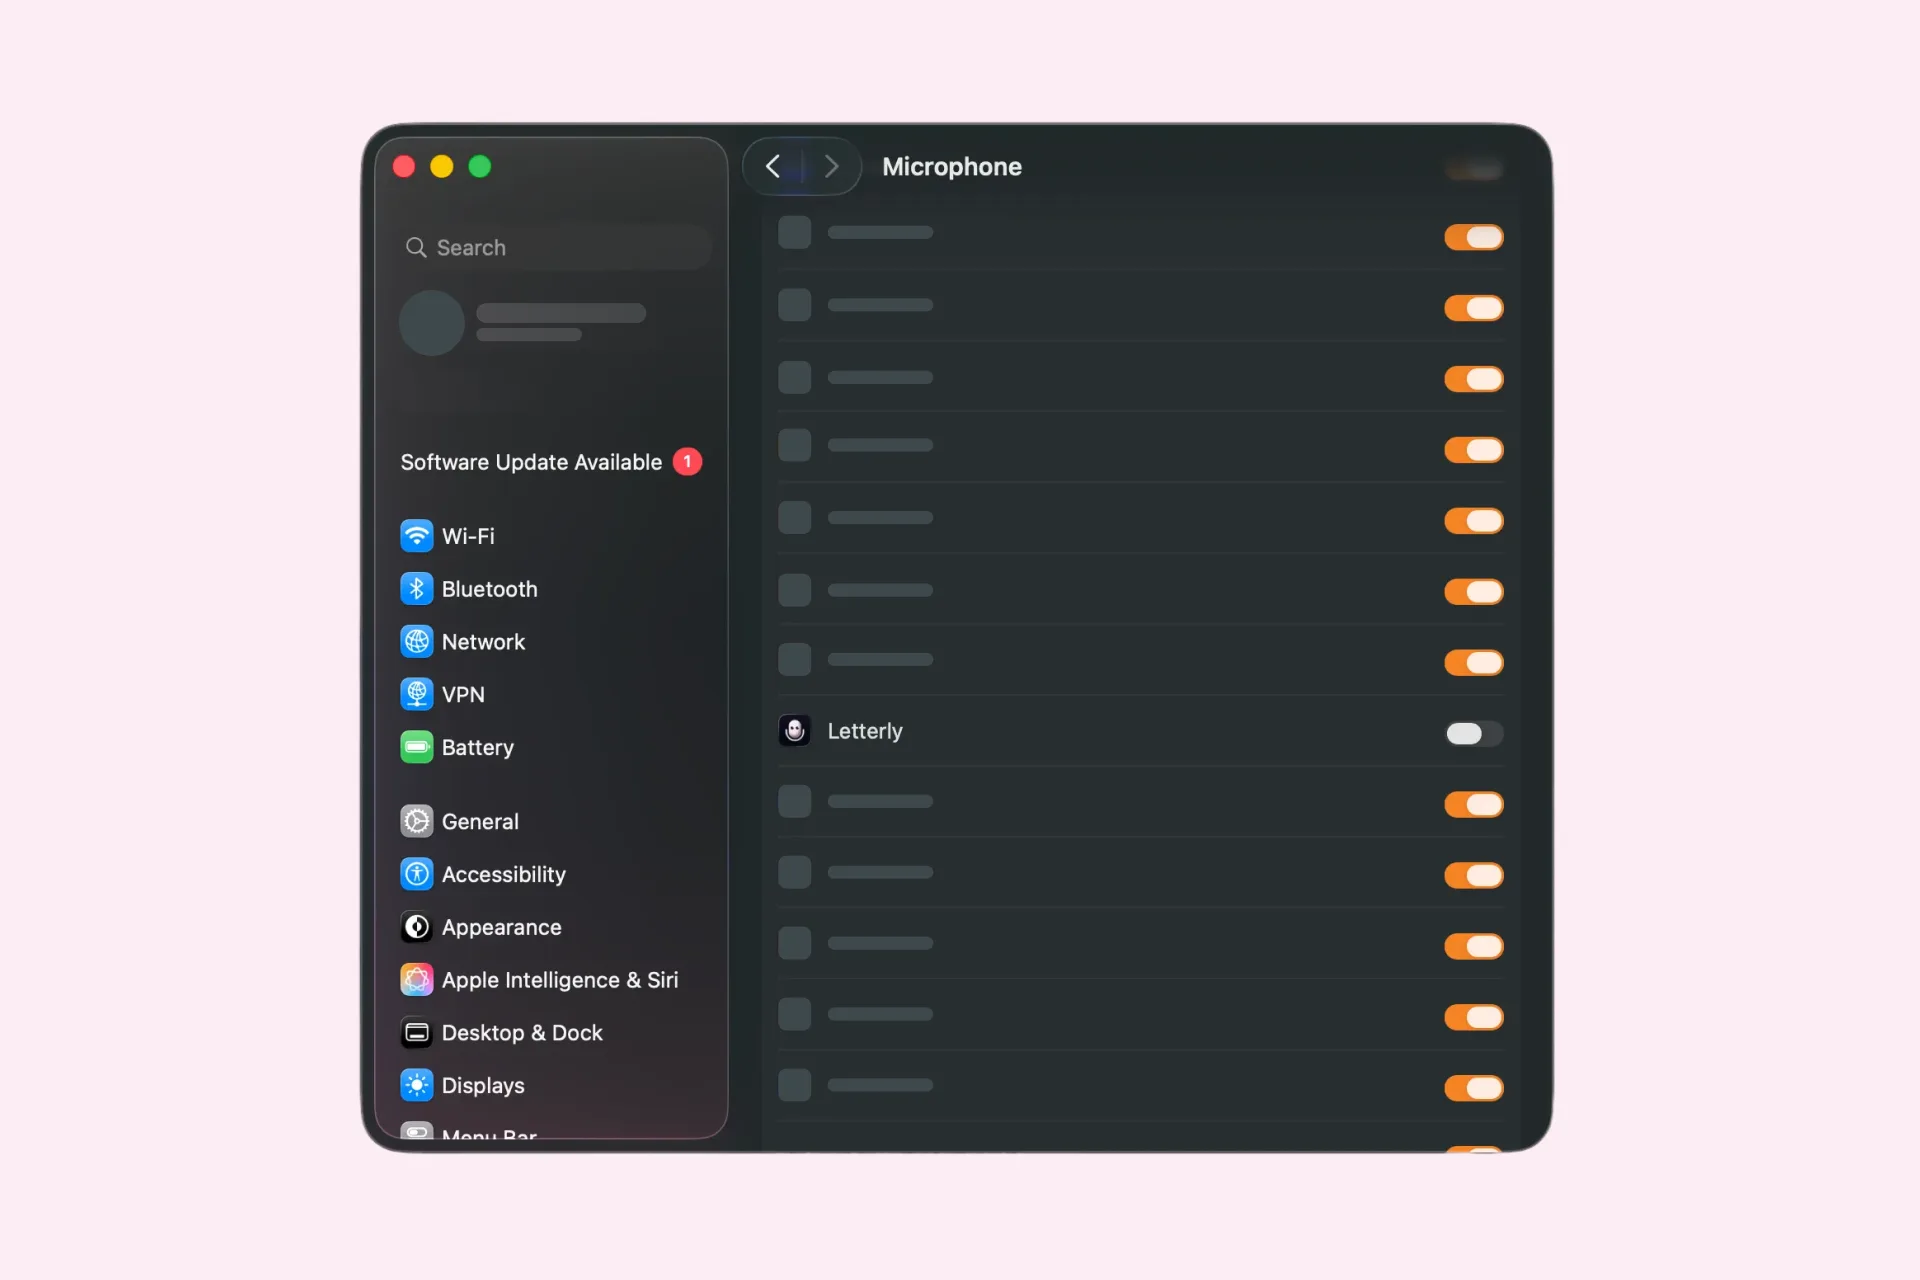
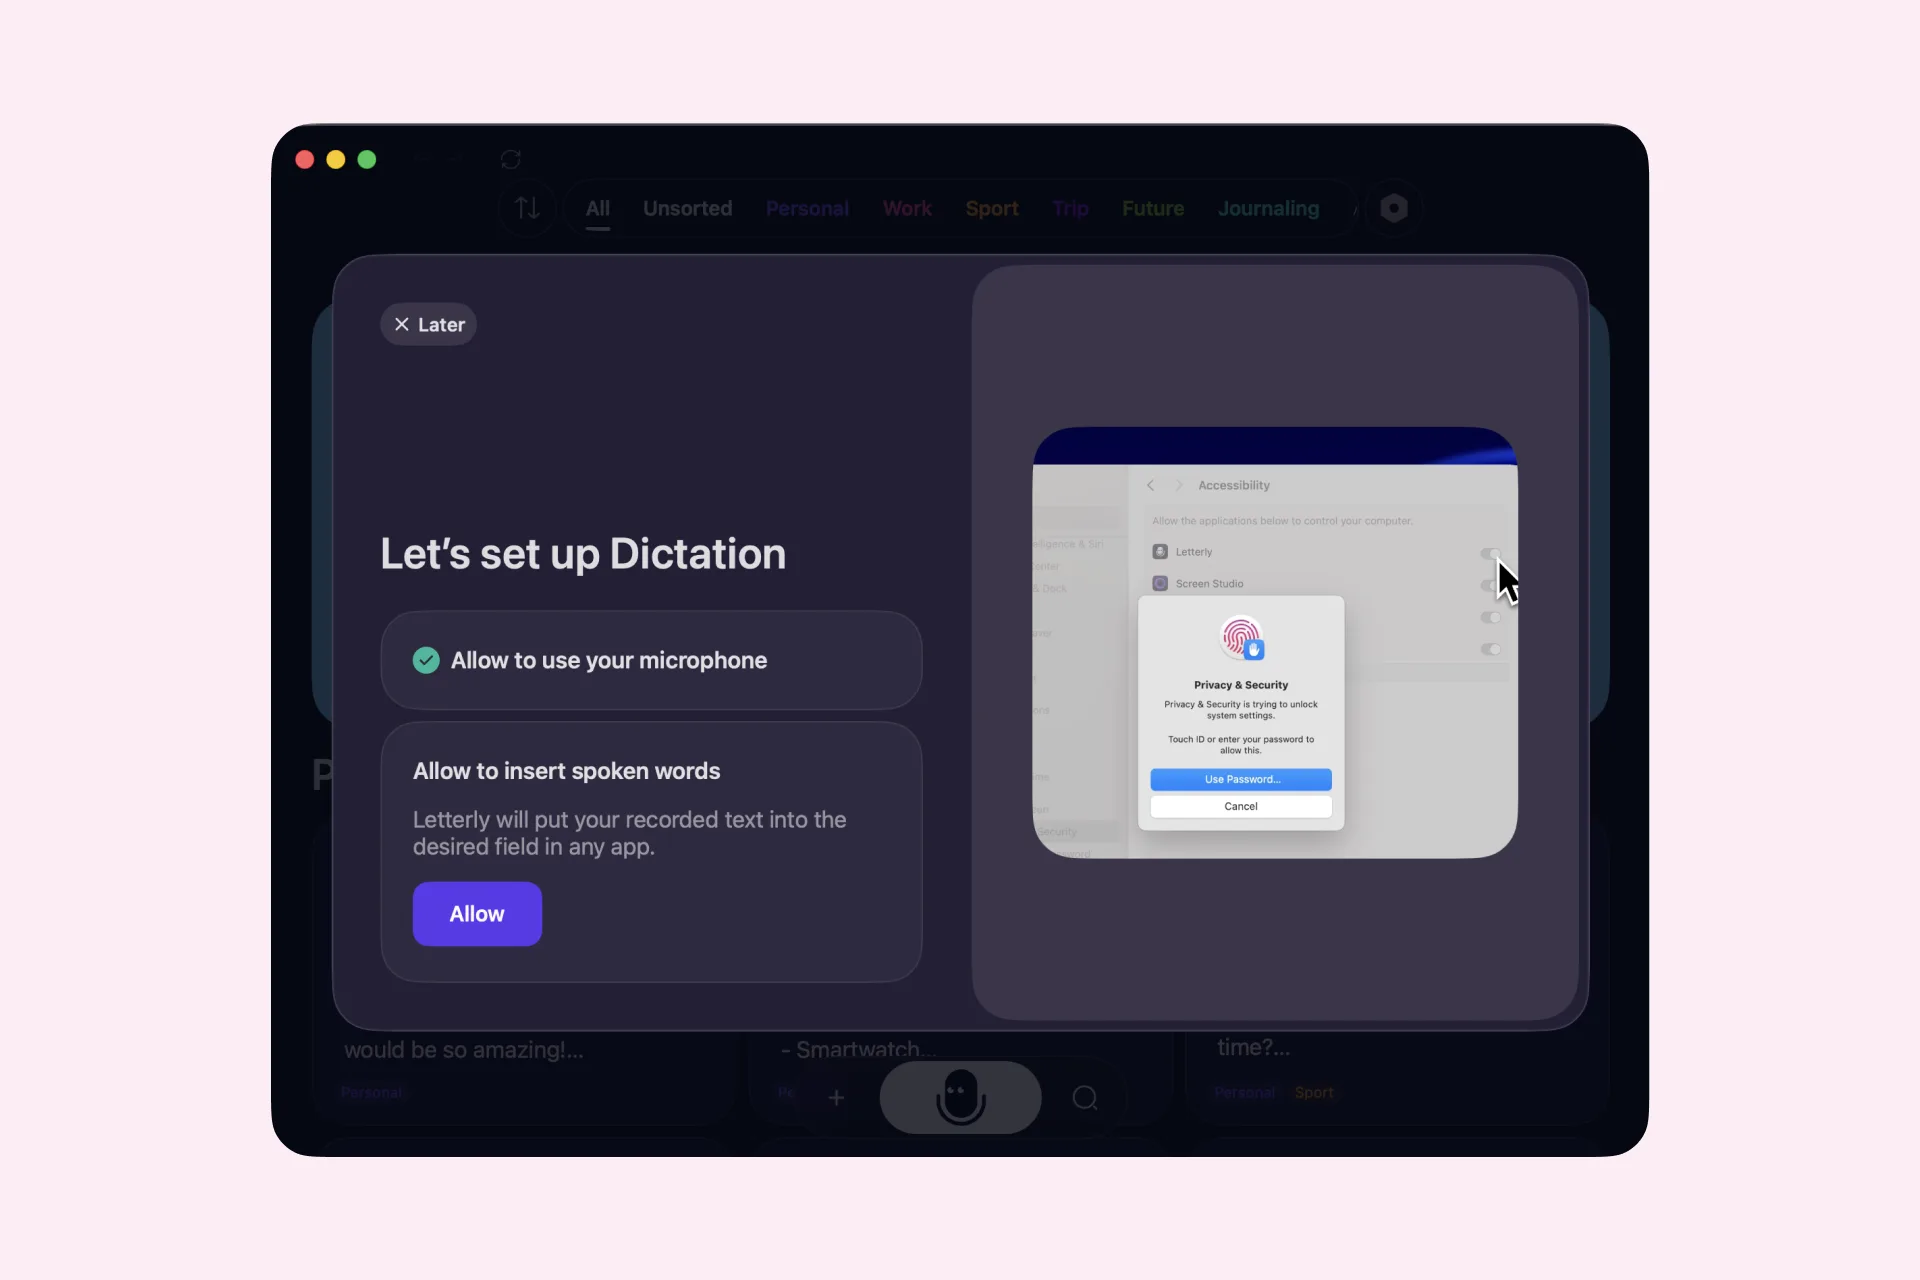
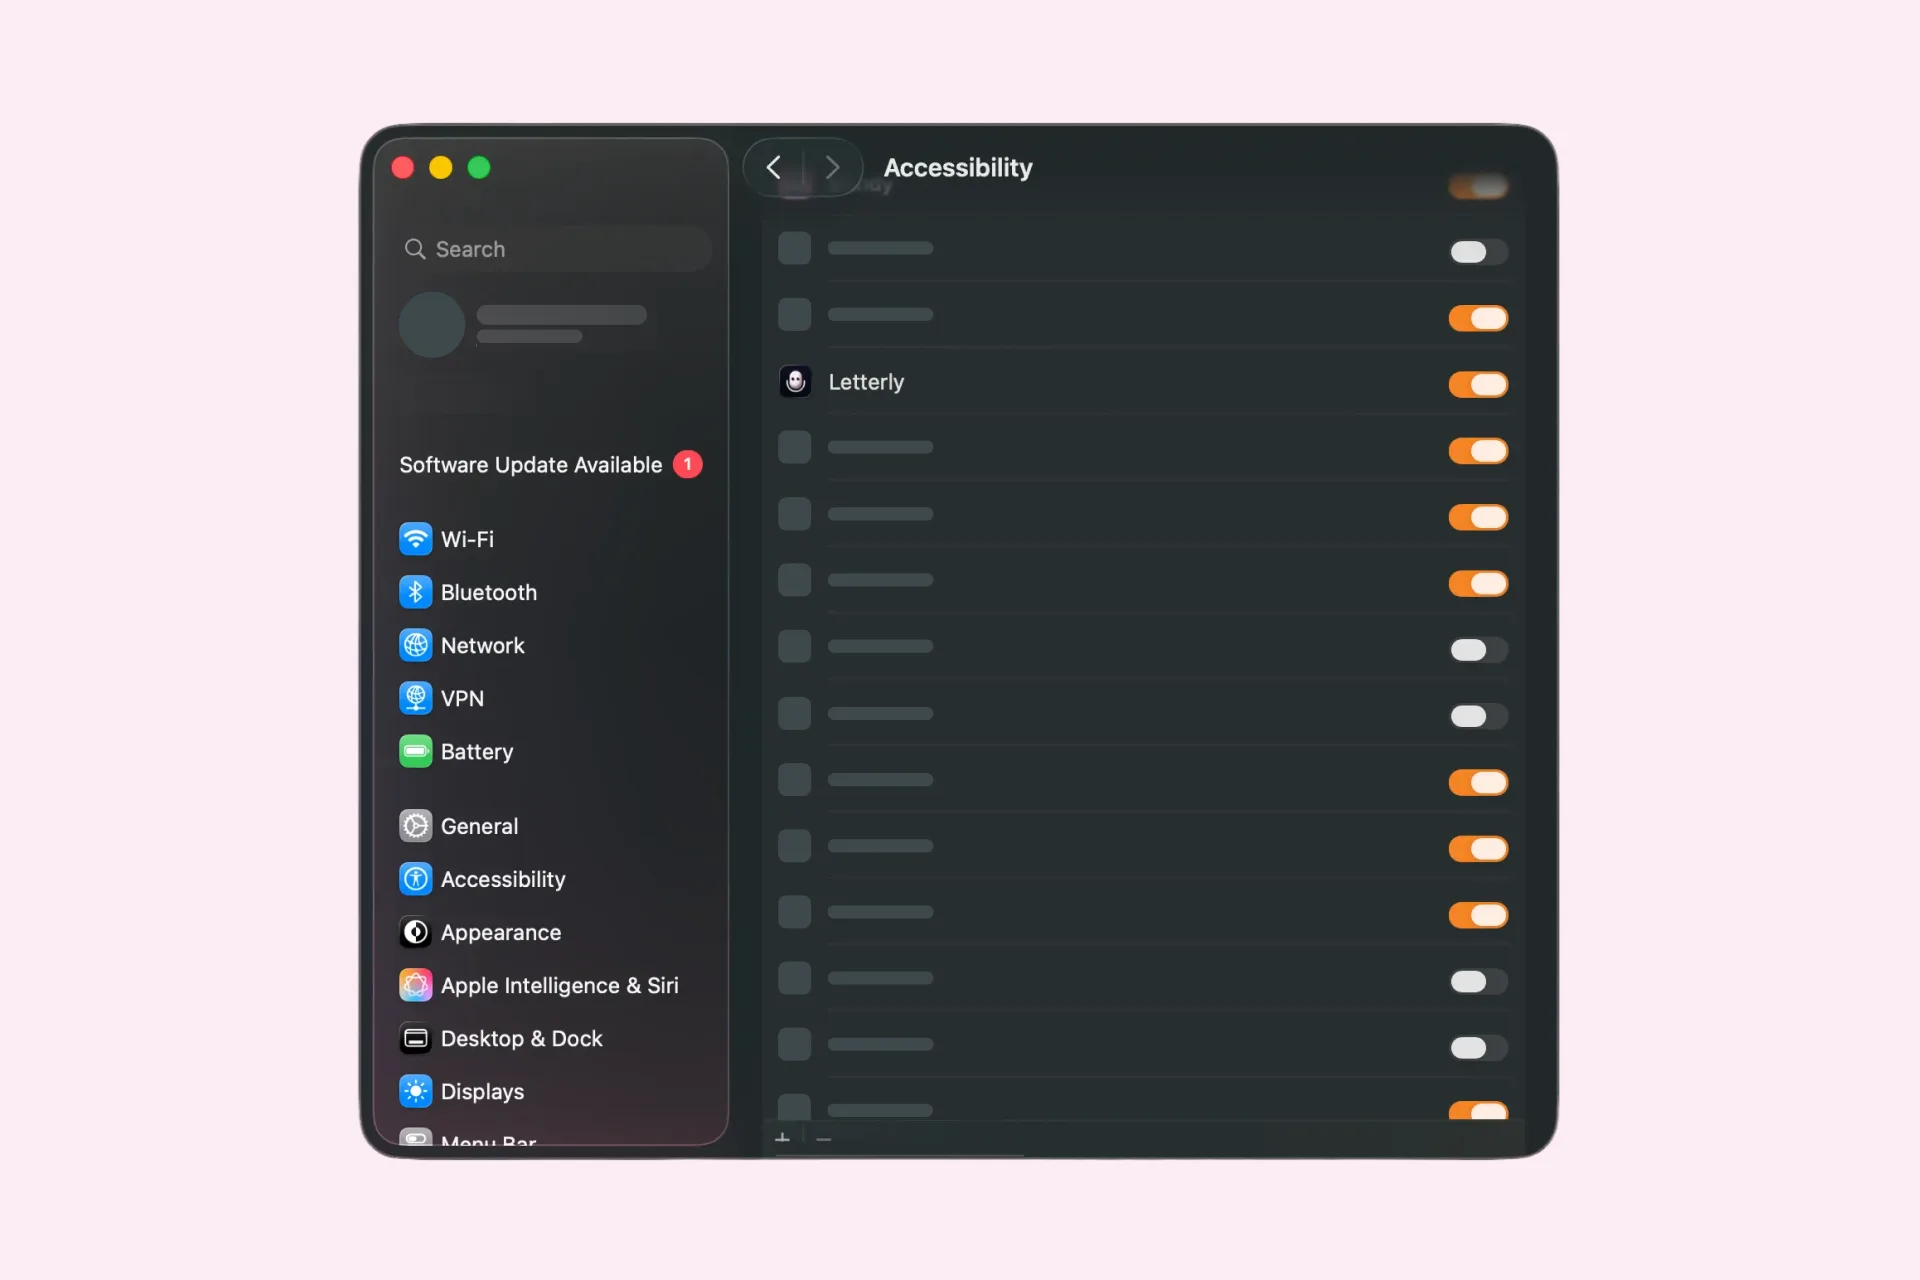
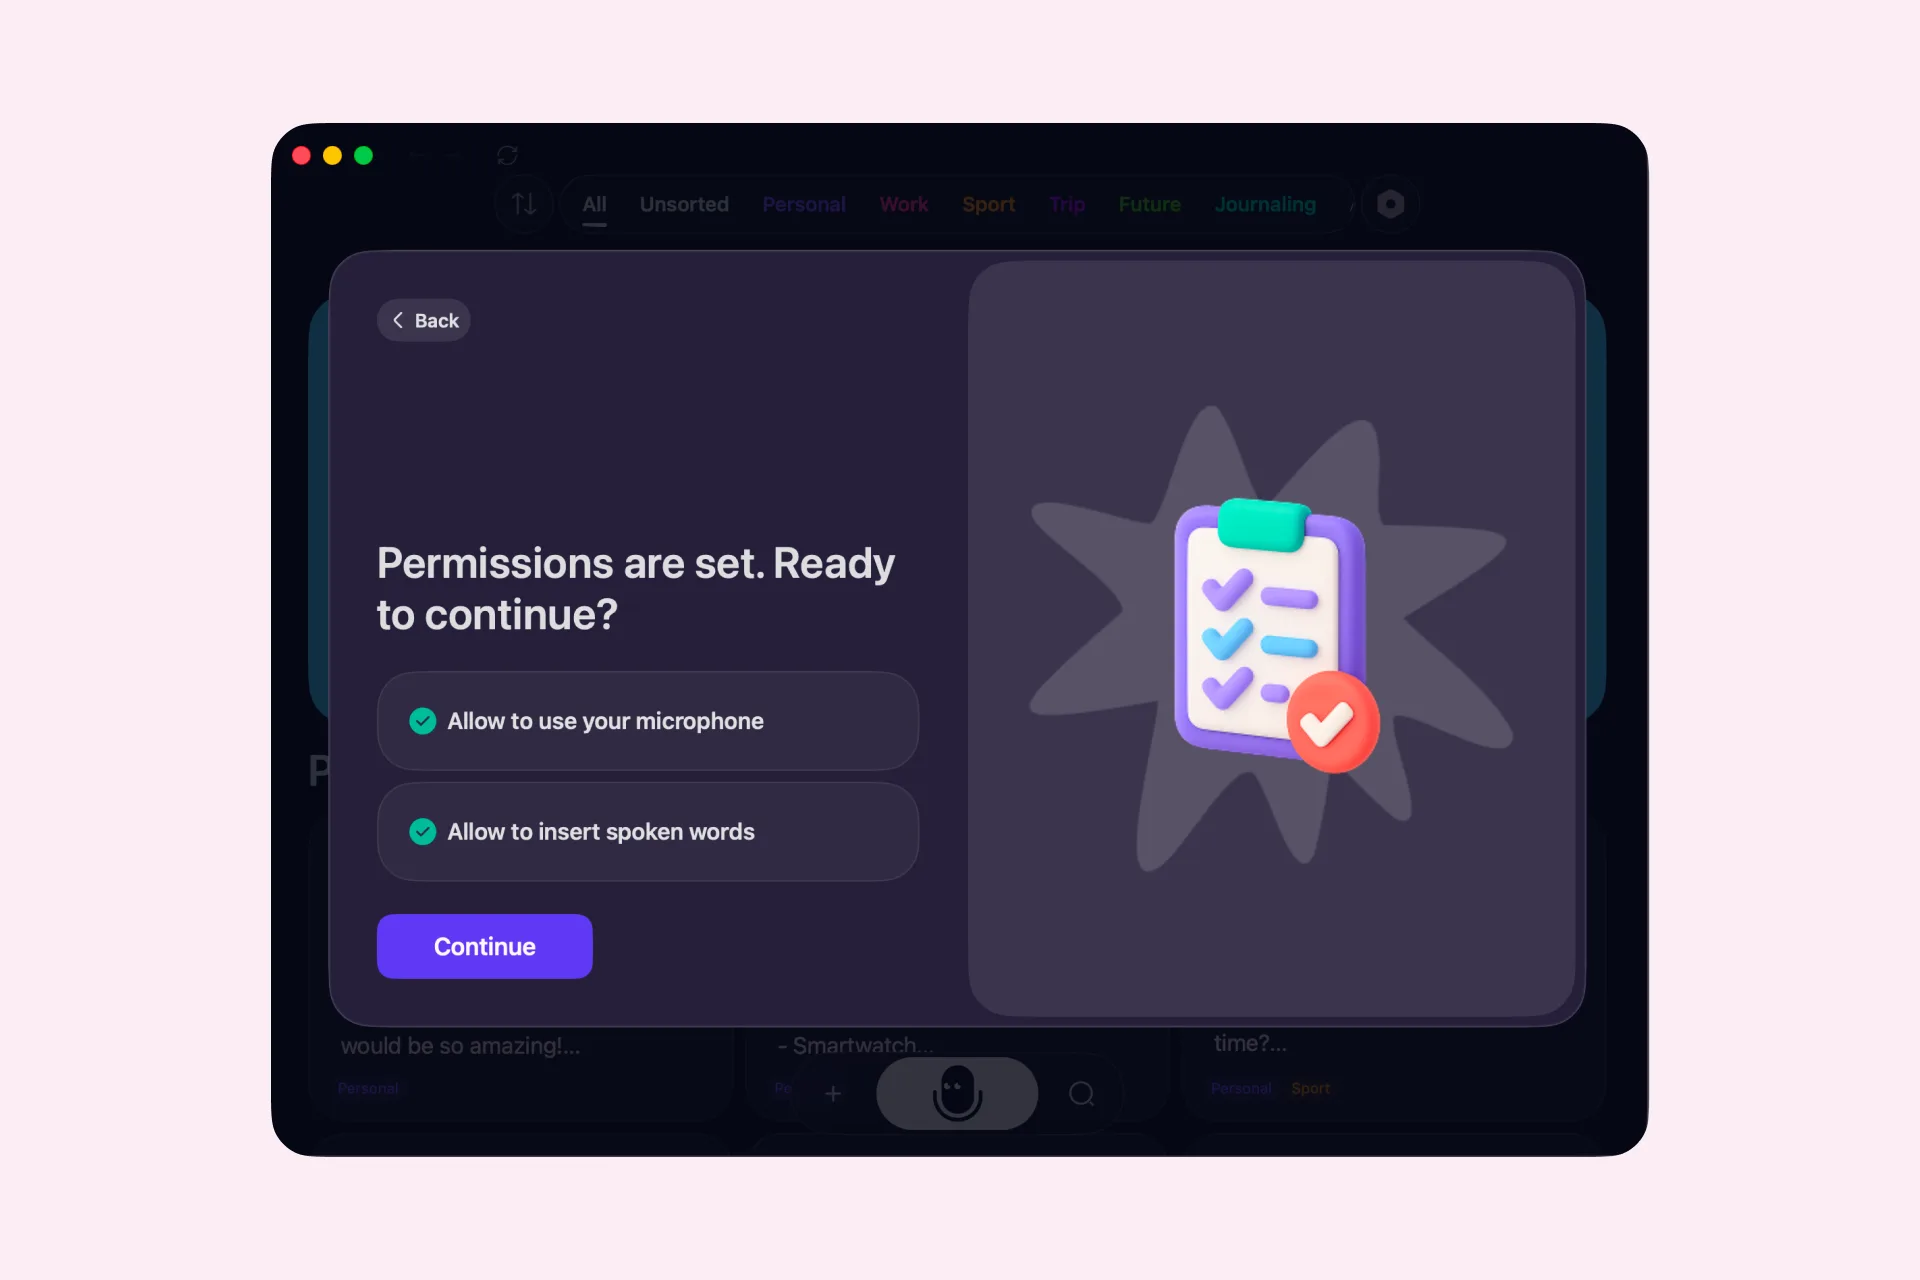
Picture 1 / 6
Customize Dictation
Open Settings → Dictation → Floating bar. You can come back and change these settings at any time.
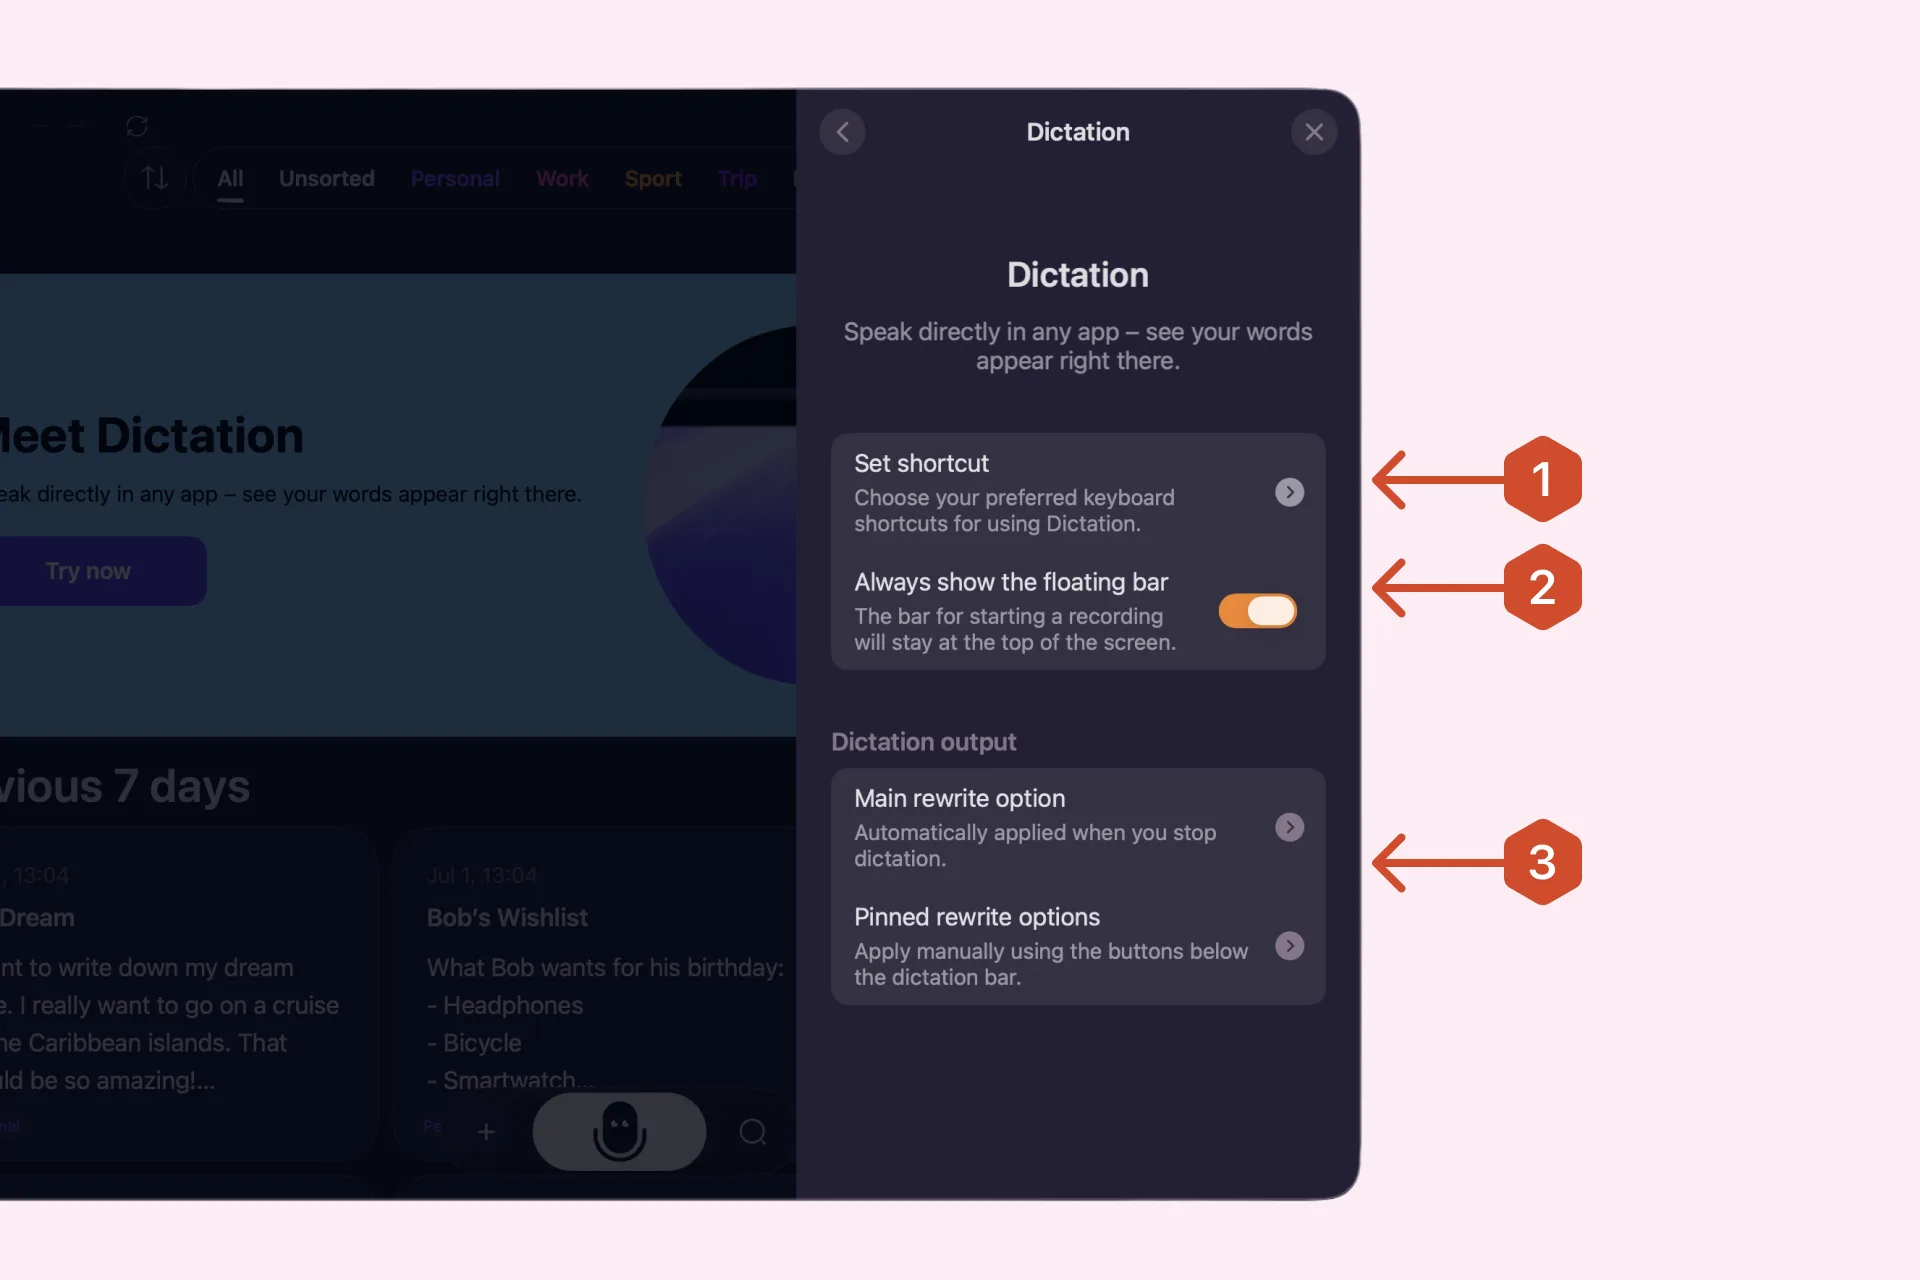
Set shortcut
By default, Dictation starts when you press F5. Hold it while speaking and release to stop, or tap once to start and again to stop. See Shortcuts.
Letterly does not support a modifier key such as Option or Command on its own.
The floating bar
A small control that stays on top of any window. Click it to start dictating without opening the app. It is optional — with it turned off, your shortcut still works.
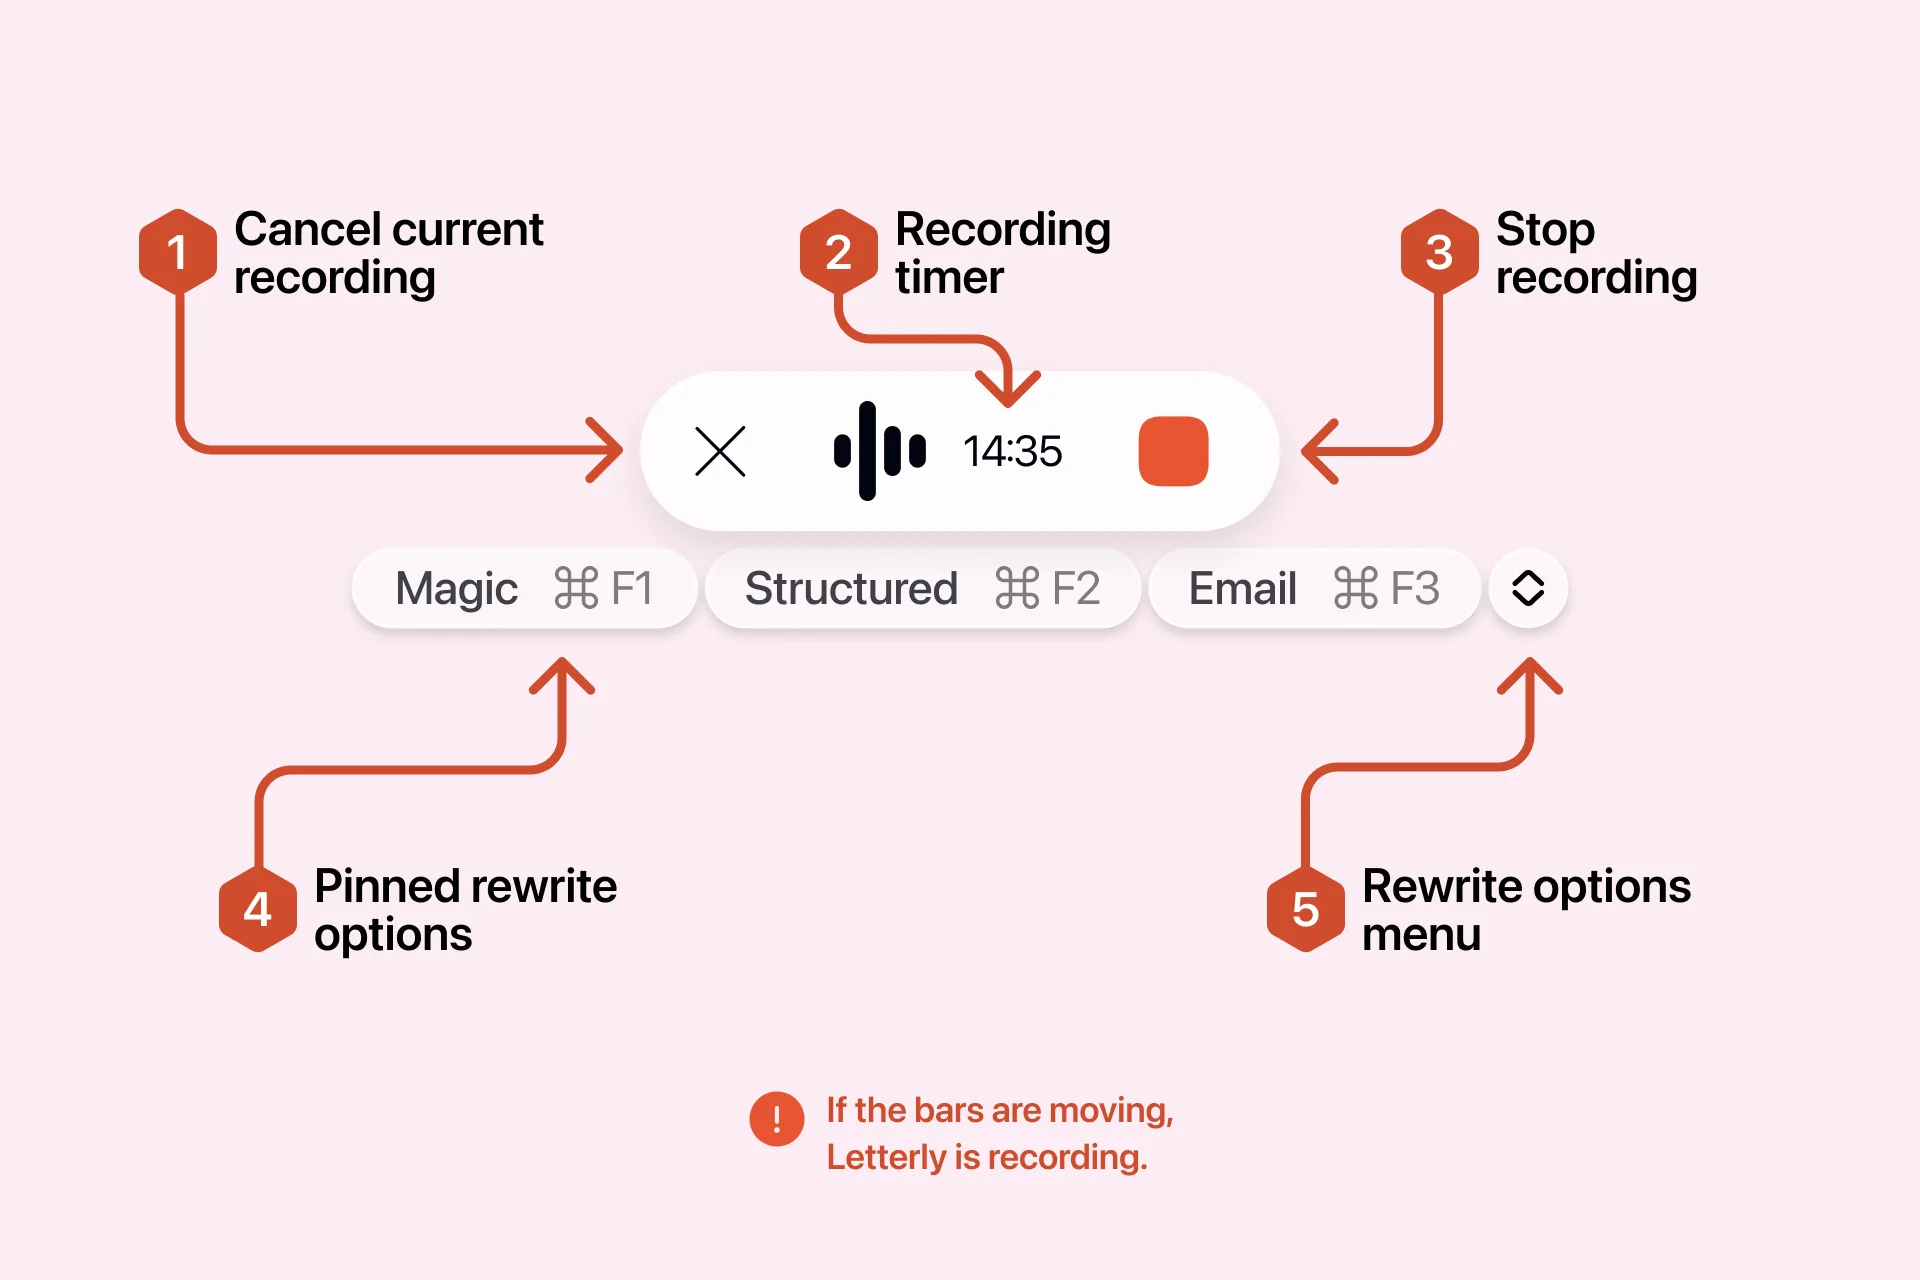
| Control | What it does |
|---|---|
| X | Discards the current dictation |
| Timer | Shows how much time you have left |
| Stop (red button) | Ends the recording and processes your text |
| Pinned rewrite options | Applies a rewrite option. Each one has a keyboard shortcut |
| Rewrite options menu | Opens the full list of rewrite options |
If the audio bars are moving, Letterly is listening. If they stay still while you speak, check that Letterly has microphone permission.
Dictation output
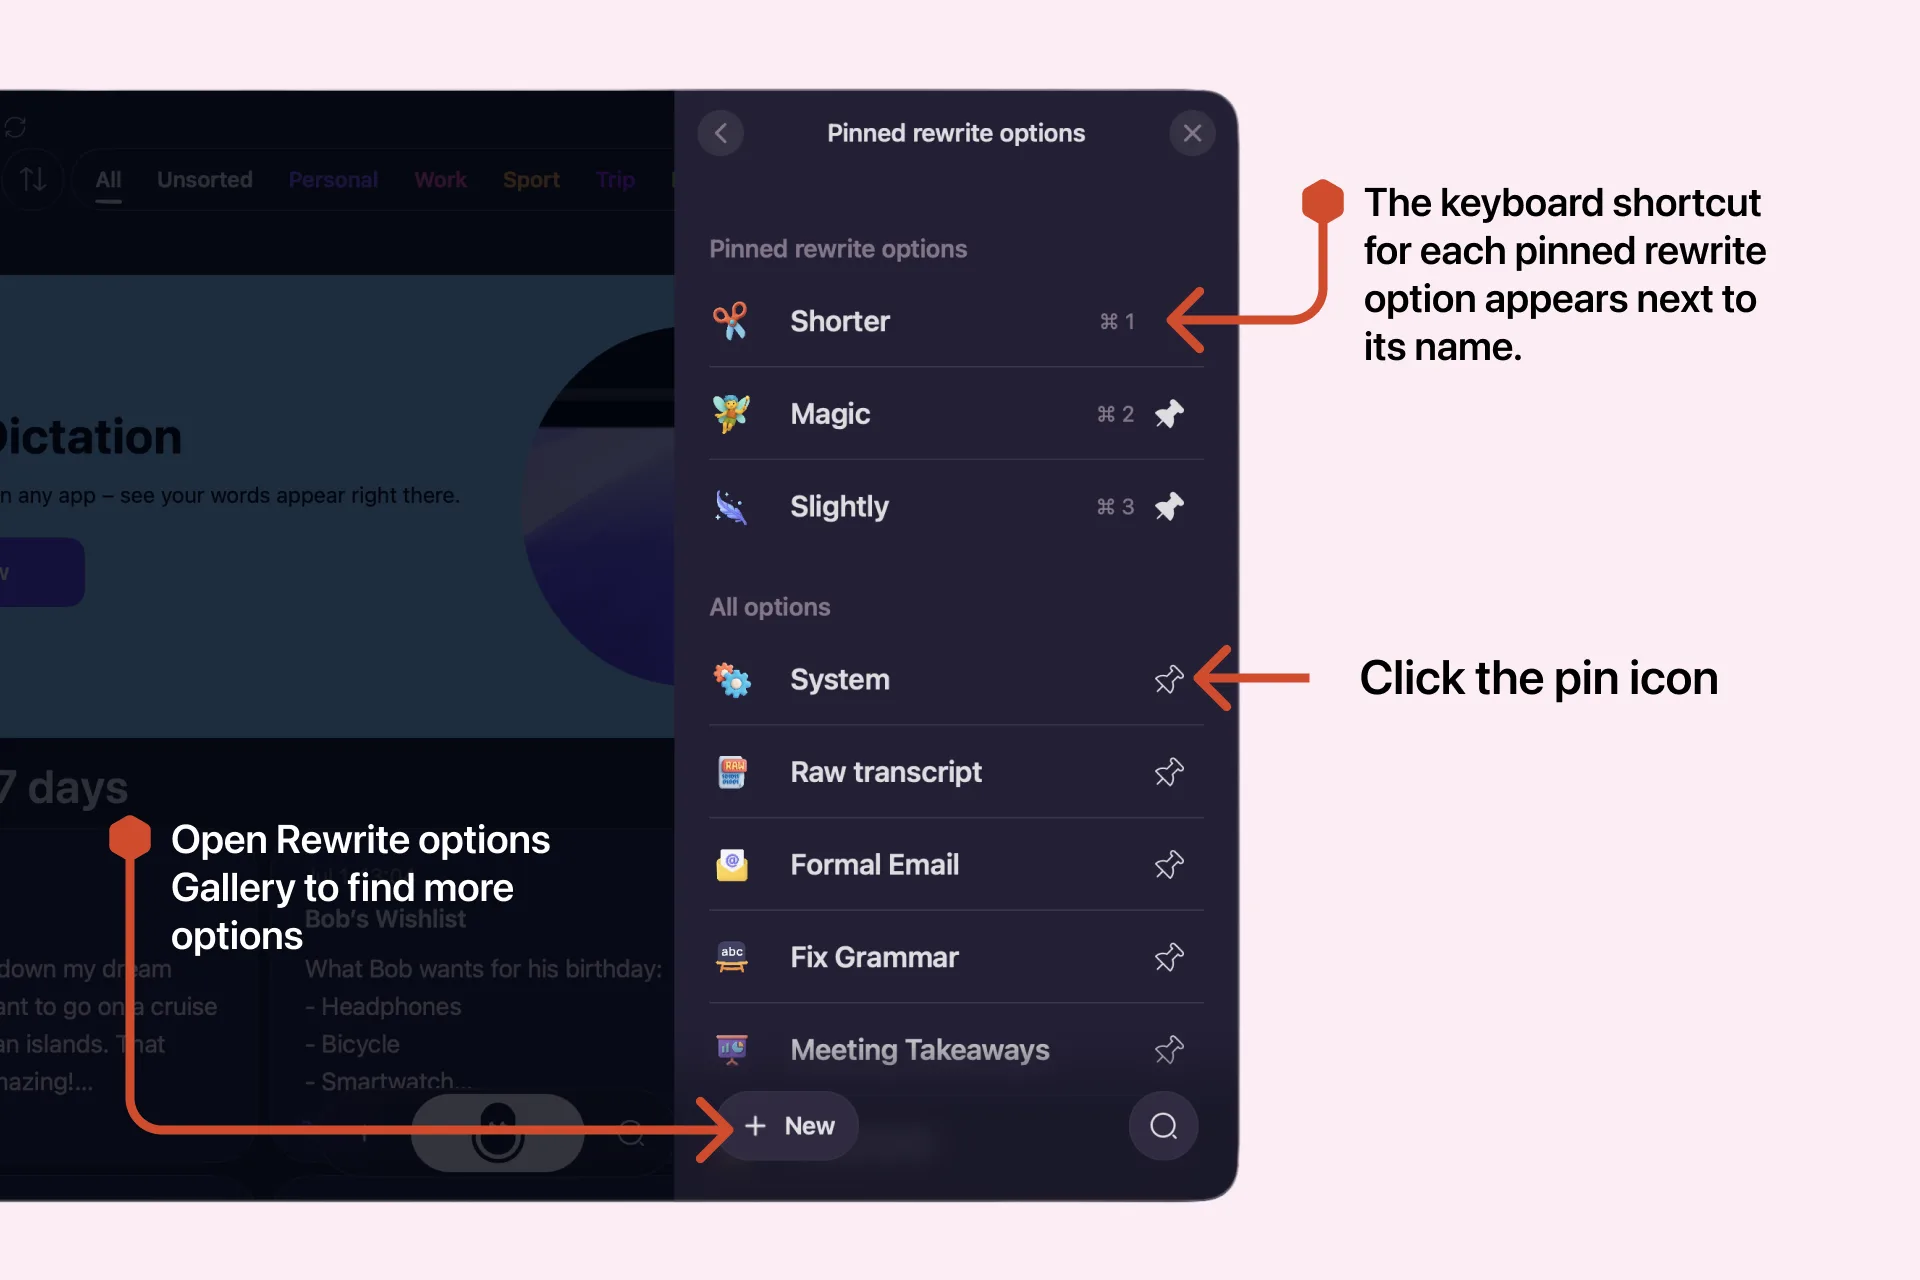
By default Letterly uses System, which keeps the text close to what you said while removing filler words and adding punctuation. Choose any option as your main one — Structured, List, Short Summary, Journal Entry — or pick Raw Transcript to keep your words untouched.
Pinned rewrite options sit right on the floating bar. Pin them in Settings → Dictation → Floating bar → Pinned rewrite options. See Dictation output.
Use Dictation
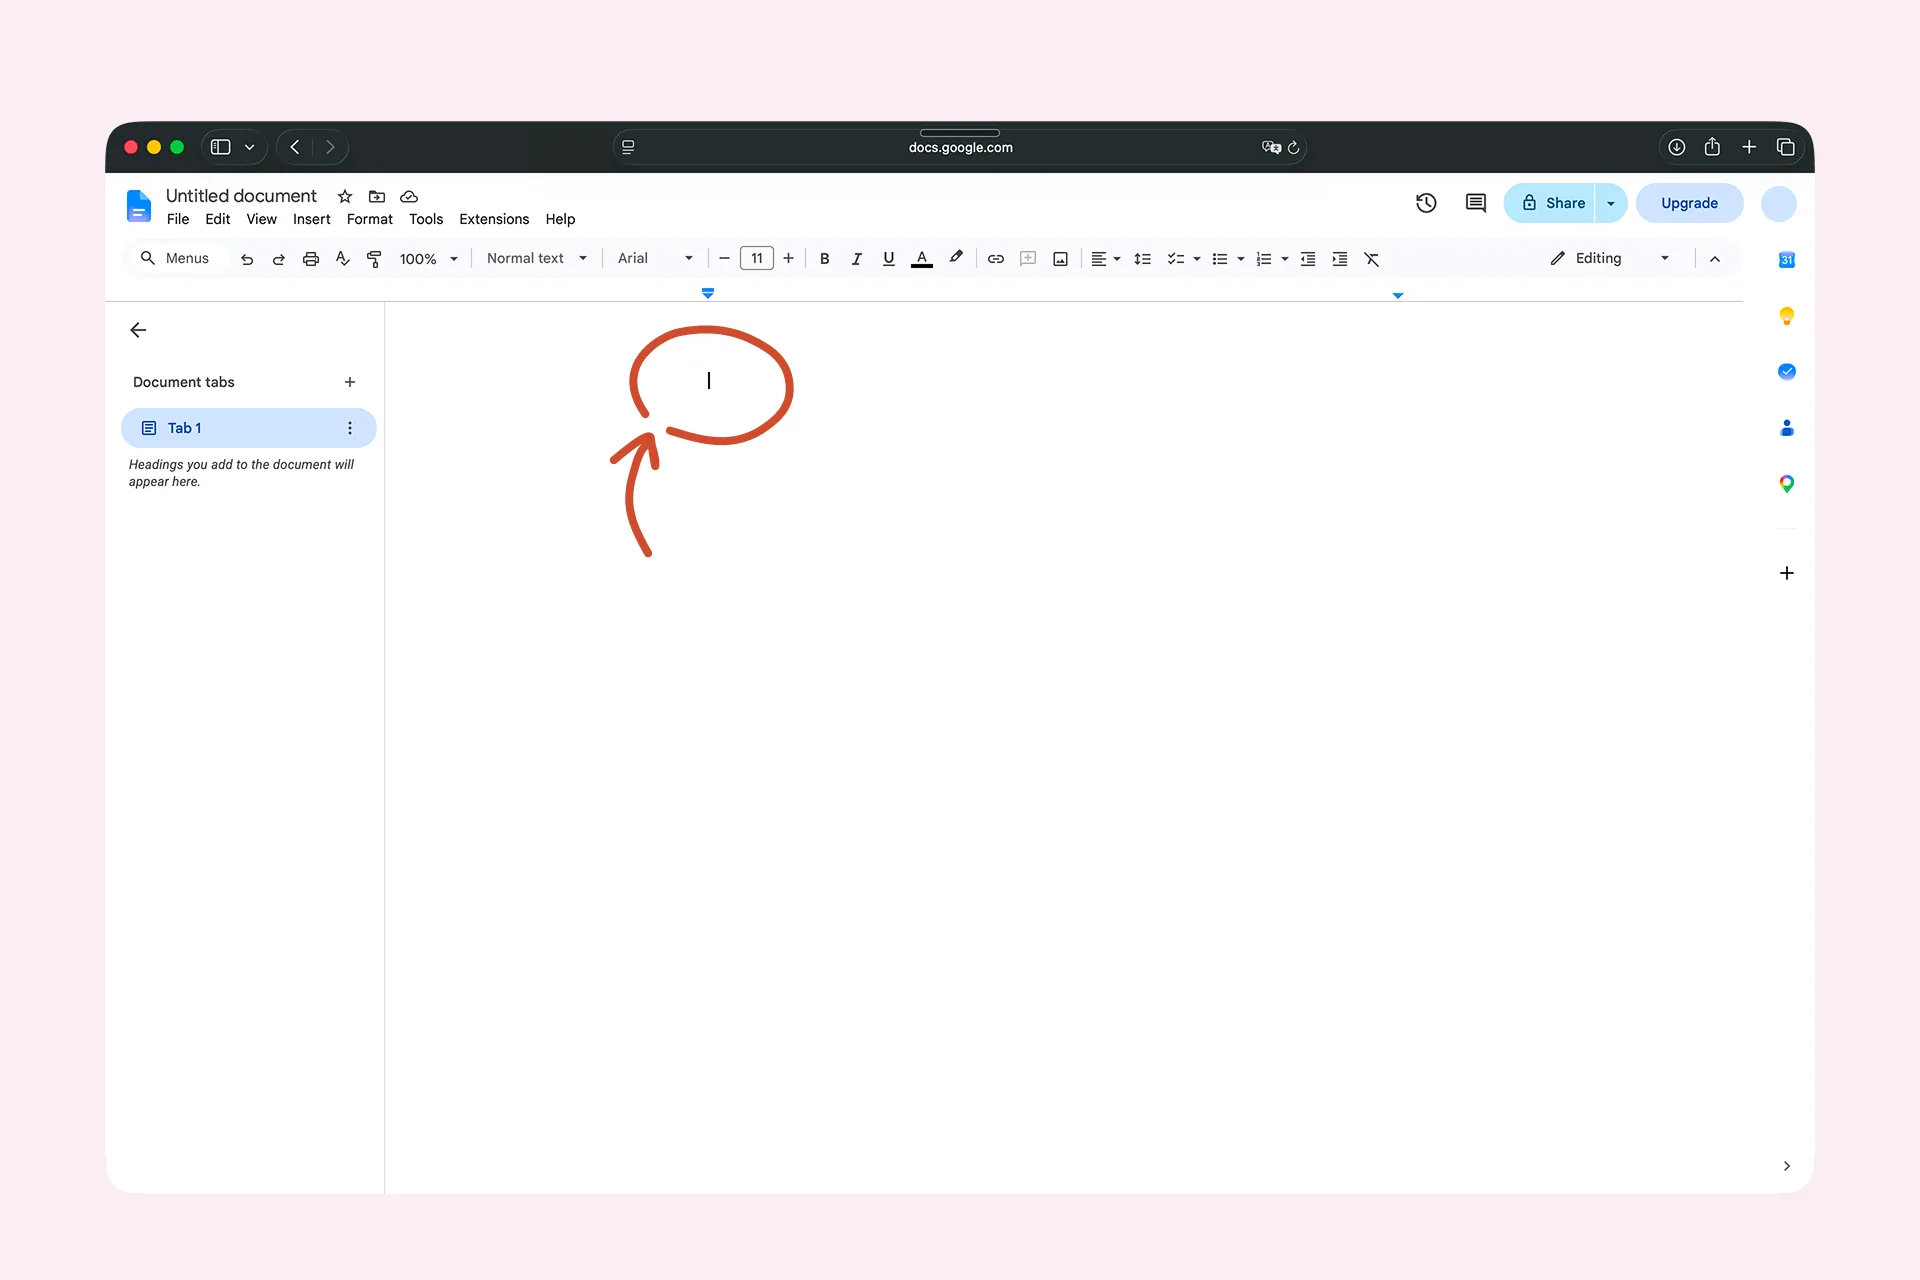
Click where you want the text to appear — an email, a message, a document — then press your shortcut or click the floating bar.
A single dictation can be up to 15 minutes. Need longer? Record a note in the app instead — up to 90 minutes.
If there is no active cursor, Letterly does not know where to insert the text, so your dictation is copied to the clipboard instead. Place your cursor and press Command + V.
Dictation history
Every dictation is saved in Settings → Dictation → History, where you can view or copy it.
Dictation History stays on the device where it was created and does not sync to your other devices.
Learn more about Dictation History →This guide takes you from nothing to your first dictation on Windows, and then through the settings that shape the text you get.
Install Letterly
Get Letterly from the Microsoft Store and open it. Full details: Download & install.
Sign in
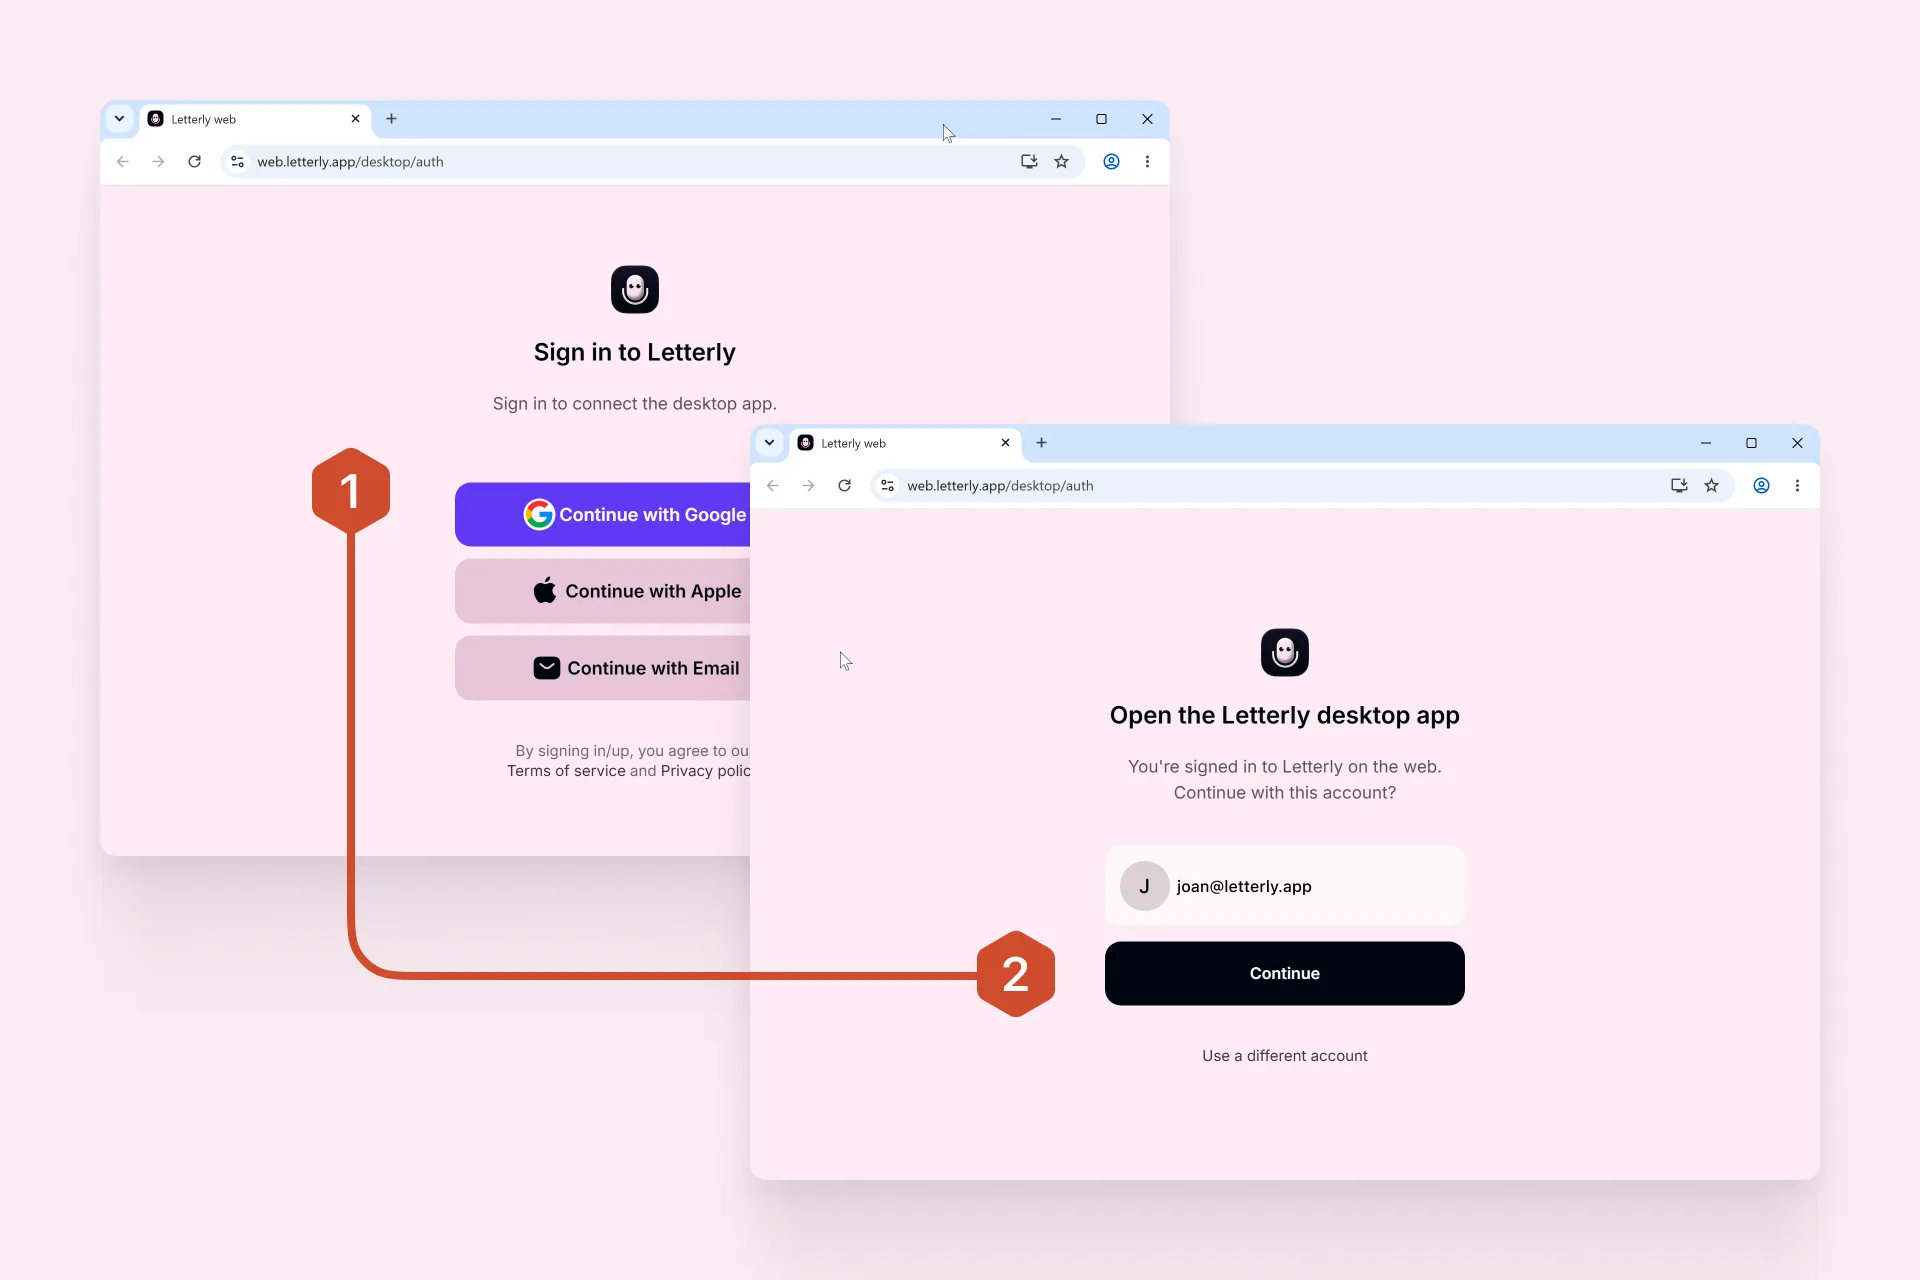
Letterly on Windows works only with an account, so signing in is the first thing that happens. The app opens the sign-in page in your web browser.
- Choose Continue with Google, Continue with Apple, or Continue with Email.
- On the Open the Letterly desktop app screen, check the account and click Continue.
- The desktop app opens on its own and takes you to the Dictation setup.
If you already have a subscription, sign in with the email you bought it with. Otherwise you start on the Free plan.
Learn more about plans →Open Dictation
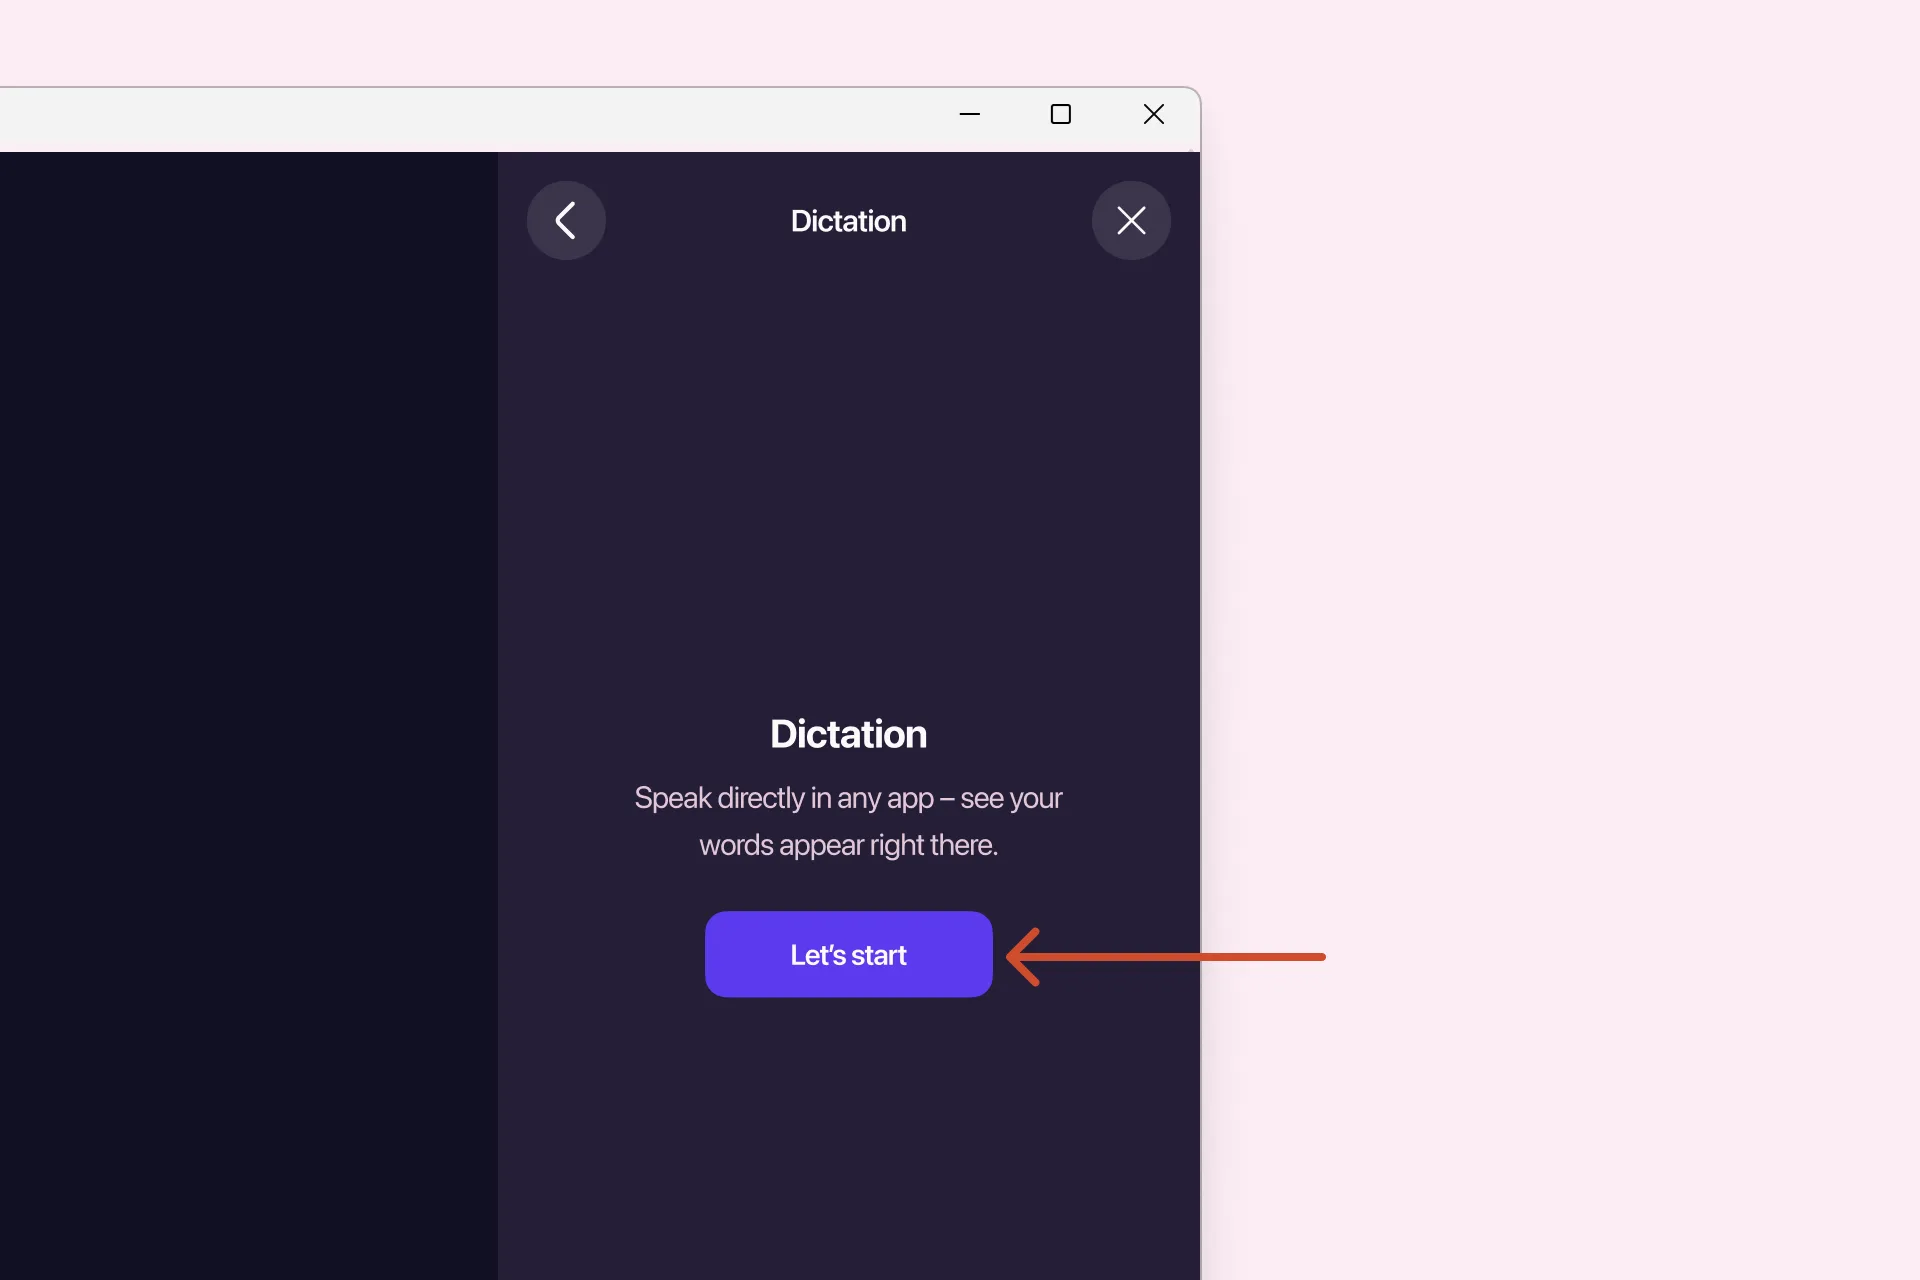
After signing in, the app takes you straight to the Dictation setup. If you closed it, open Settings → Dictation.
Allow permissions
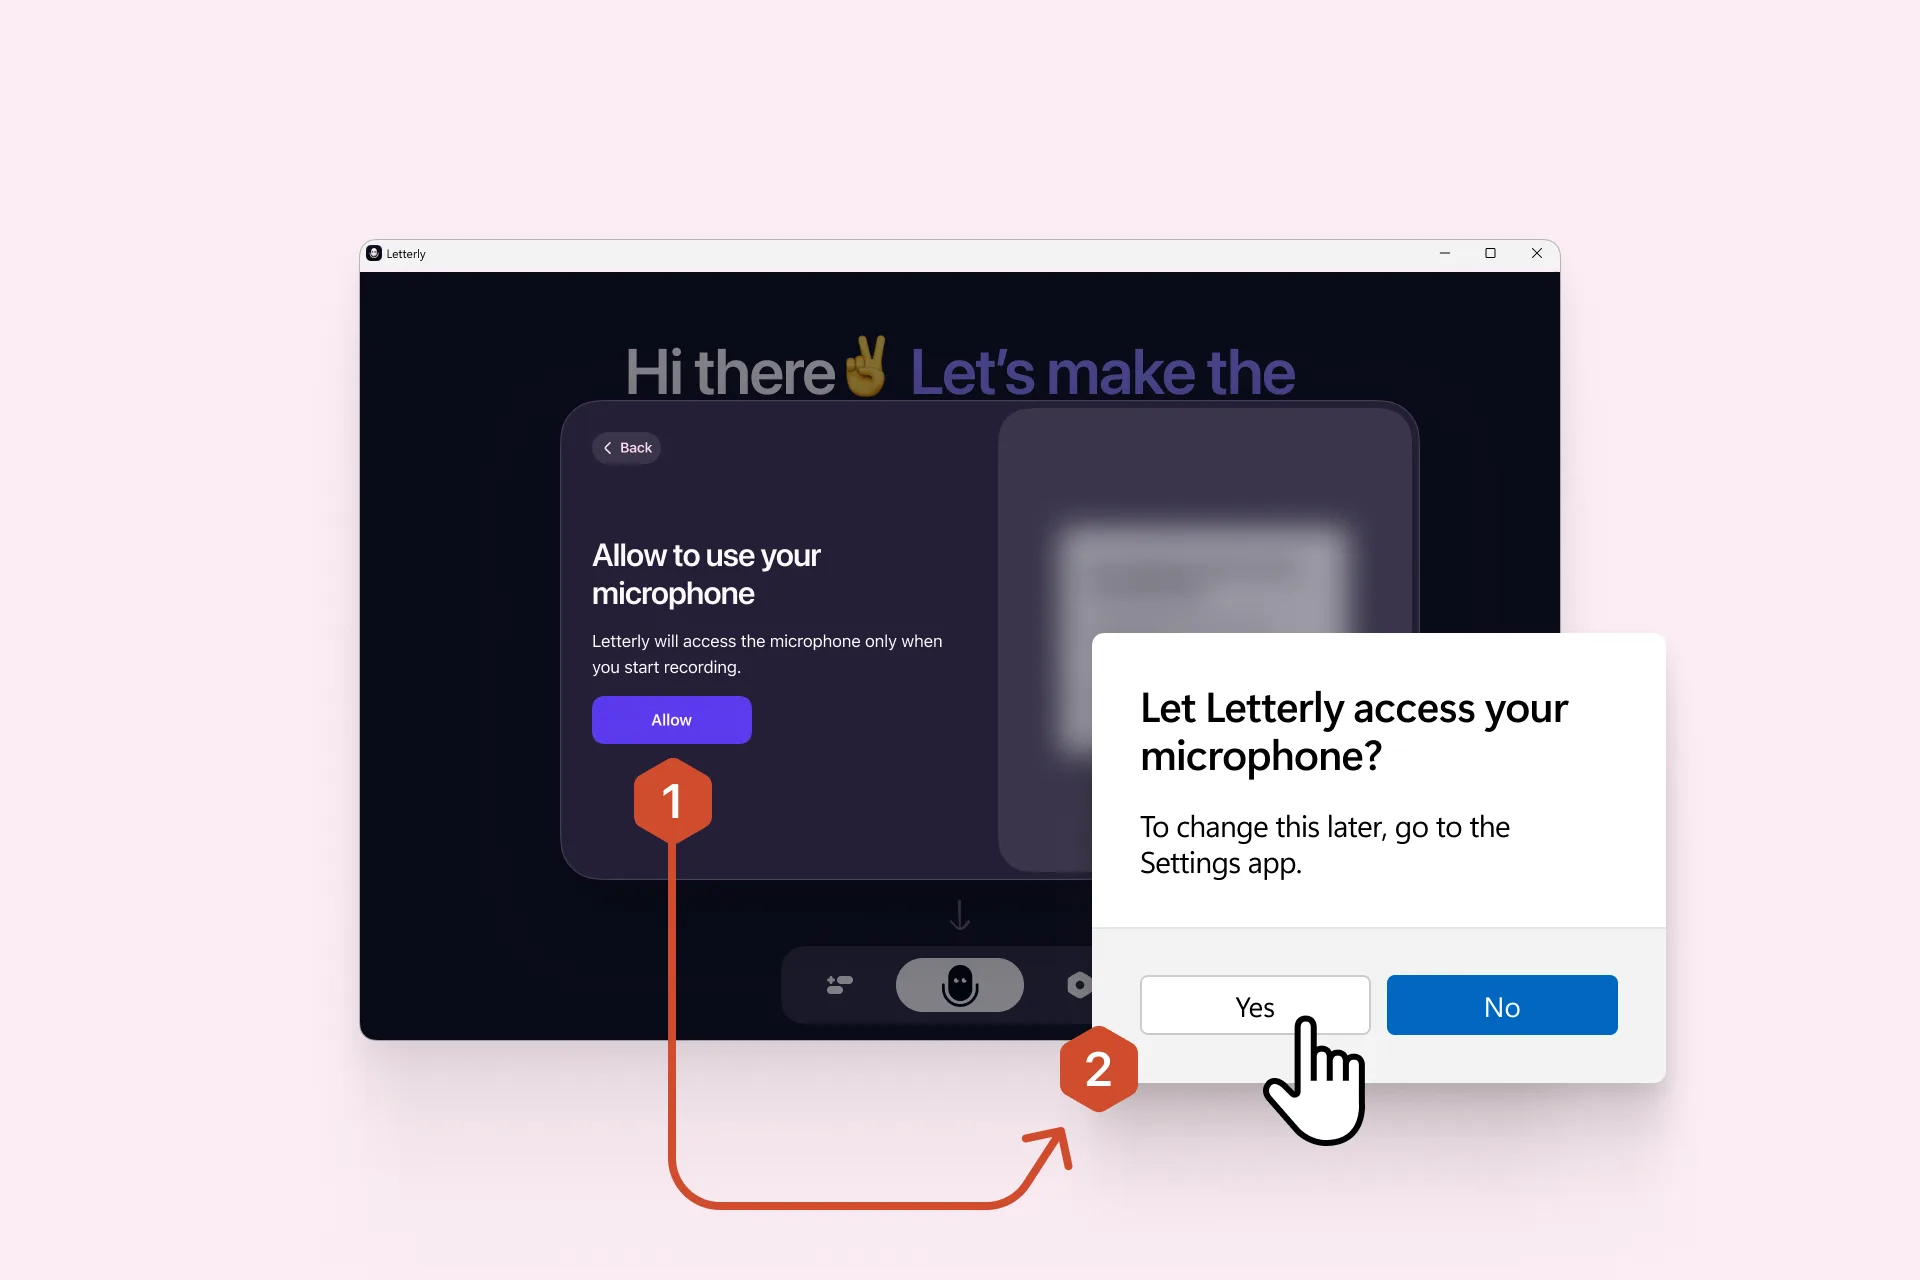
If you have used Letterly before, microphone access may already be enabled — this step is skipped automatically.
- Click Allow in Letterly.
- When the Windows permission window appears, click Yes.
Customize Dictation
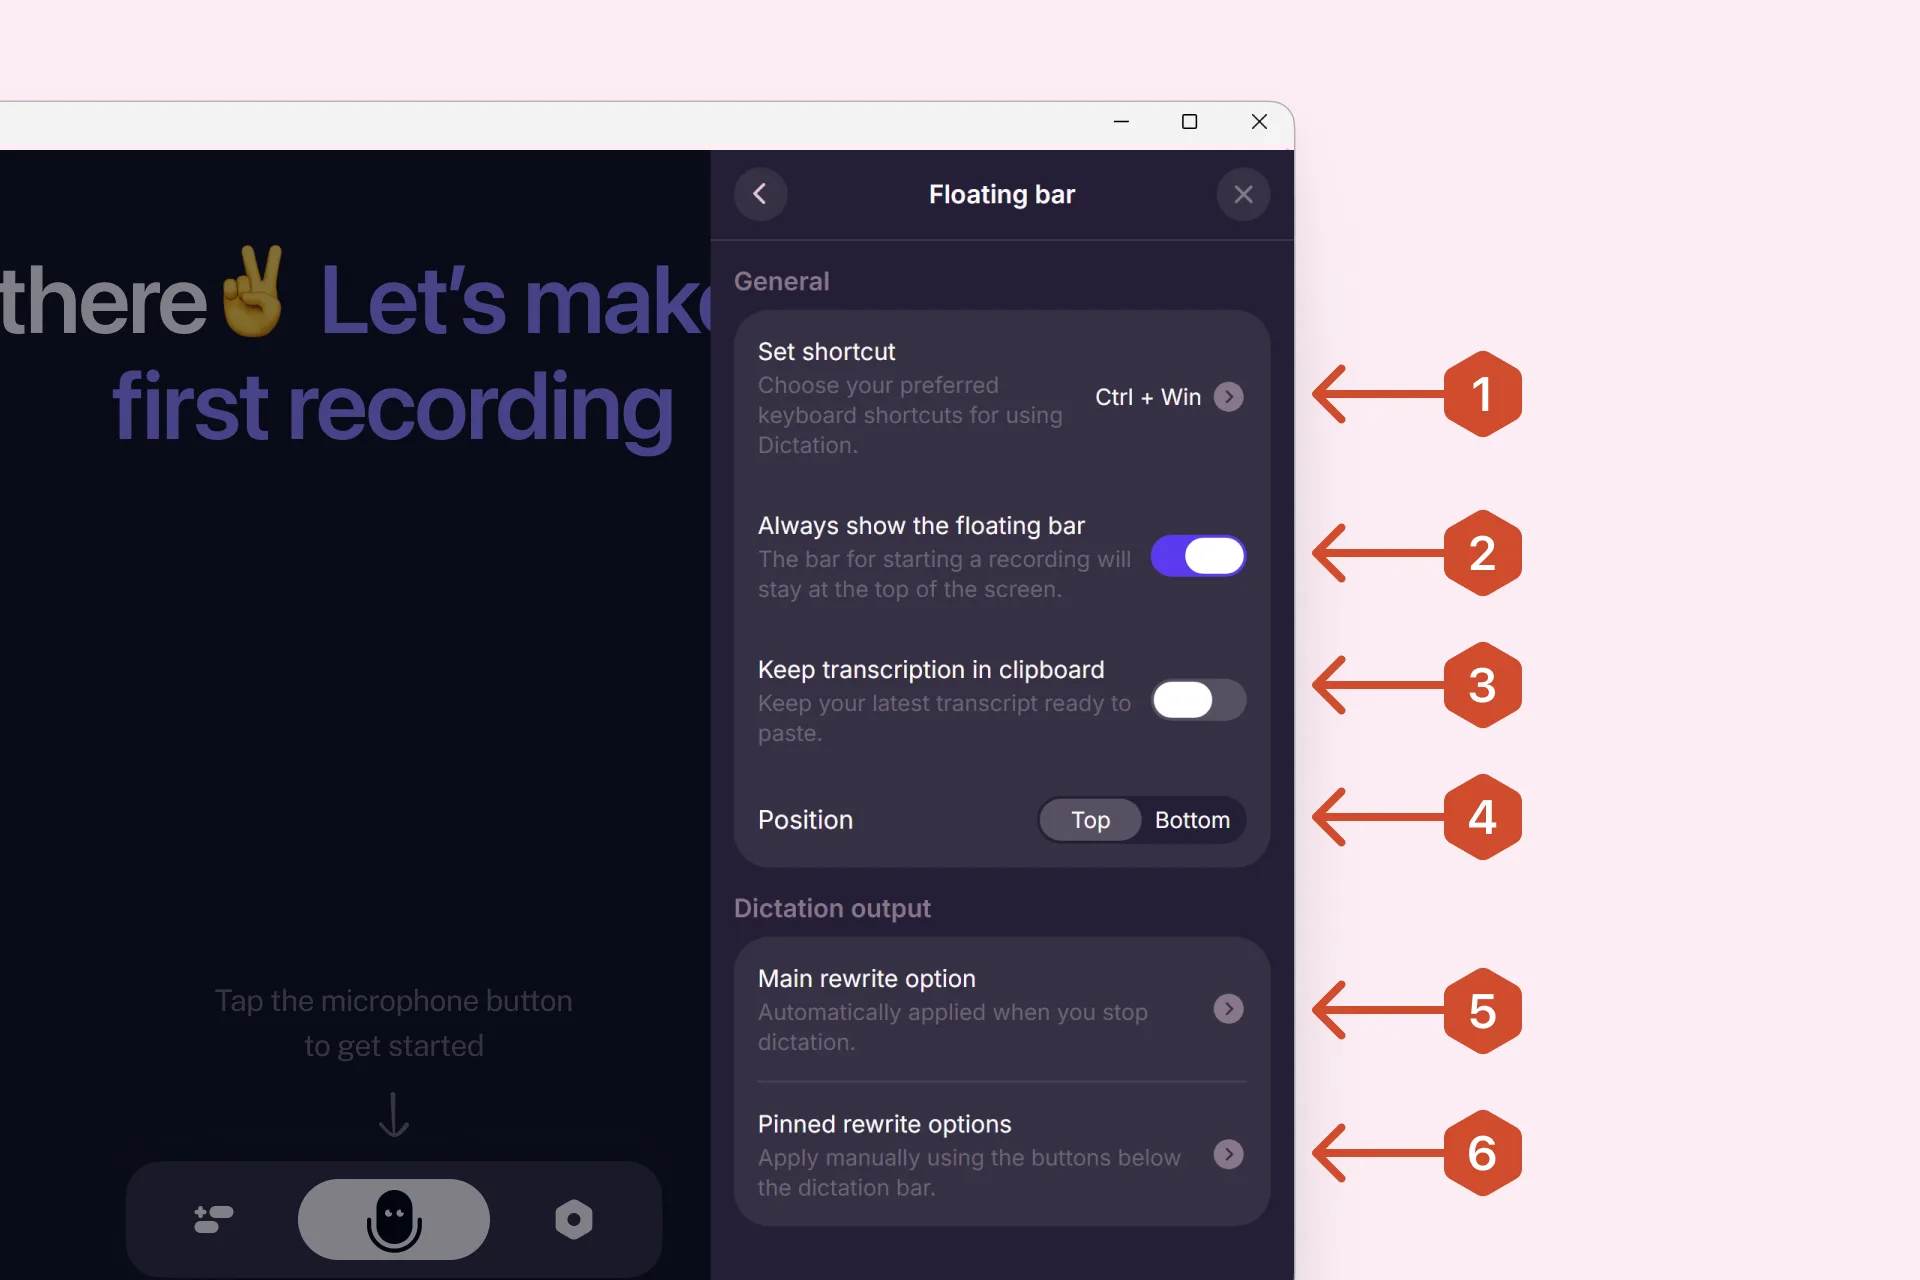
Open Settings → Dictation → Floating bar. Everything you can change about dictation lives here, top to bottom.
Set shortcut
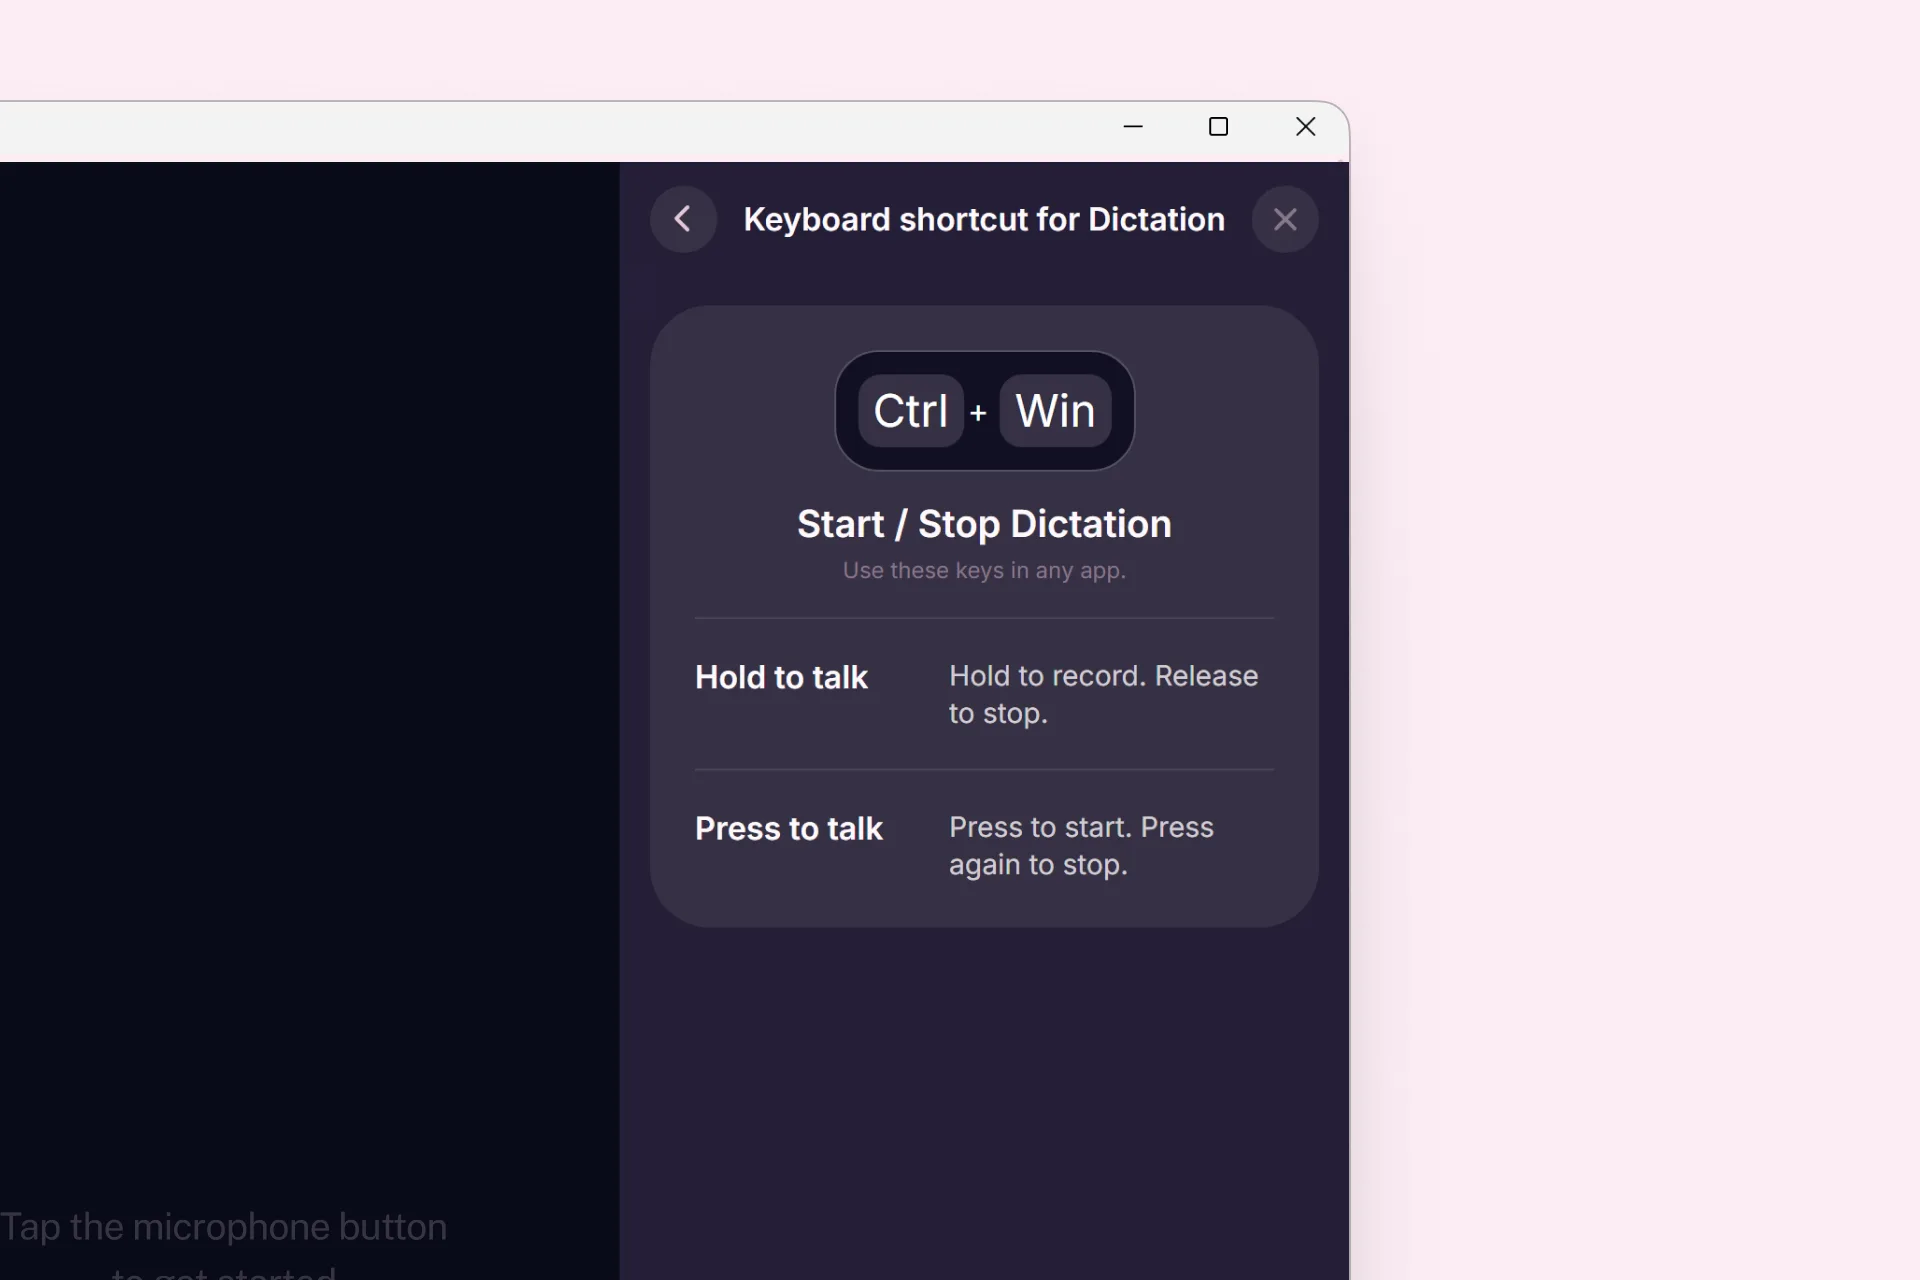
The key combination that starts dictation. The default is Ctrl + Win — hold it for something short, or press once to start and again to stop. See Shortcuts.
Always show the floating bar
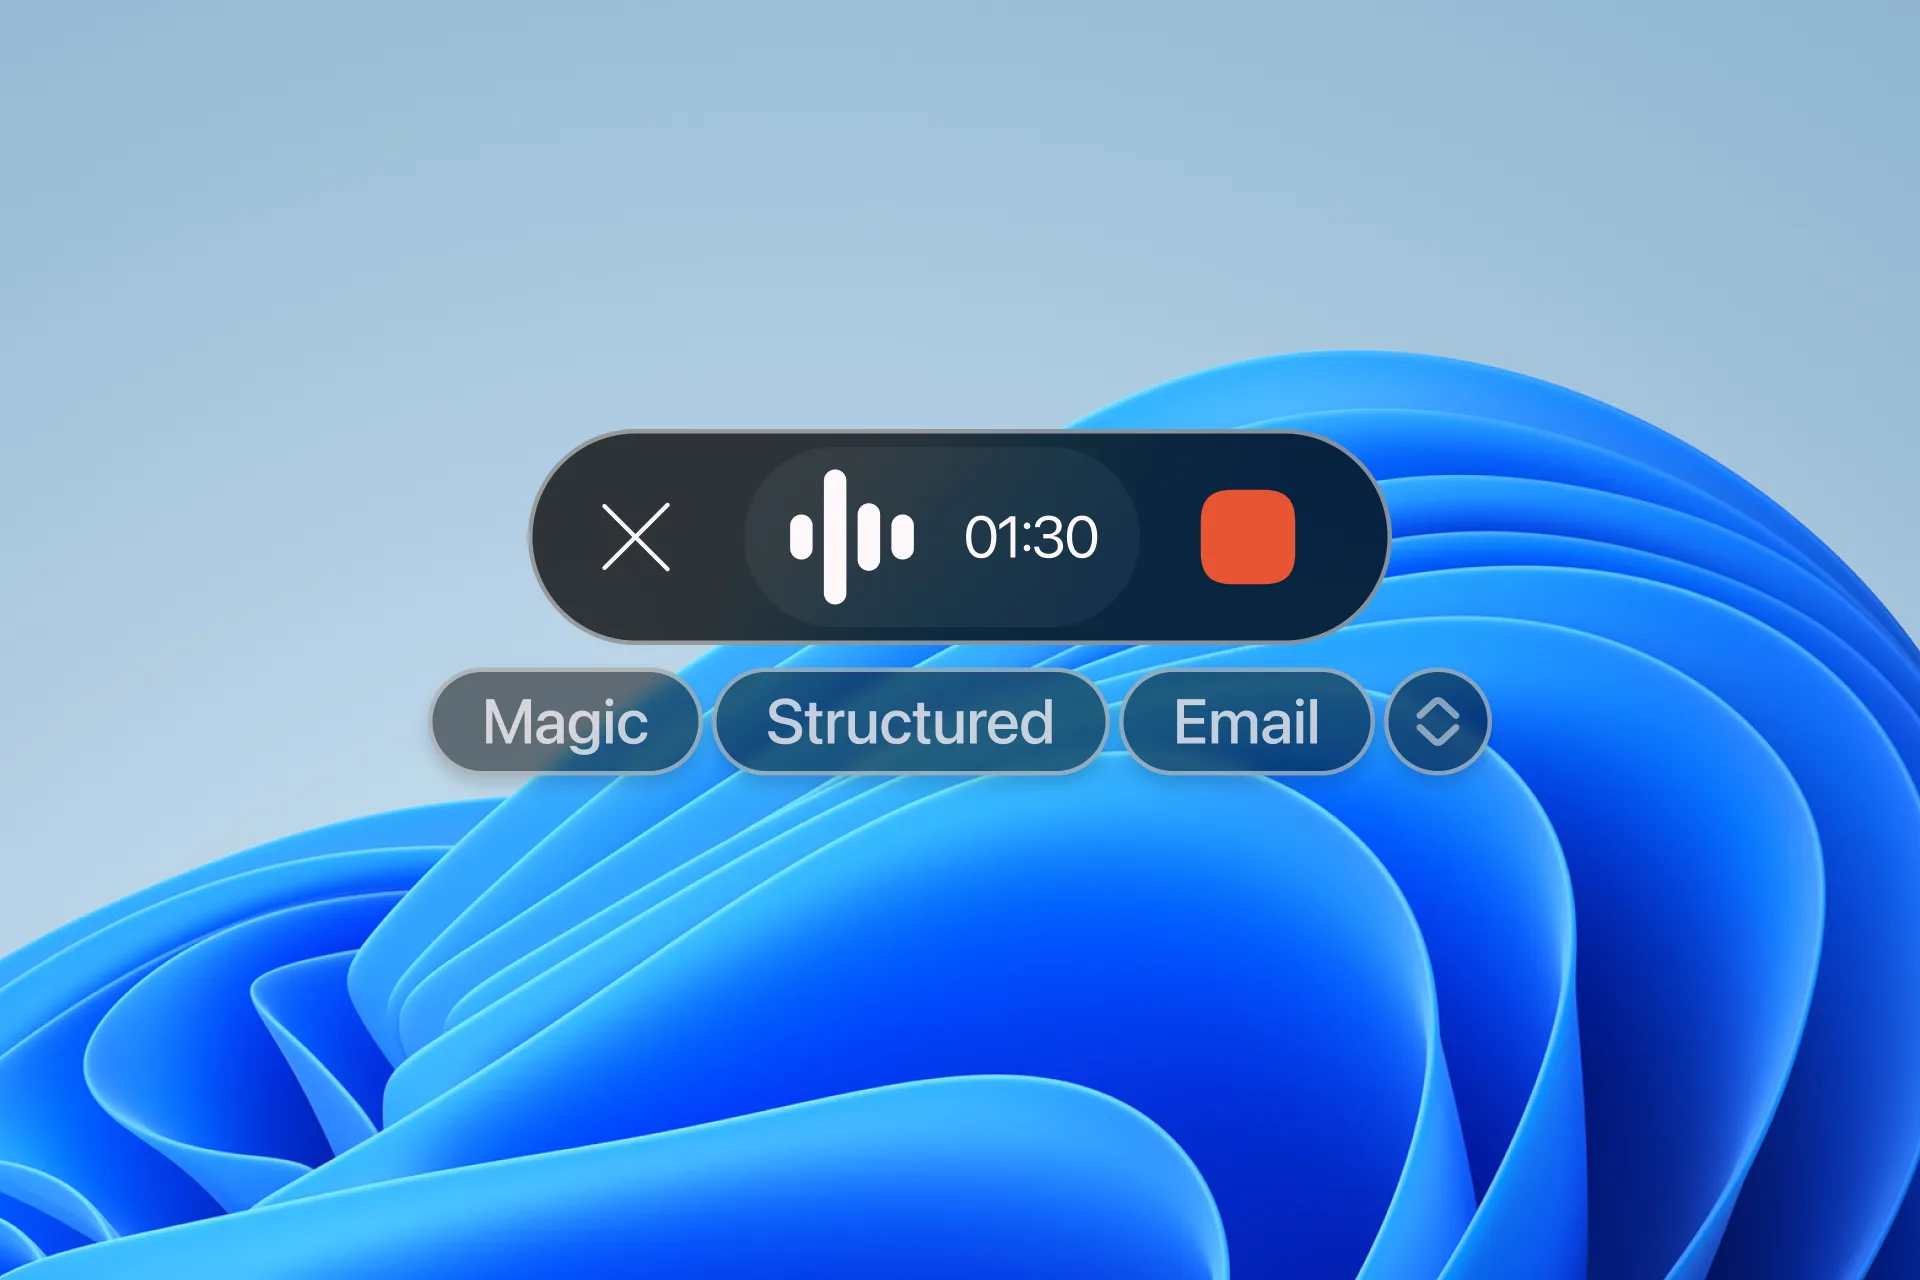
When on, the floating bar stays visible at all times. Turn it off if you would rather it only appear when needed — your shortcut still works either way.
Even when it is always on, the bar stays out of your way — a thin pill resting at the edge of the screen.
Keep transcription in clipboard
When this is on, every finished dictation is also copied to your clipboard, so the text is ready to paste with Ctrl + V. It works as a safety net: if there was no cursor in a text field, nothing is lost — click where you need it and paste.
Only the latest dictation is kept. Each new one replaces the previous.
Position
Where the bar sits on your screen: Top or Bottom. There is also Custom — pick it from the bar itself, then drag the bar anywhere.
Dictation output
By default Letterly uses System, which keeps the text close to what you said while removing filler words and adding punctuation. Choose any option as your main one, or pick Raw Transcript to keep your words untouched.
Pinned rewrite options sit right on the floating bar. Pin them in Settings → Dictation → Floating bar → Pinned rewrite options. See Dictation output.
Use Dictation
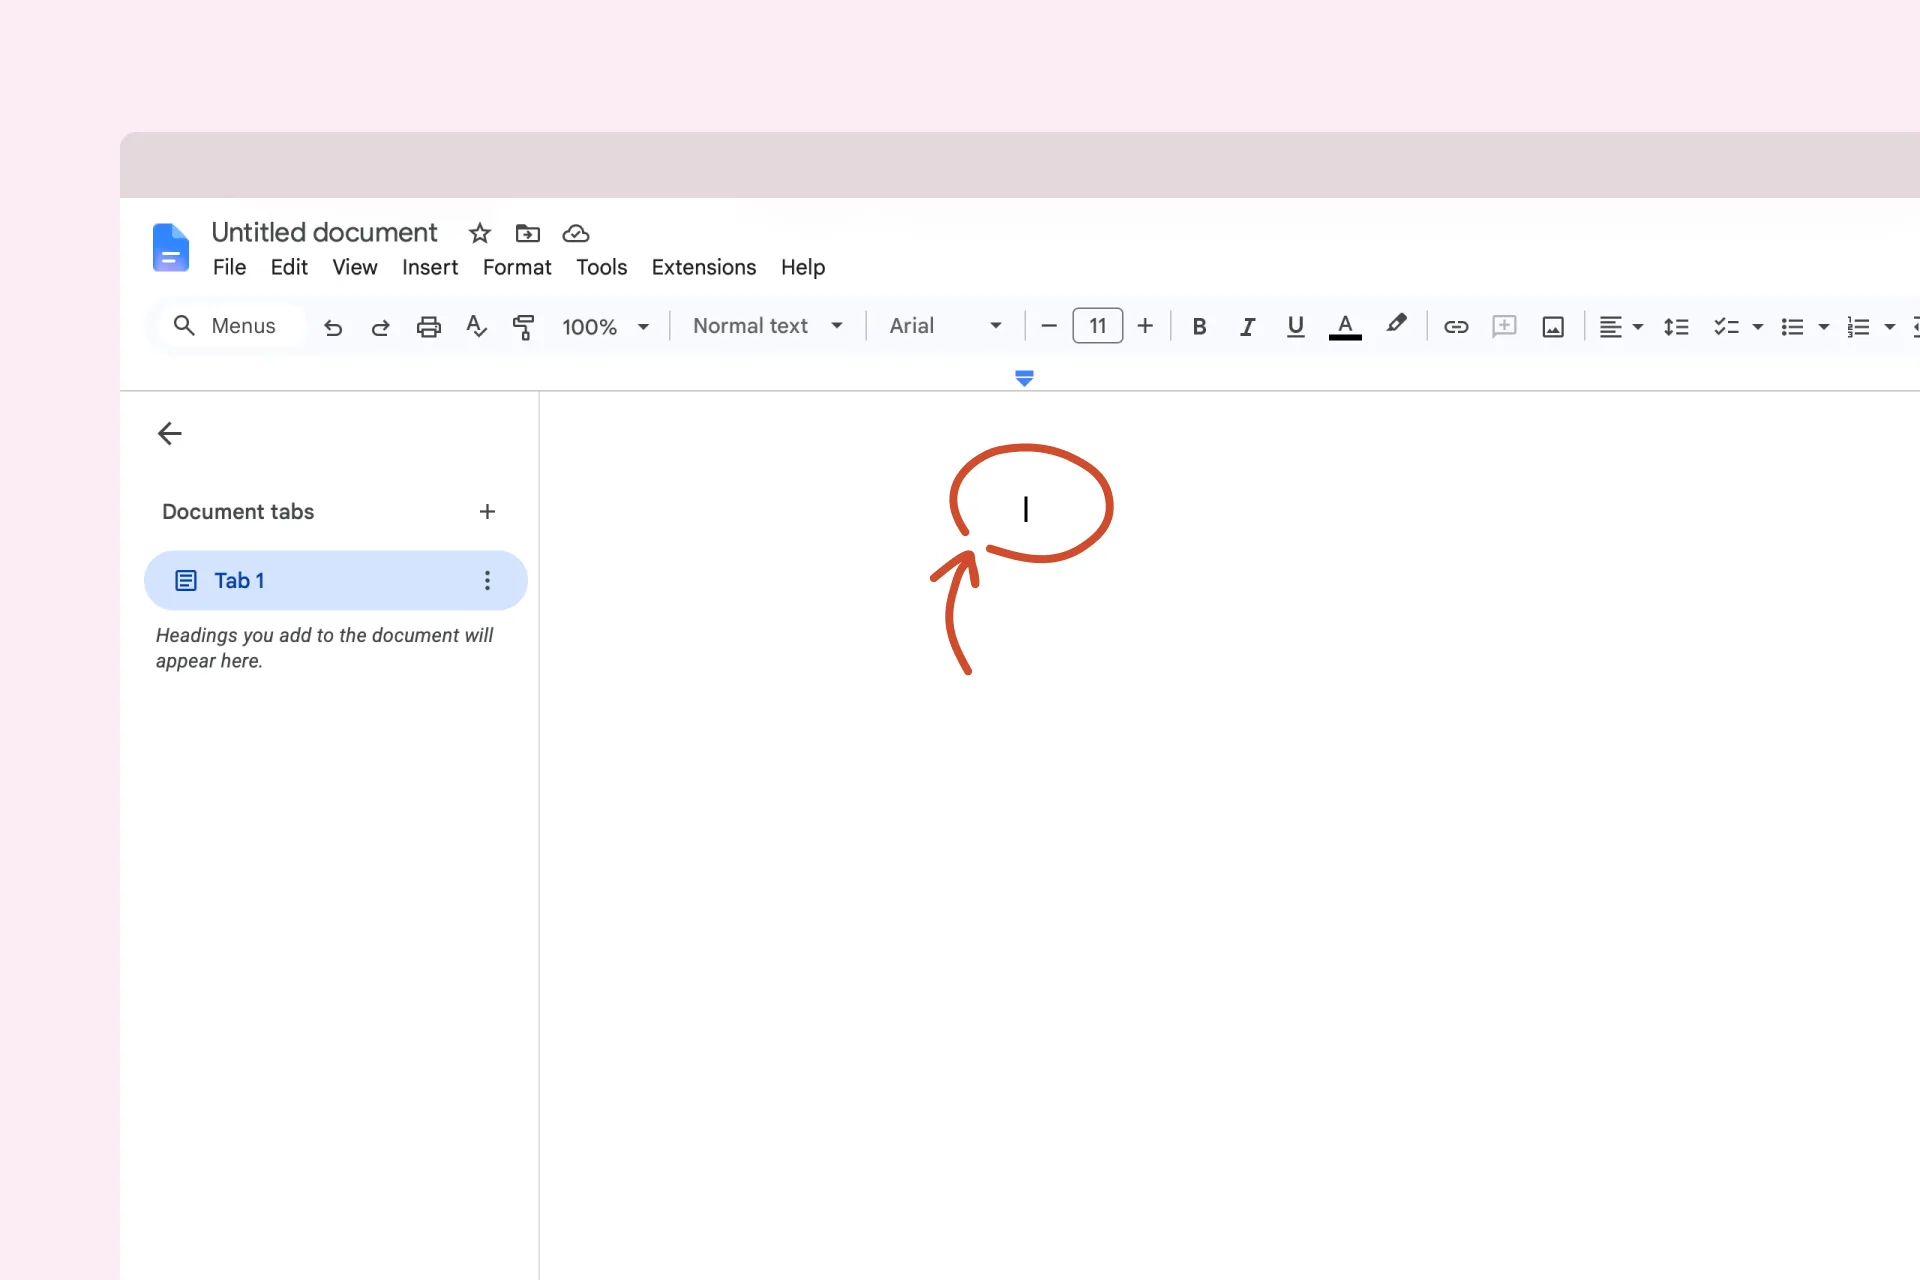
Click where you want the text to appear so the cursor is in the field, then press Ctrl + Win or click the floating bar and speak.
A single dictation can be up to 15 minutes. Need longer? Record a note in the app instead — up to 90 minutes.
If there is no active cursor, your dictation is copied to the clipboard instead. Place your cursor and press Ctrl + V, or right-click the floating bar and choose Paste last transcript.
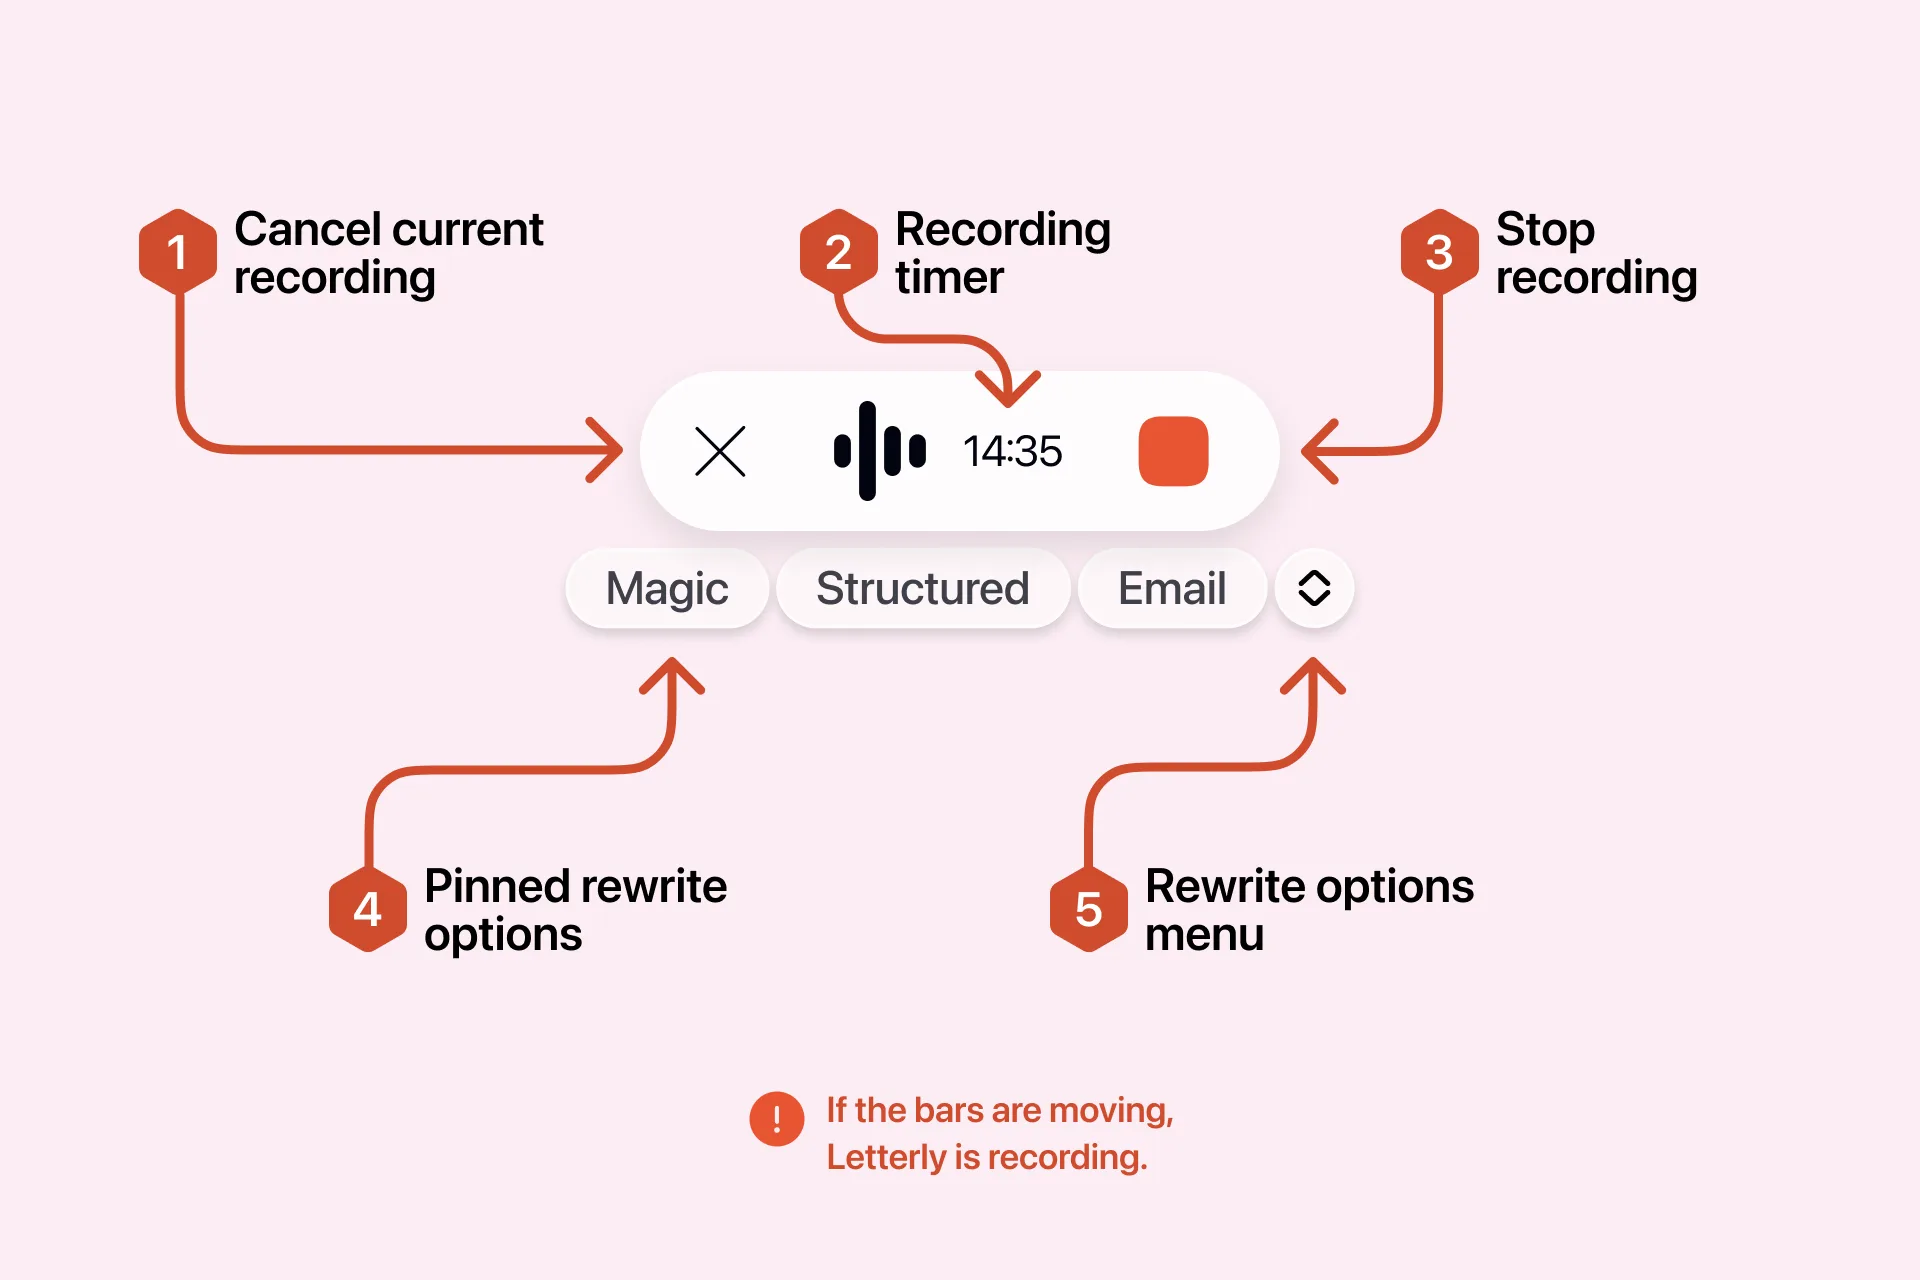
| Control | What it does |
|---|---|
| X | Discards the current dictation |
| Timer | Shows how much time you have left |
| Stop (red button) | Ends the recording and processes your text |
| Pinned rewrite options | Applies a rewrite option to your dictation |
| Rewrite options menu | Opens the full list of rewrite options |
The right-click menu
Right-click the floating bar to reach: Paste last transcript · History · Microphone · Bar position · Always show the floating bar · Open Letterly · Settings · Quit Letterly.
The Microphone setting is only in this menu — there is no microphone picker in the Dictation settings.
Dictation history
Every dictation is saved in Settings → Dictation → History, newest first. Right-click an entry for quick actions.
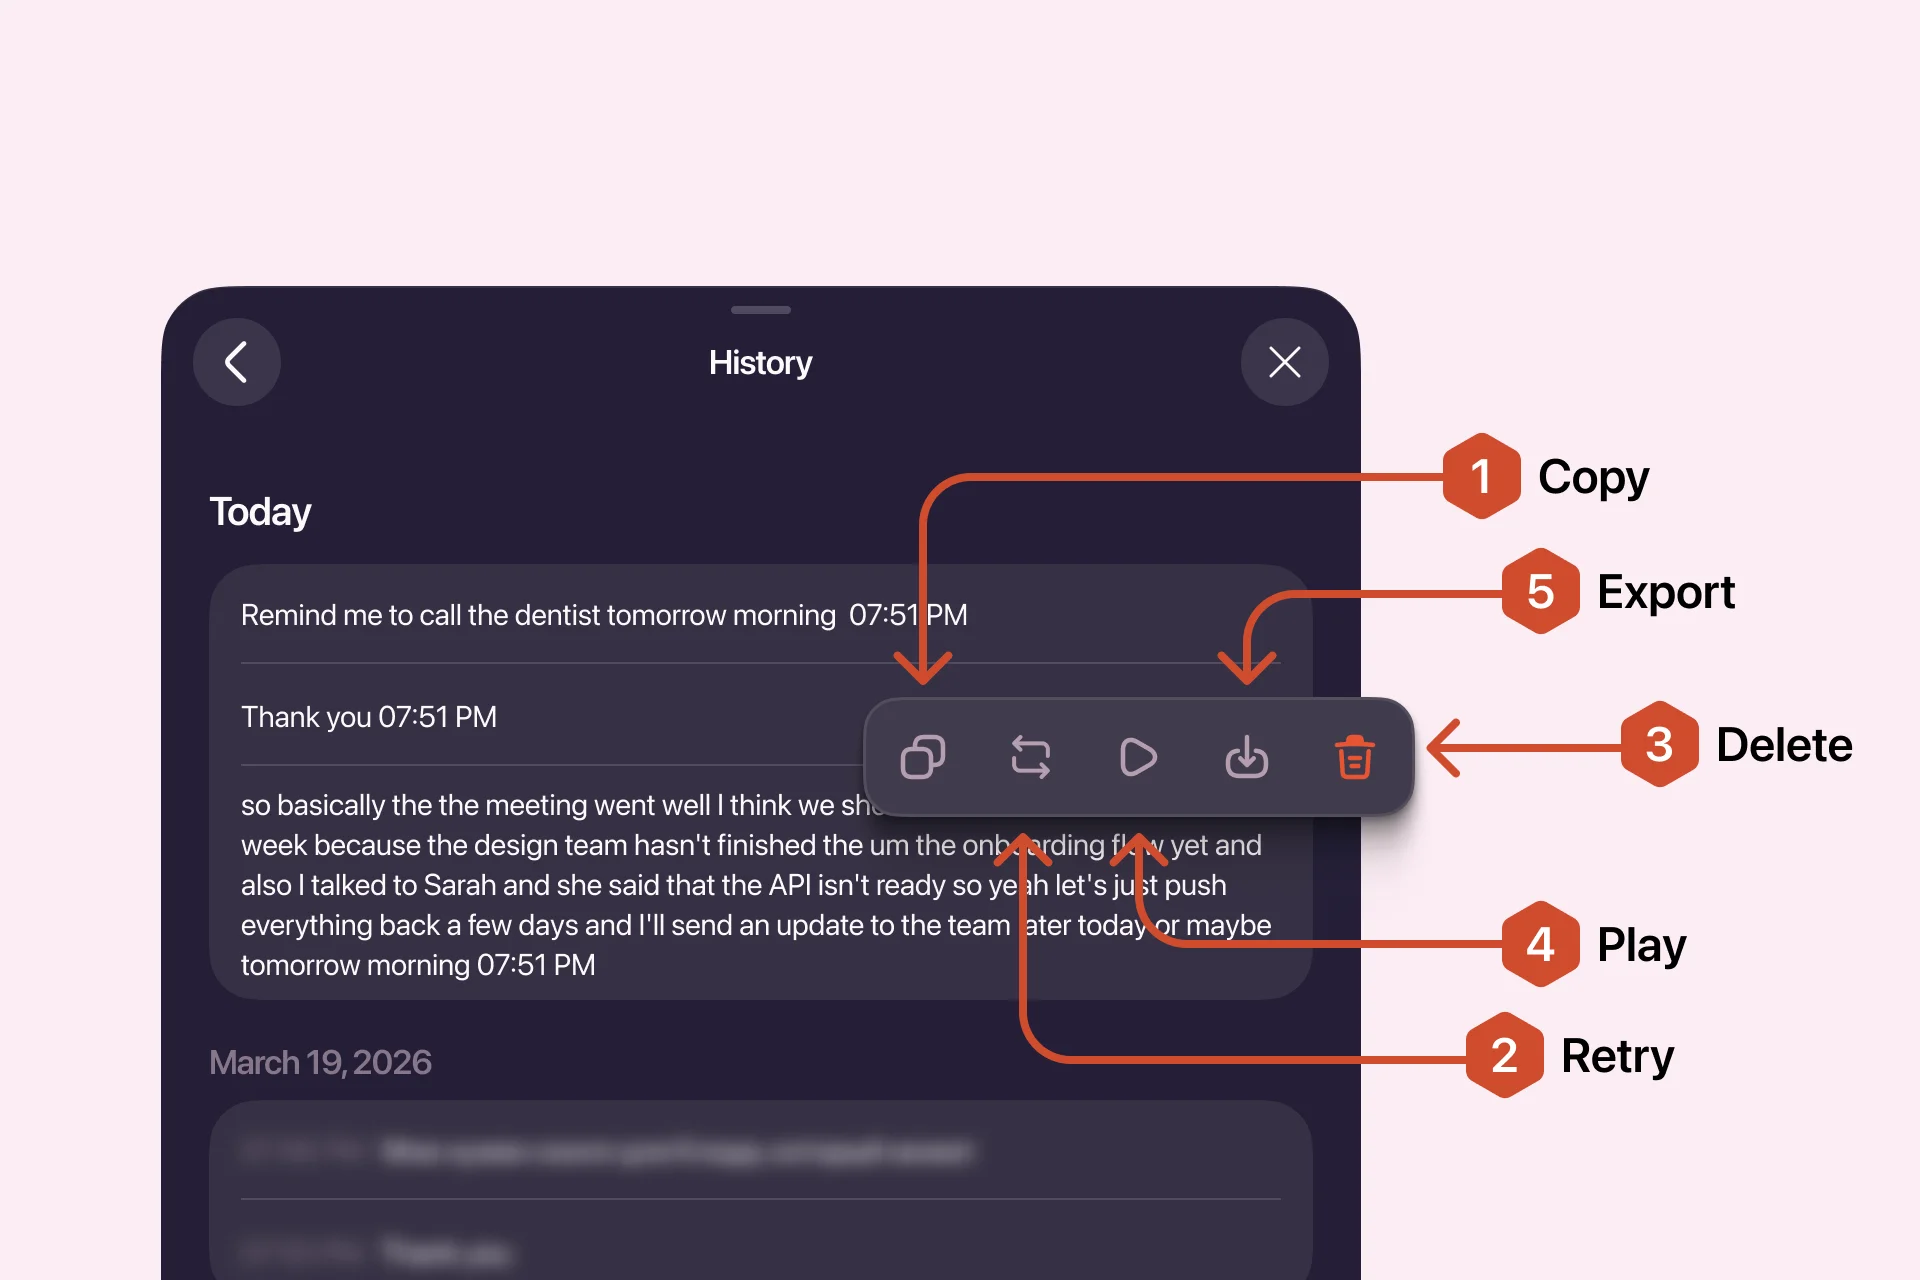
| Action | What it does |
|---|---|
| Copy | Copies the text to your clipboard |
| Play | Plays the original recording, so you can check what you actually said |
| Retry | Runs the rewrite on that dictation again |
| Export audio | Saves the original recording as an audio file on your computer |
| Delete | Removes the entry |
Dictation History stays on the device where it was created and does not sync to your other devices.
Learn more about Dictation History →