Set up Dictation
On iPhone you dictate with the Letterly Keyboard. Add it once, and you can dictate in any app without opening Letterly.
Update Letterly to the latest version before you start.
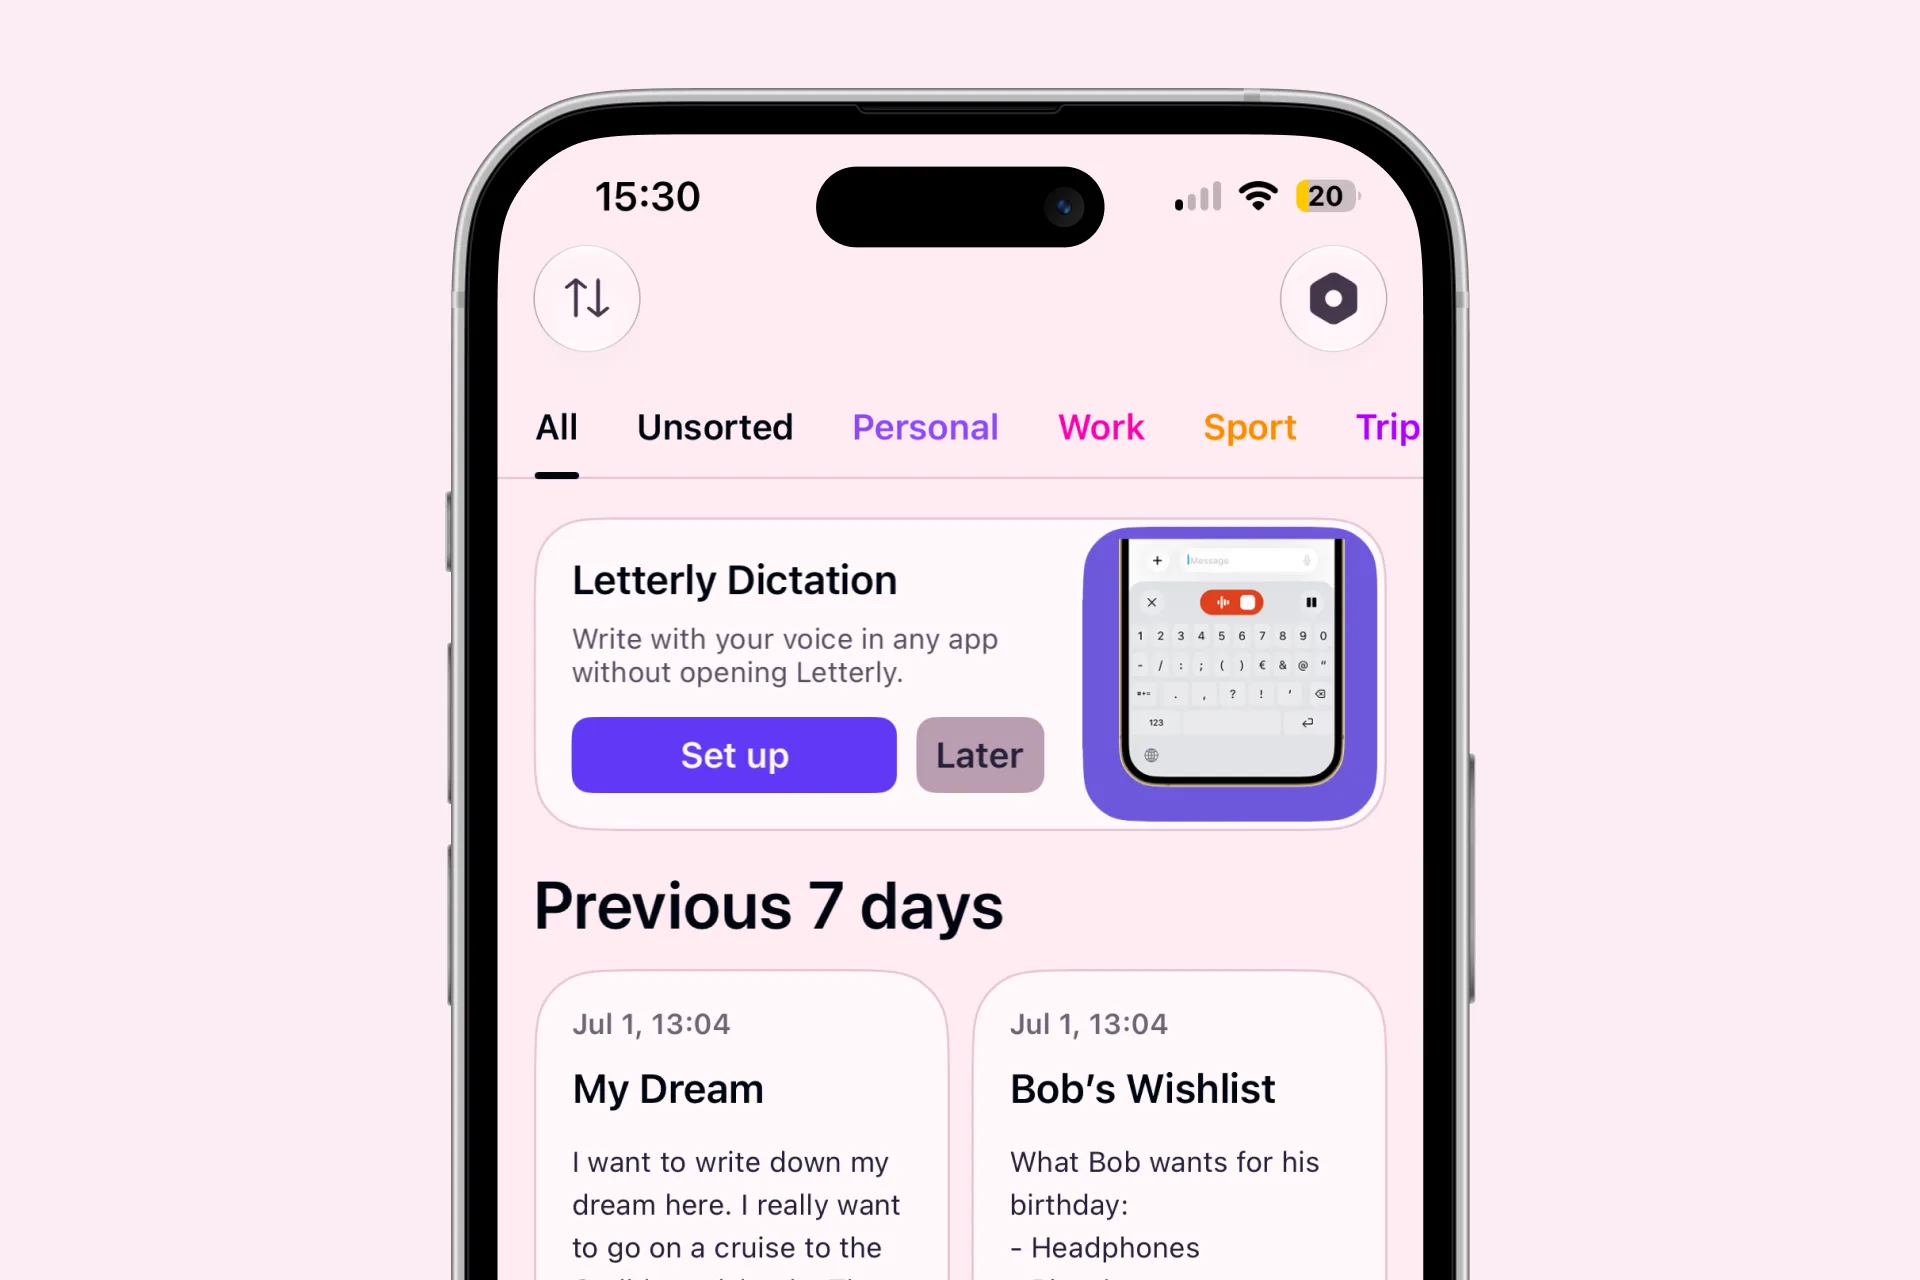
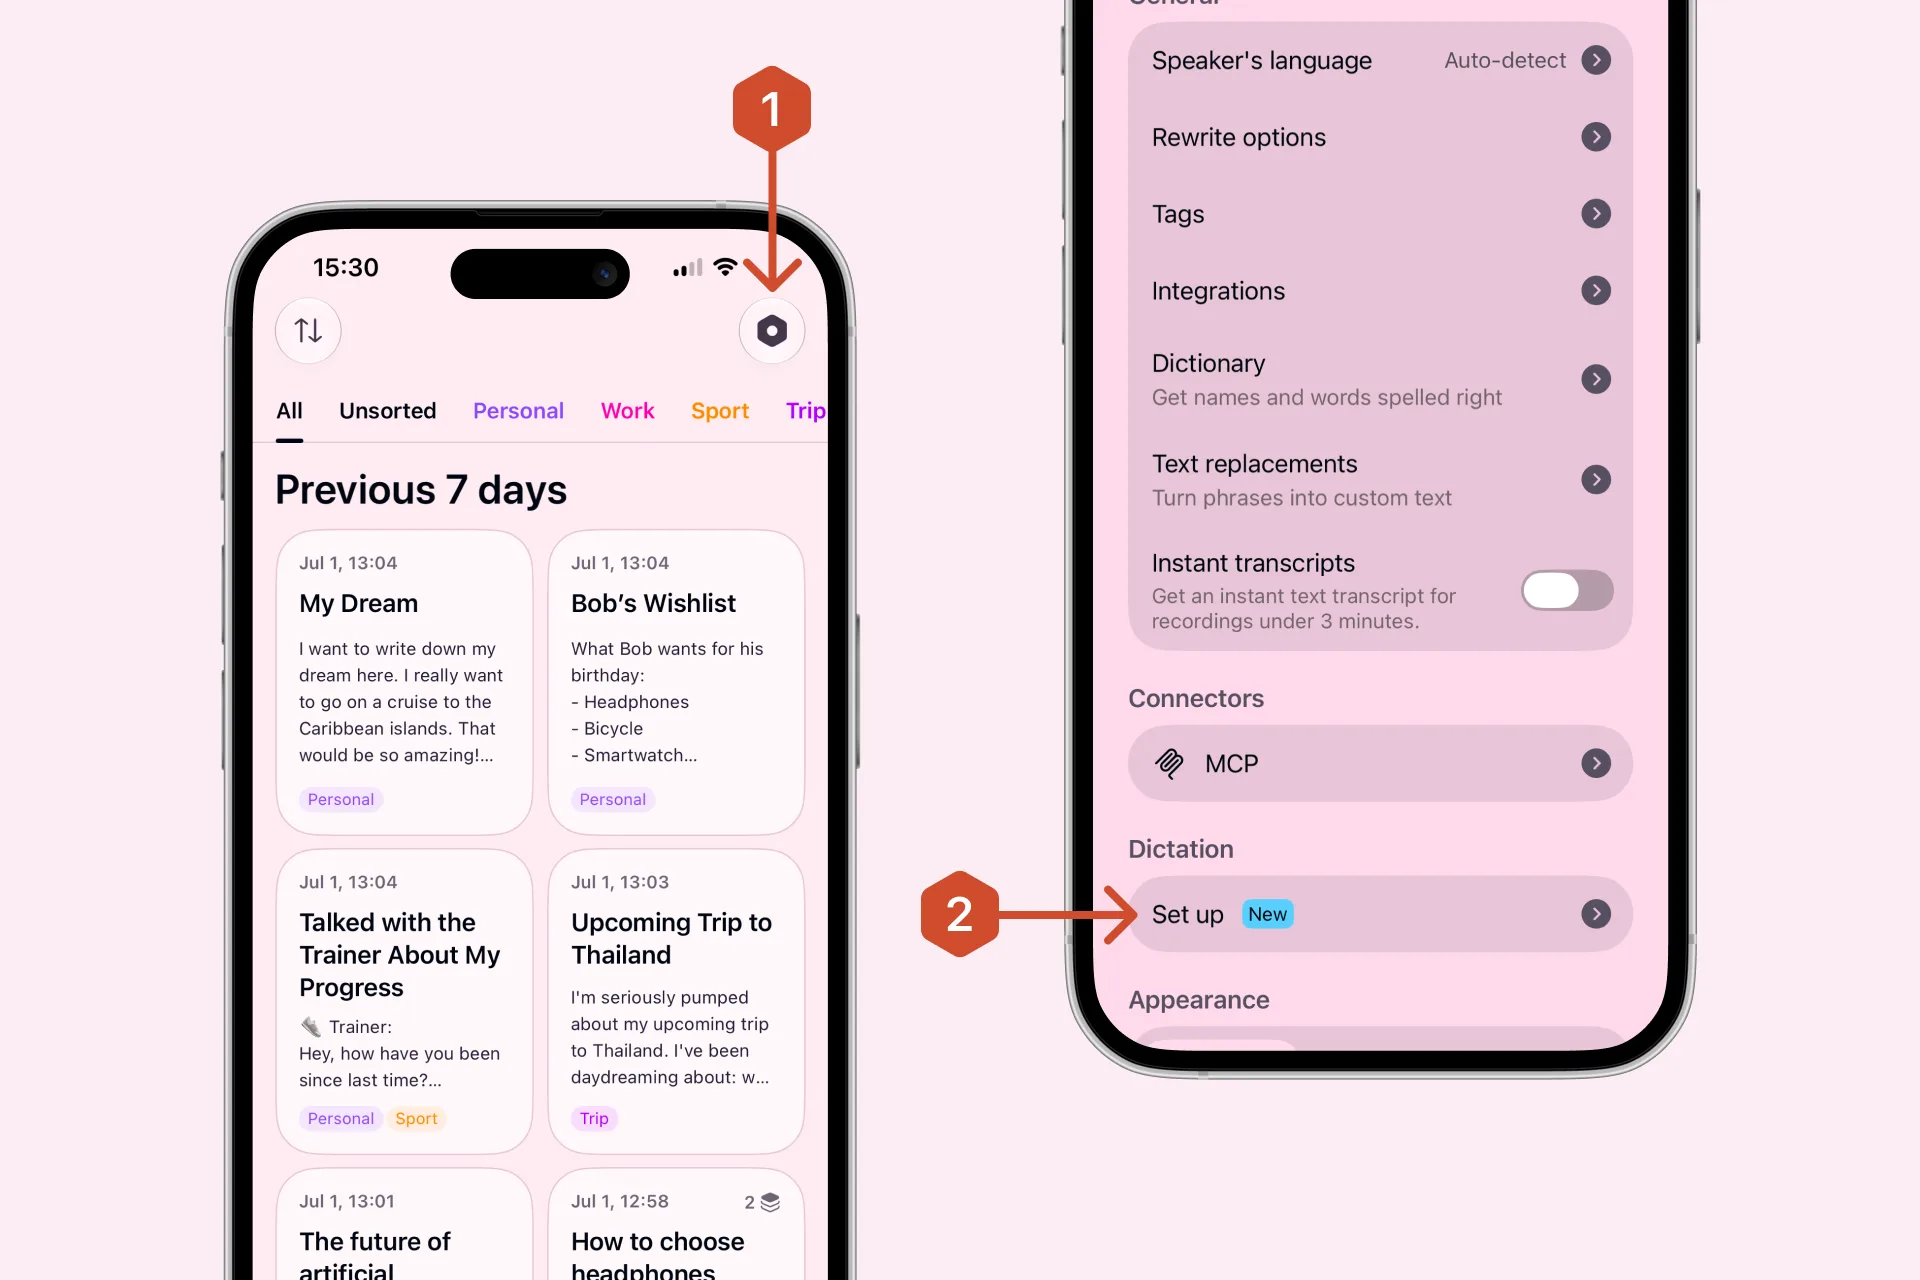
Open the app and tap Set up on the Letterly Dictation banner on the Home screen. If you tapped Later before, open Settings → Dictation and tap Set up there.
Step 1. Add the Letterly Keyboard
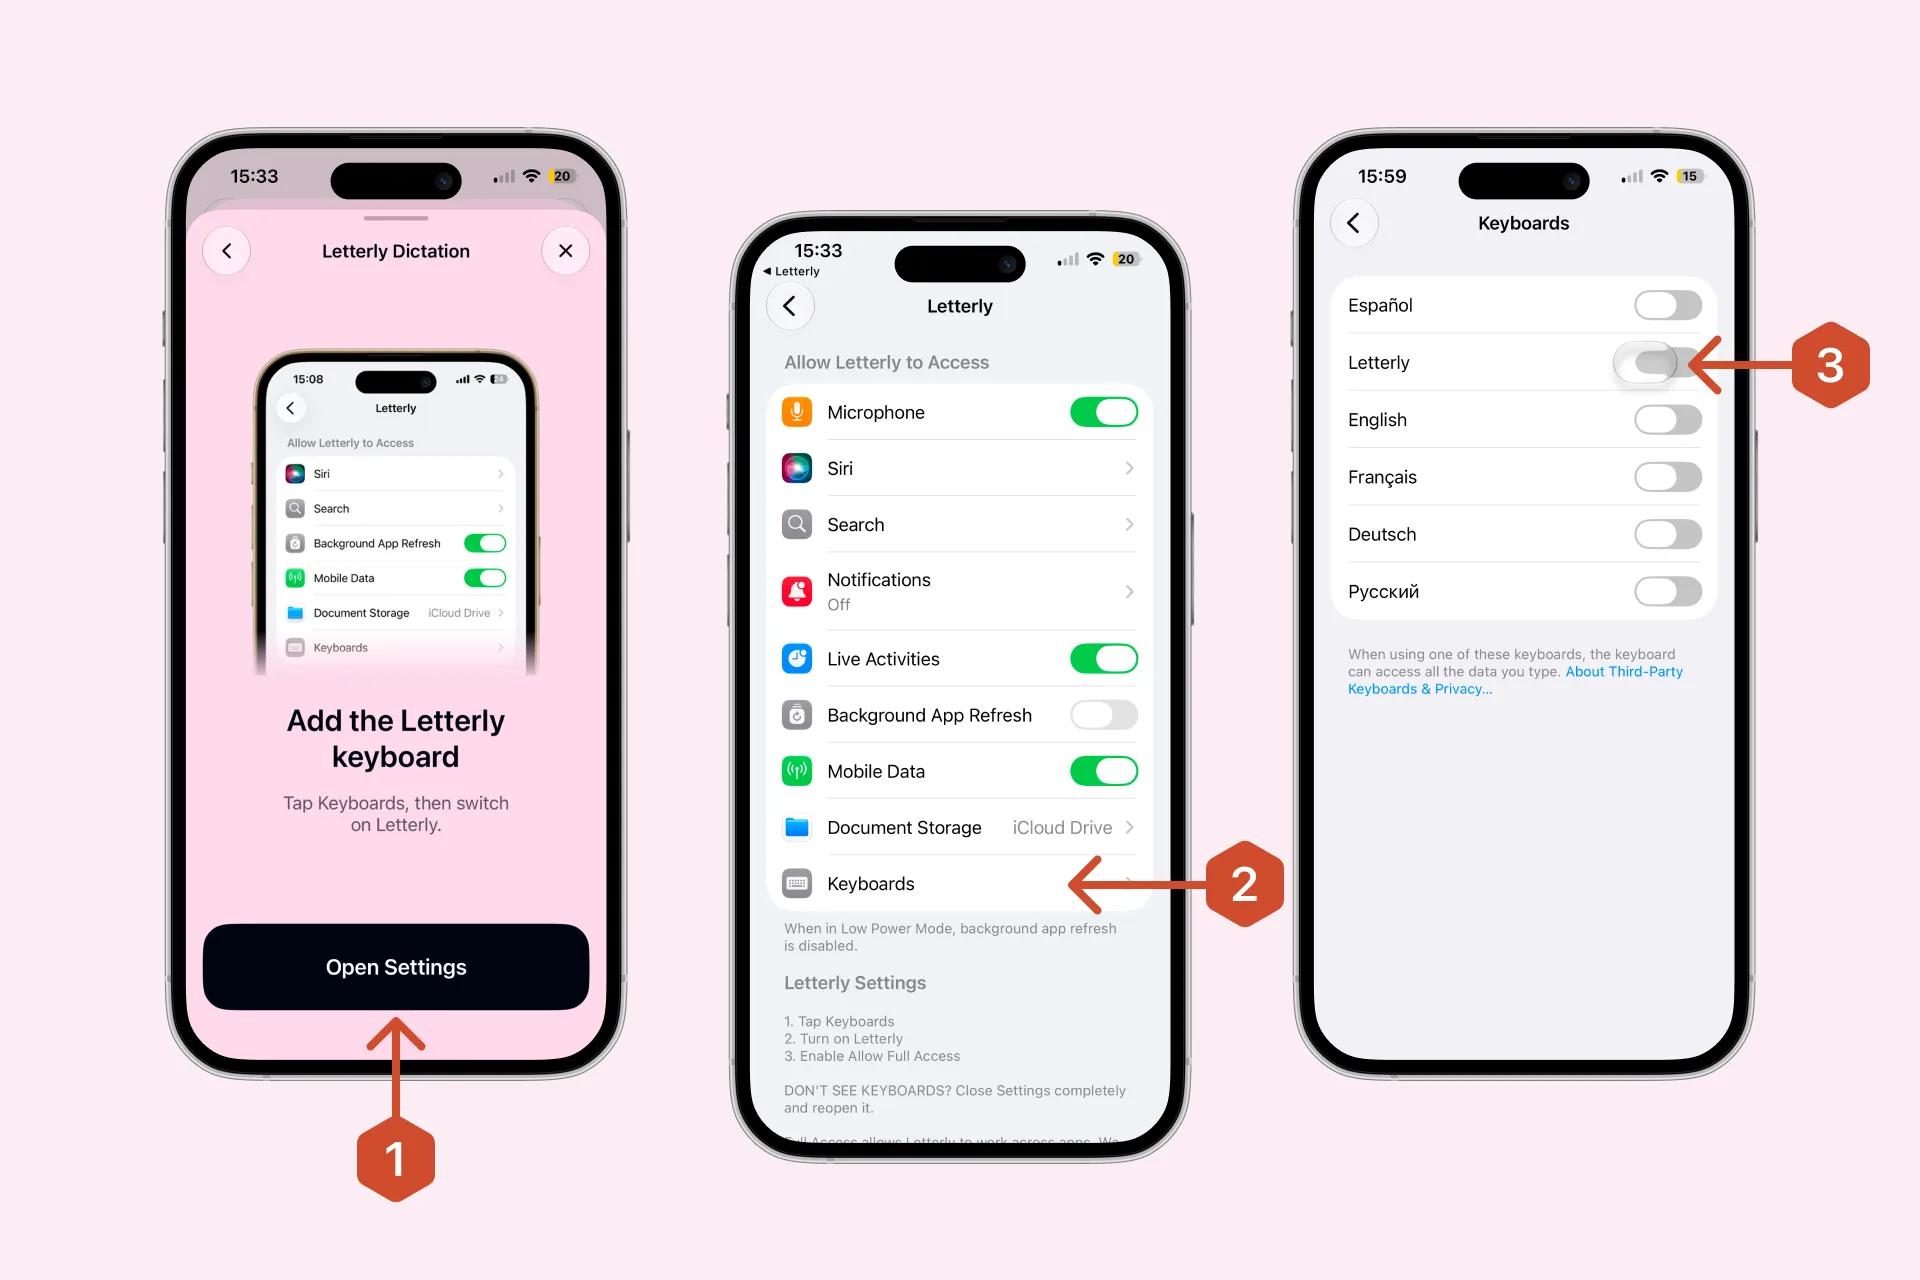
- In Letterly, tap Open Settings.
- In your iPhone settings, tap Keyboards.
- Turn on Letterly.
New to Letterly? If you are prompted, allow microphone access before you start dictating.
Step 2. Enable Full Access
After you turn on the Letterly Keyboard, the Allow Full Access option appears below it on the same screen. Turn it on.
Why Letterly needs Full Access
Full Access is a technical requirement that allows the Letterly Keyboard to process your dictation and return the finished text to the keyboard. Without this permission, Dictation cannot work.
Apple displays a standard warning for every third-party keyboard that uses Full Access. The warning describes what this permission technically allows — it does not describe how Letterly handles your data.
Letterly does not misuse, sell, or share your data. Your Dictation History is stored locally on your device, and no one on the Letterly team has direct access to your personal notes or dictated content.
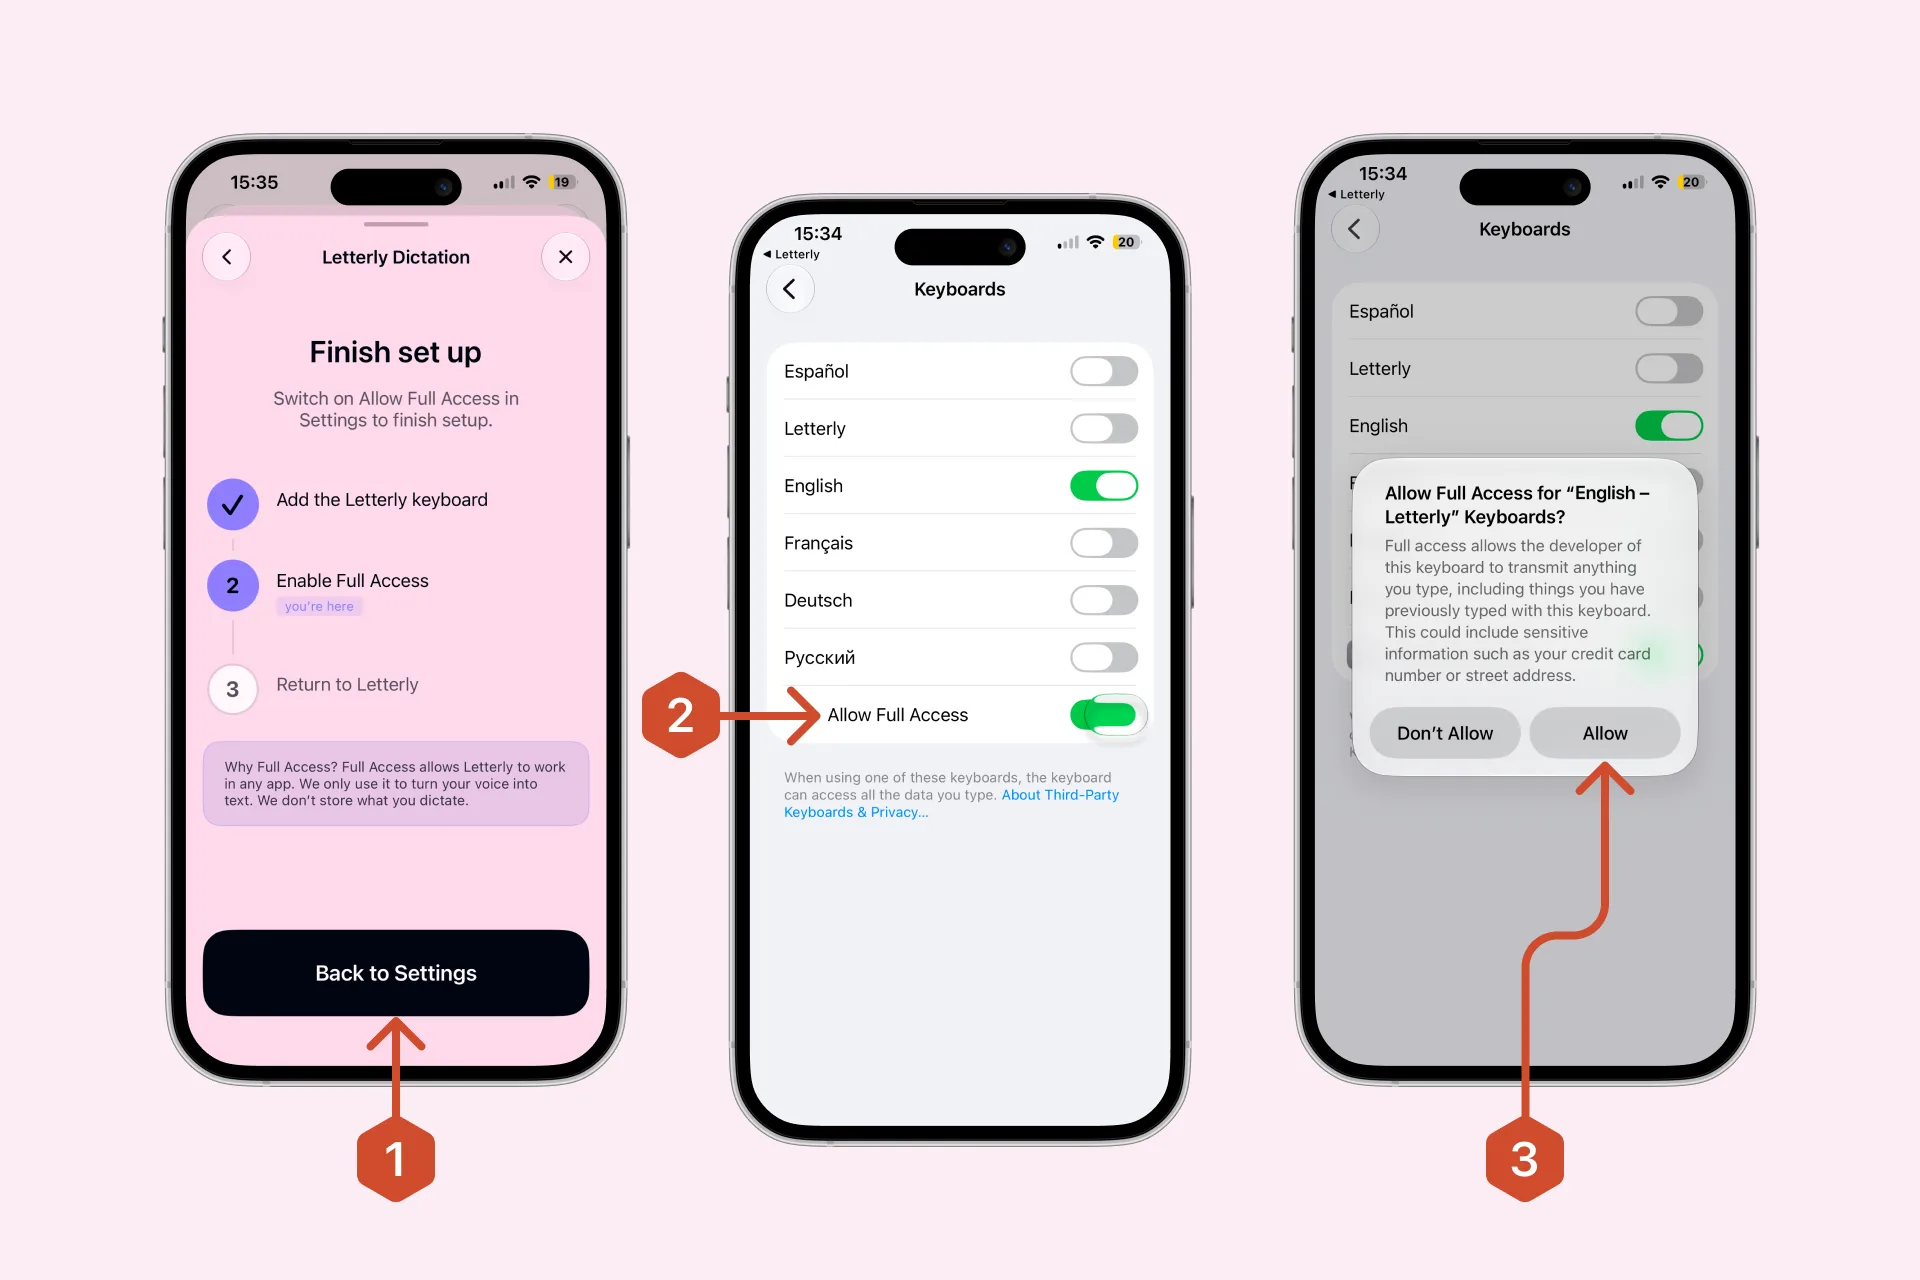
Step 3. Return to Letterly
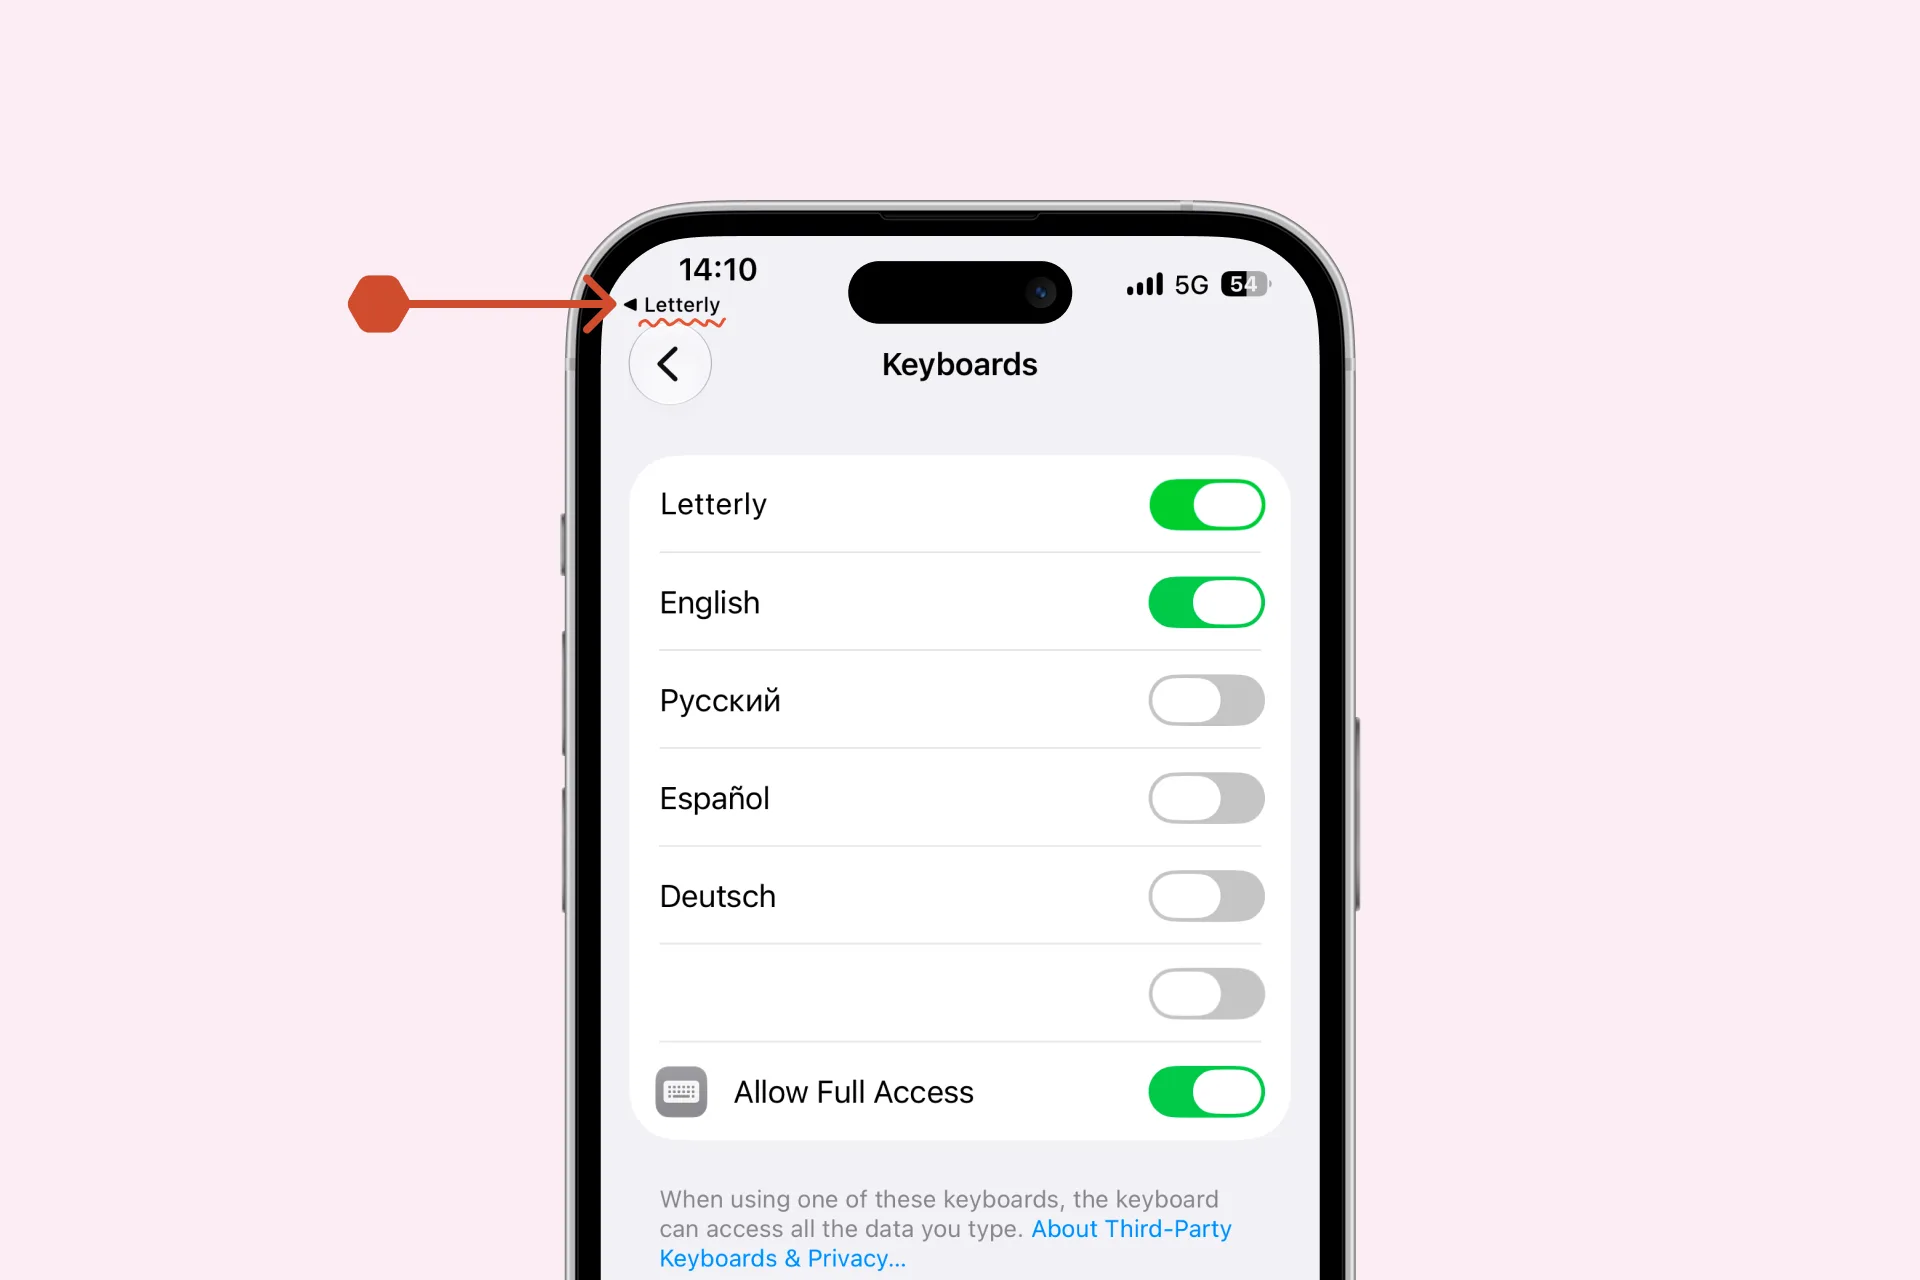
After you turn on Allow Full Access, tap Letterly in the top-left corner to return to the app and complete the setup.
You can now dictate in Messages, Mail, Notes, WhatsApp, ChatGPT, and other apps.
On Android you dictate with the Dictation Bubble — a floating button that stays on top of your other apps.
Update Letterly to the latest version before you start.
Open the app and tap Set up on the Letterly Dictation banner on the Home screen. If you tapped Later before, open Settings → Dictation and tap Set up there.
You will grant two permissions:
- Display over other apps, so the Bubble can appear while you use other apps.
- Accessibility, so Letterly can detect the active text field and insert your dictated text there.
Step 1. Allow the Bubble to appear over other apps
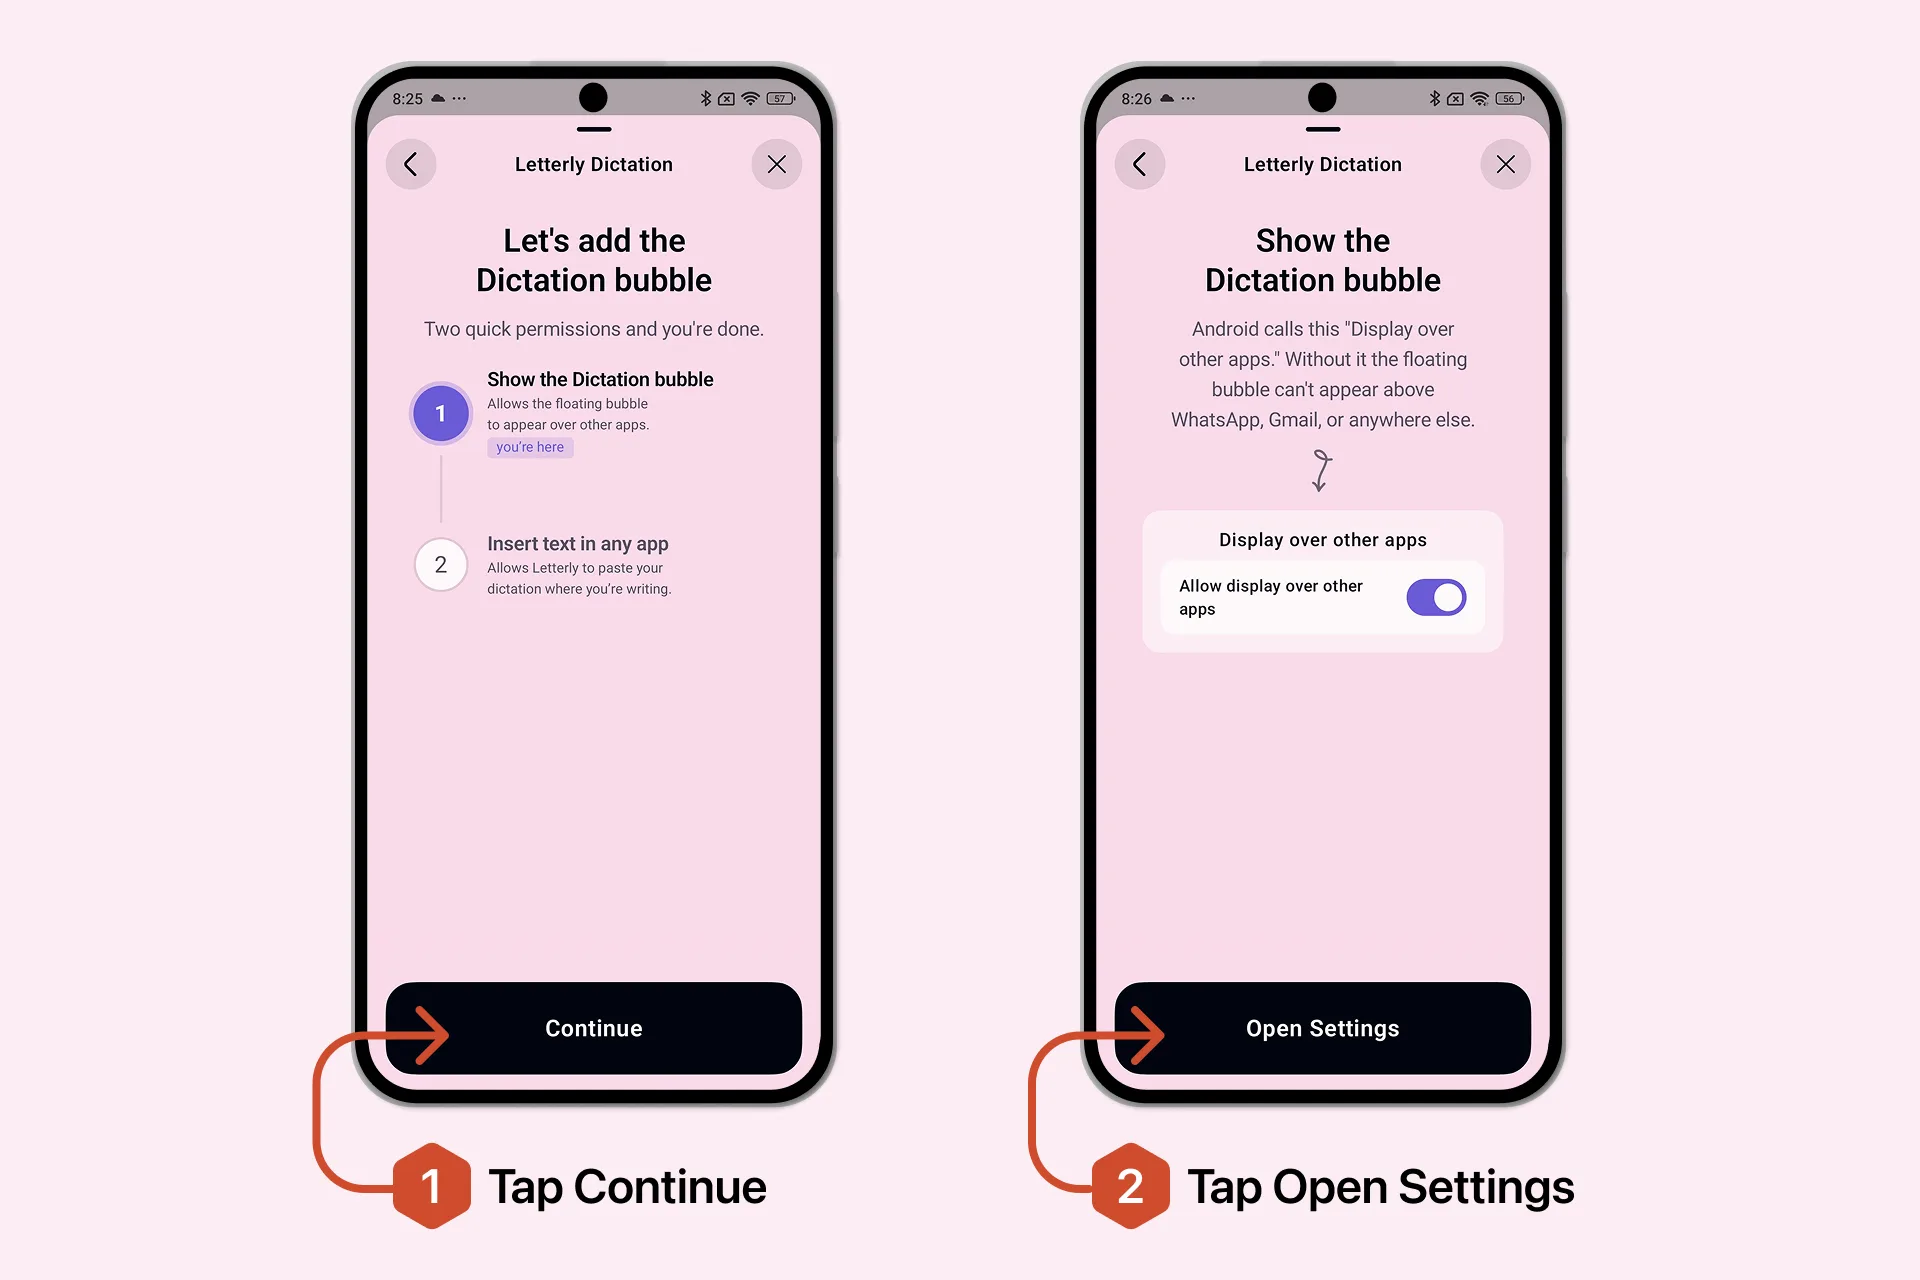
On the setup screen, tap Continue next to Show the Dictation Bubble, then tap Open Settings.
Android opens the Display over other apps settings. Depending on your device, you may first see a list of apps.
- Find and tap Letterly.
- Turn on Allow display over other apps.
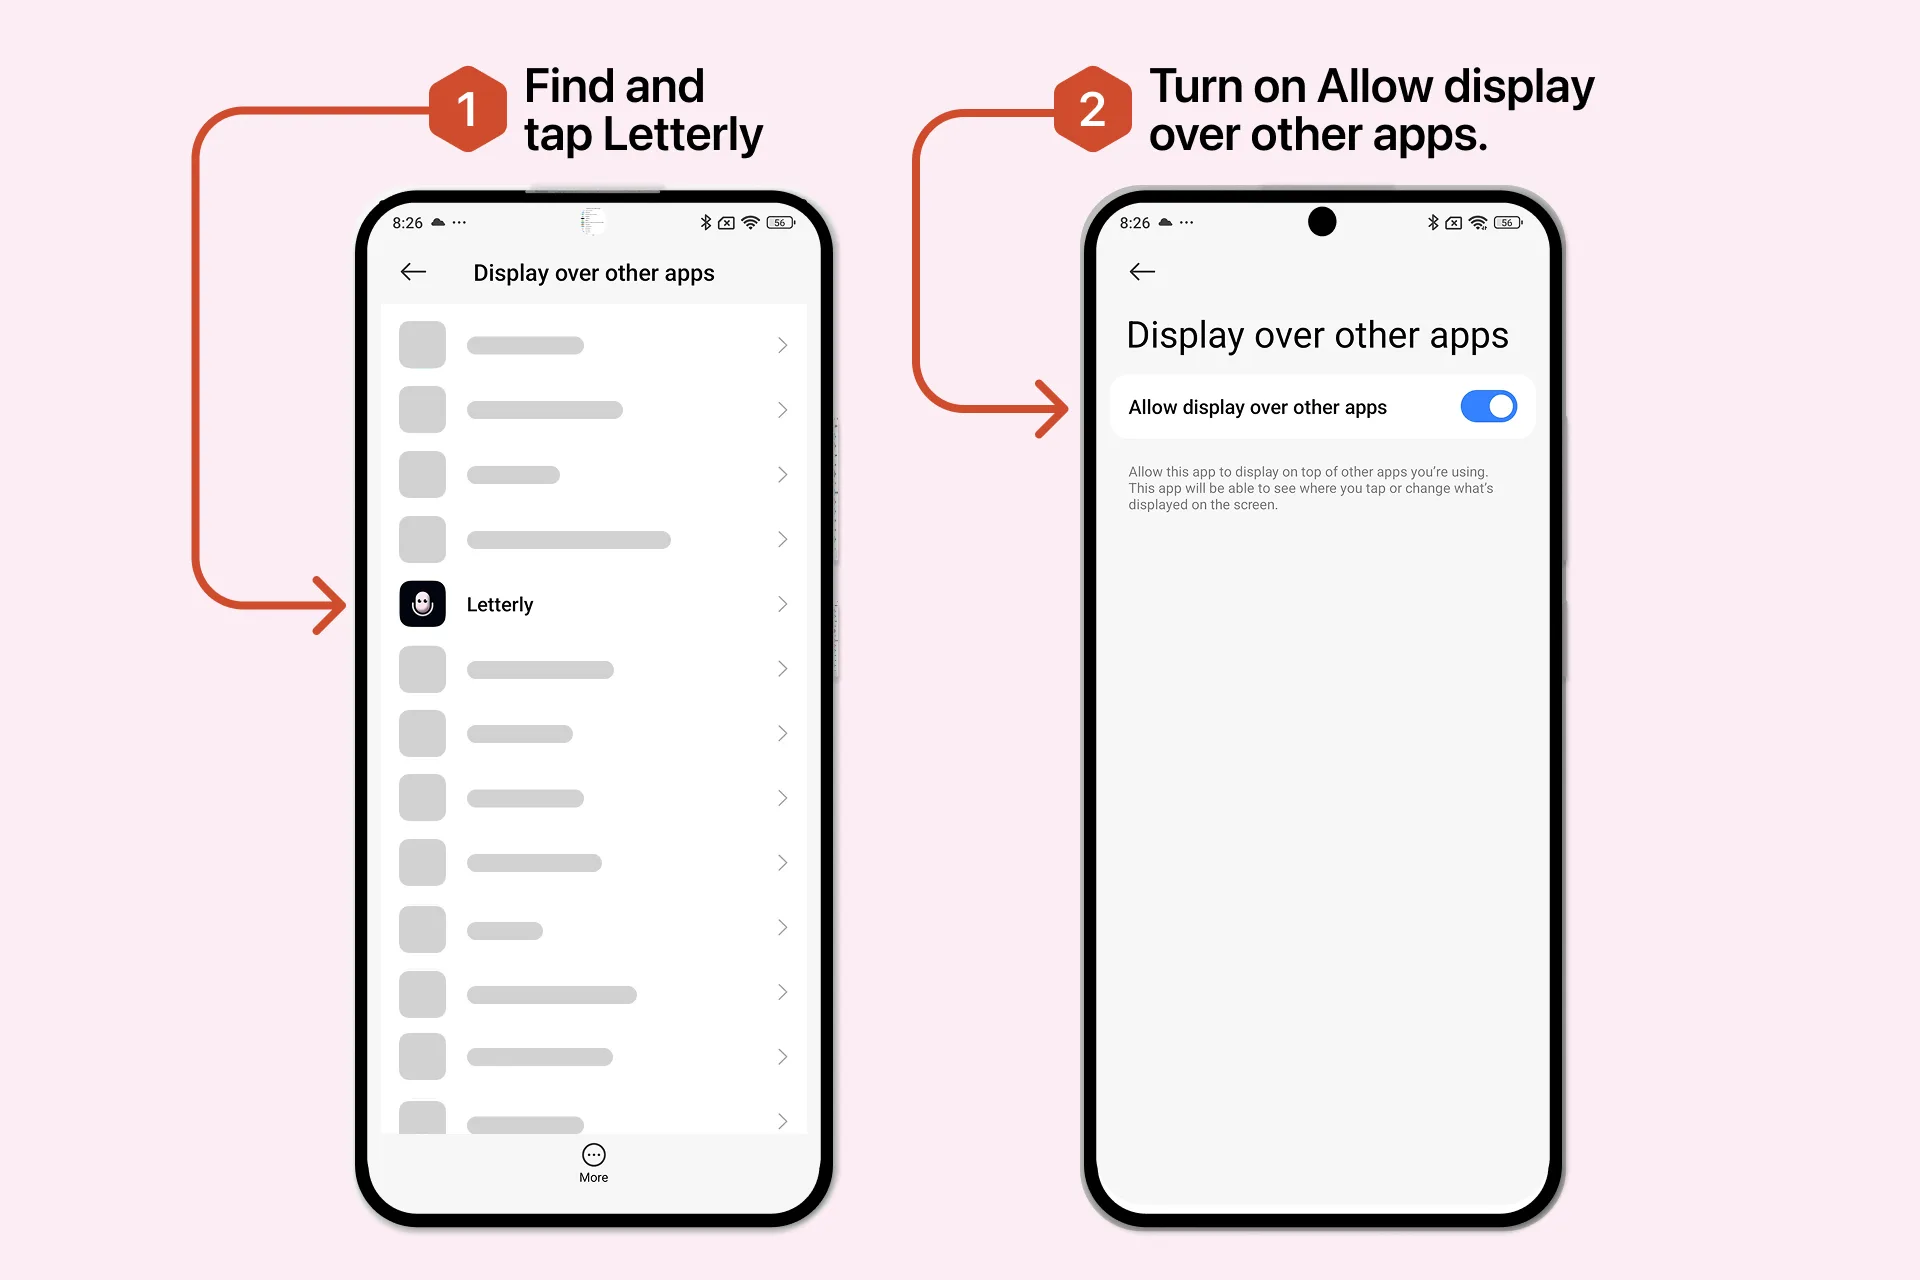
Android calls it Display over other apps. It allows the floating Dictation Bubble to appear above WhatsApp, Gmail, Messages, ChatGPT and other apps. Without it, the Bubble cannot appear outside Letterly.
After enabling the permission, return to Letterly to continue the setup.
Step 2. Allow Letterly to insert text
The second permission lets Letterly find the text field where you are writing and insert your finished dictation there.
Tap Open Settings next to Insert text in any app. Before opening your Android settings, Letterly explains how it uses Accessibility Services — review it and tap Continue.
Letterly uses Android's AccessibilityService API only to detect the active text field and insert your dictated text into it. Letterly does not use this permission to read passwords, payment details or banking fields, record calls, change system settings, or control your device without your action.
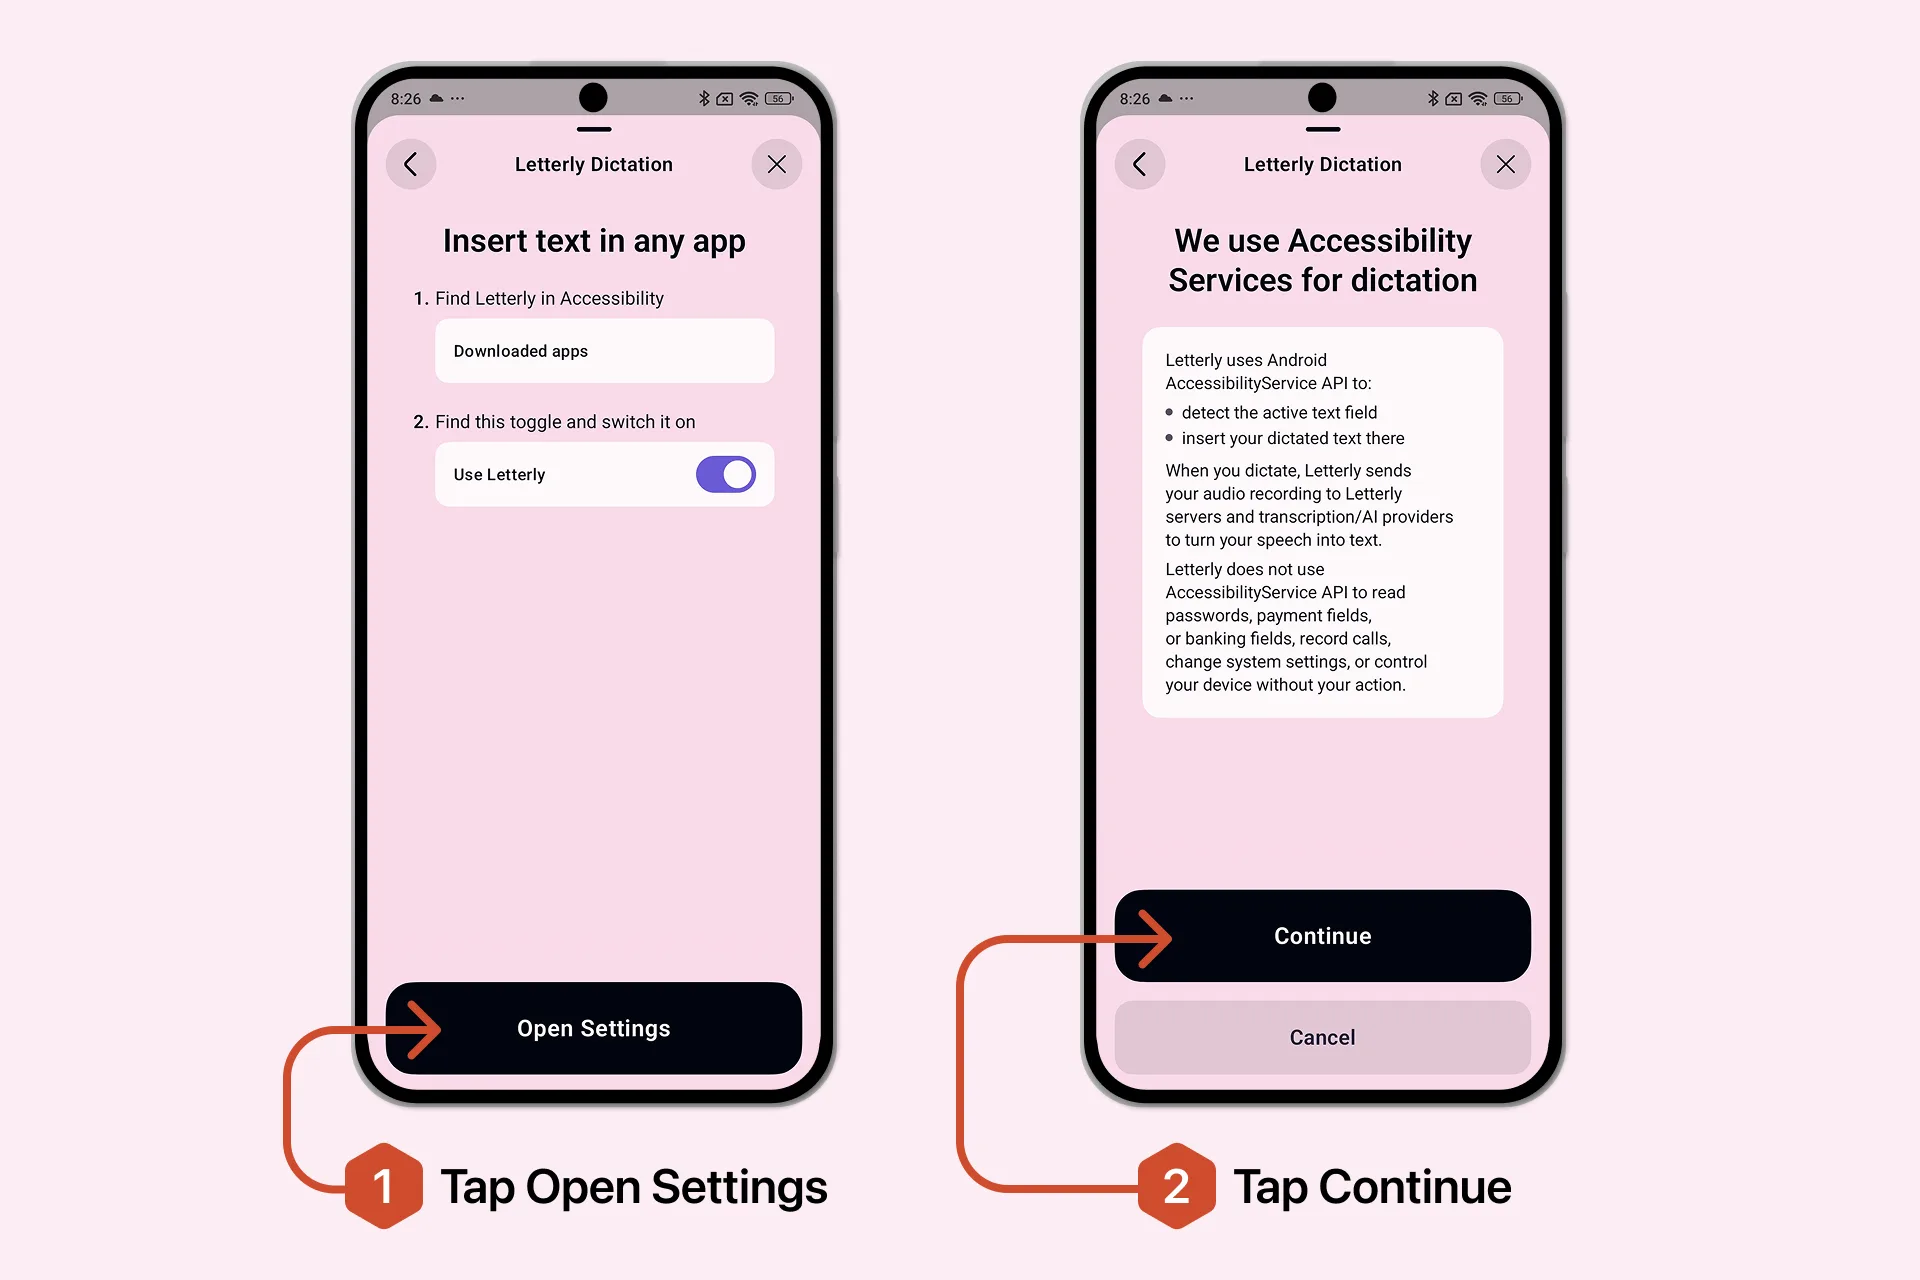
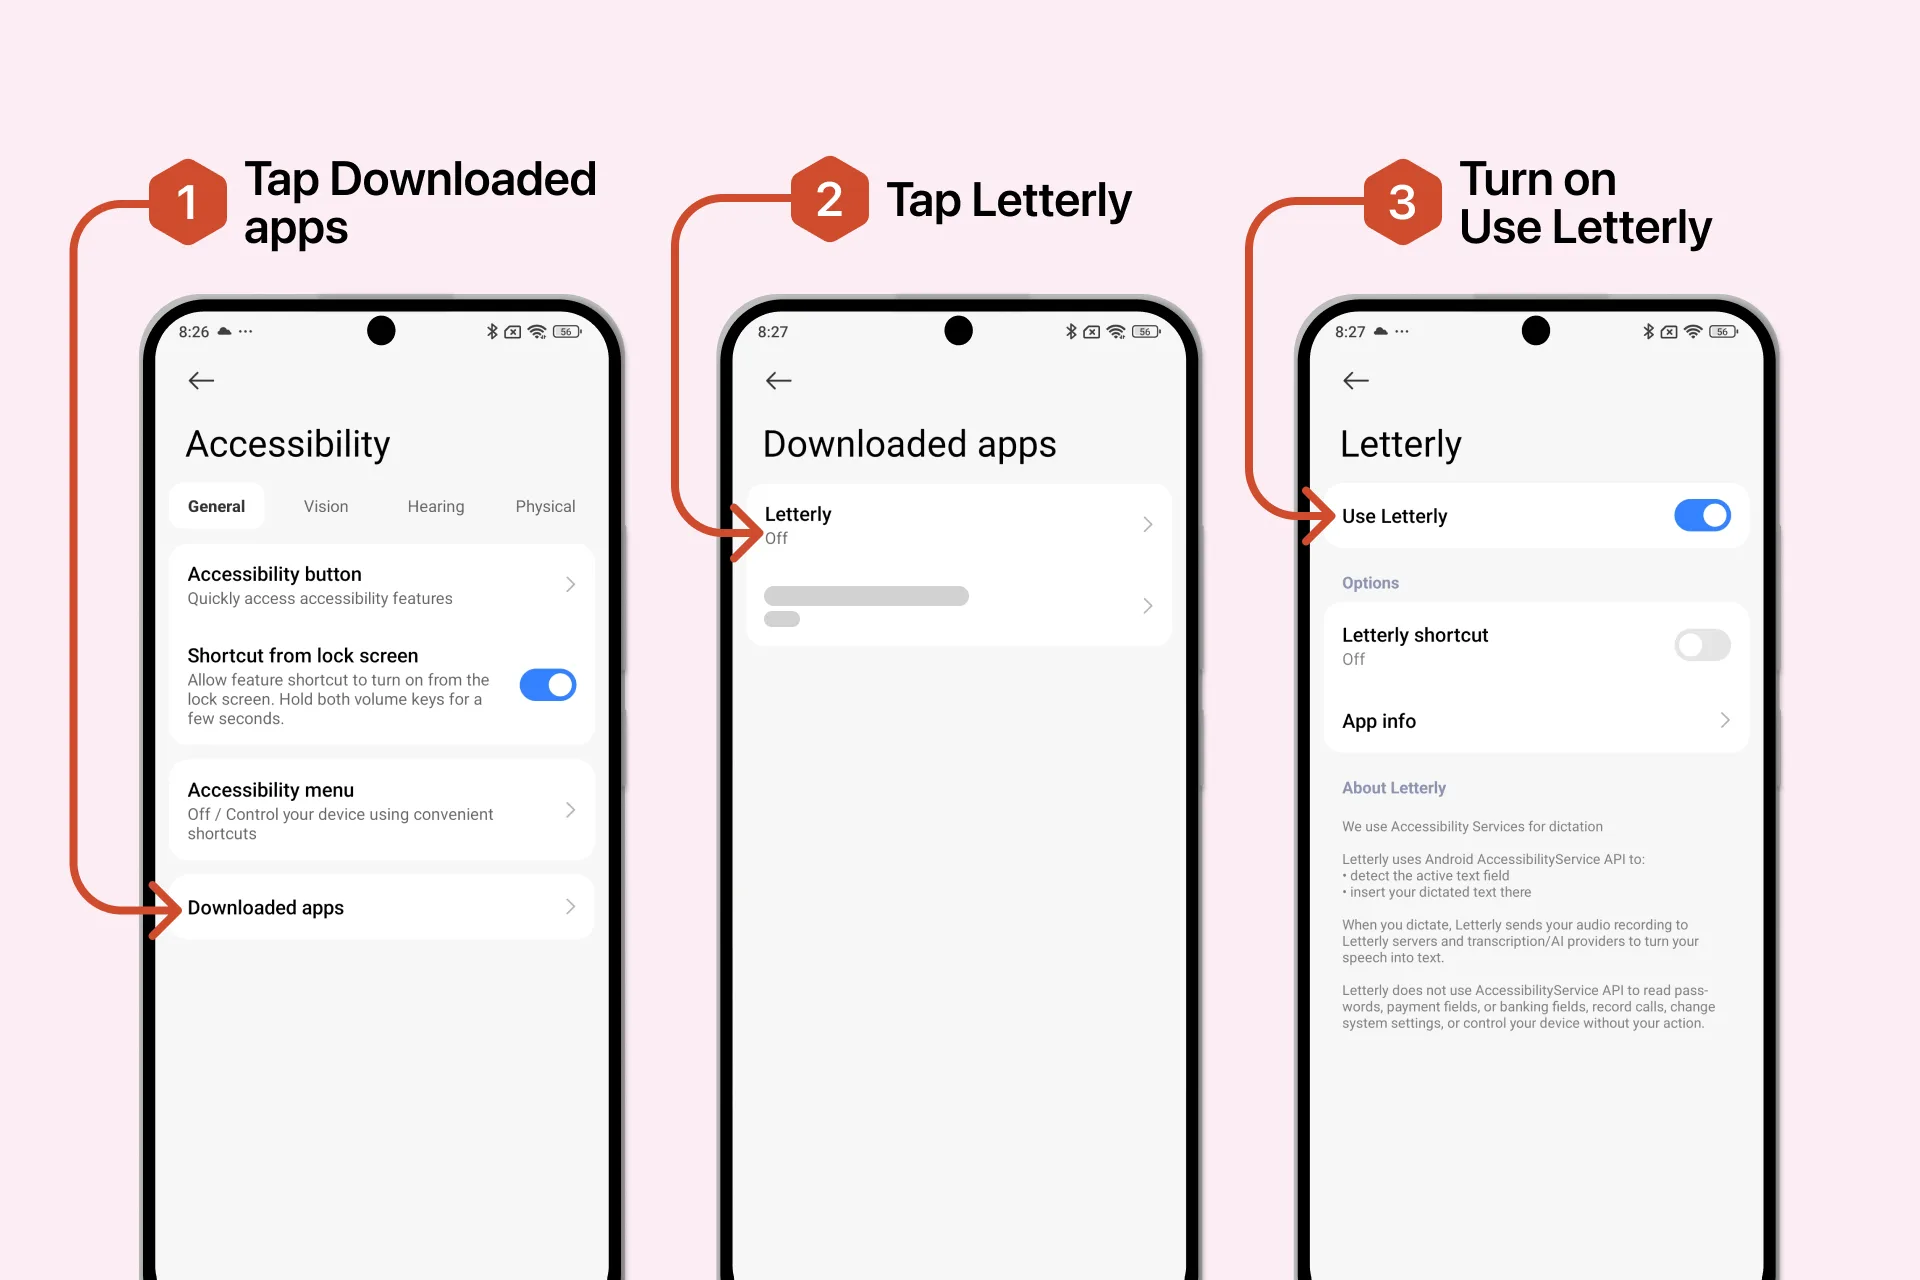
Android opens the Accessibility settings. Menu names vary by device — on many phones the path is:
- Tap Downloaded apps.
- Tap Letterly.
- Turn on Use Letterly.
Step 3. Confirm the Android warning
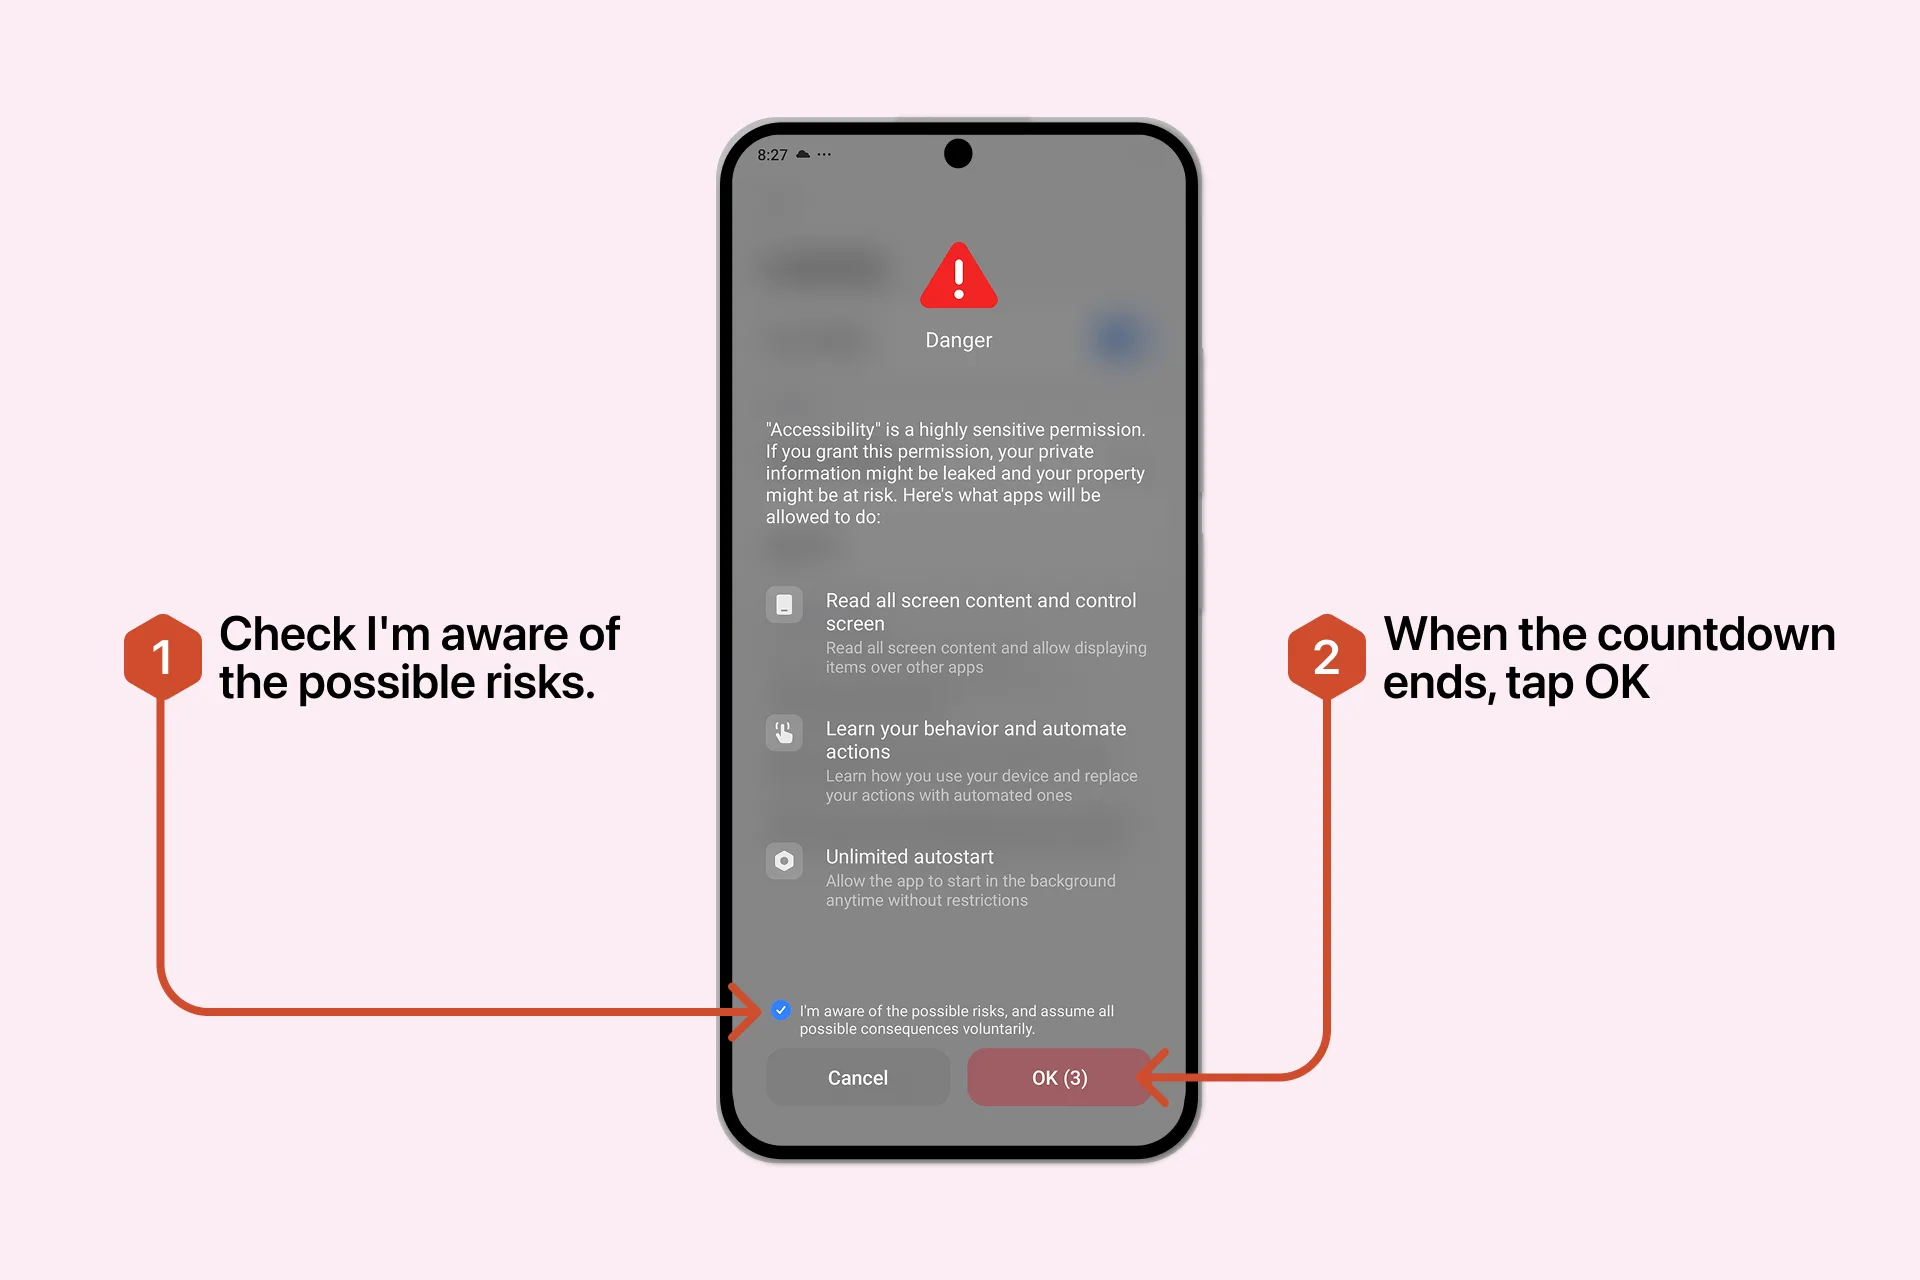
Some Android devices show an additional system warning, because Accessibility is considered a sensitive permission. Android shows it for any app that uses Accessibility Services.
This is a standard system notice. It does not describe Letterly's privacy practices. Letterly uses the permission only to detect the active text field and insert your dictated text — we do not use sensitive information for anything else, sell it, share it with third parties for their own use, or use it to train AI models. The Letterly team has no direct access to your notes or dictated content.
- Wait for the countdown to finish, if one appears.
- Select I'm aware of the possible risks.
- Tap OK.
Return to Letterly. The setup is complete and the Dictation Bubble appears on your screen — press and hold it to drag it anywhere you like.
On Mac you dictate with a shortcut or by clicking the floating bar. Setup takes two permissions.
Step 1. Open Letterly on your Mac
Get the app from the Mac App Store, open it, and go to Settings.
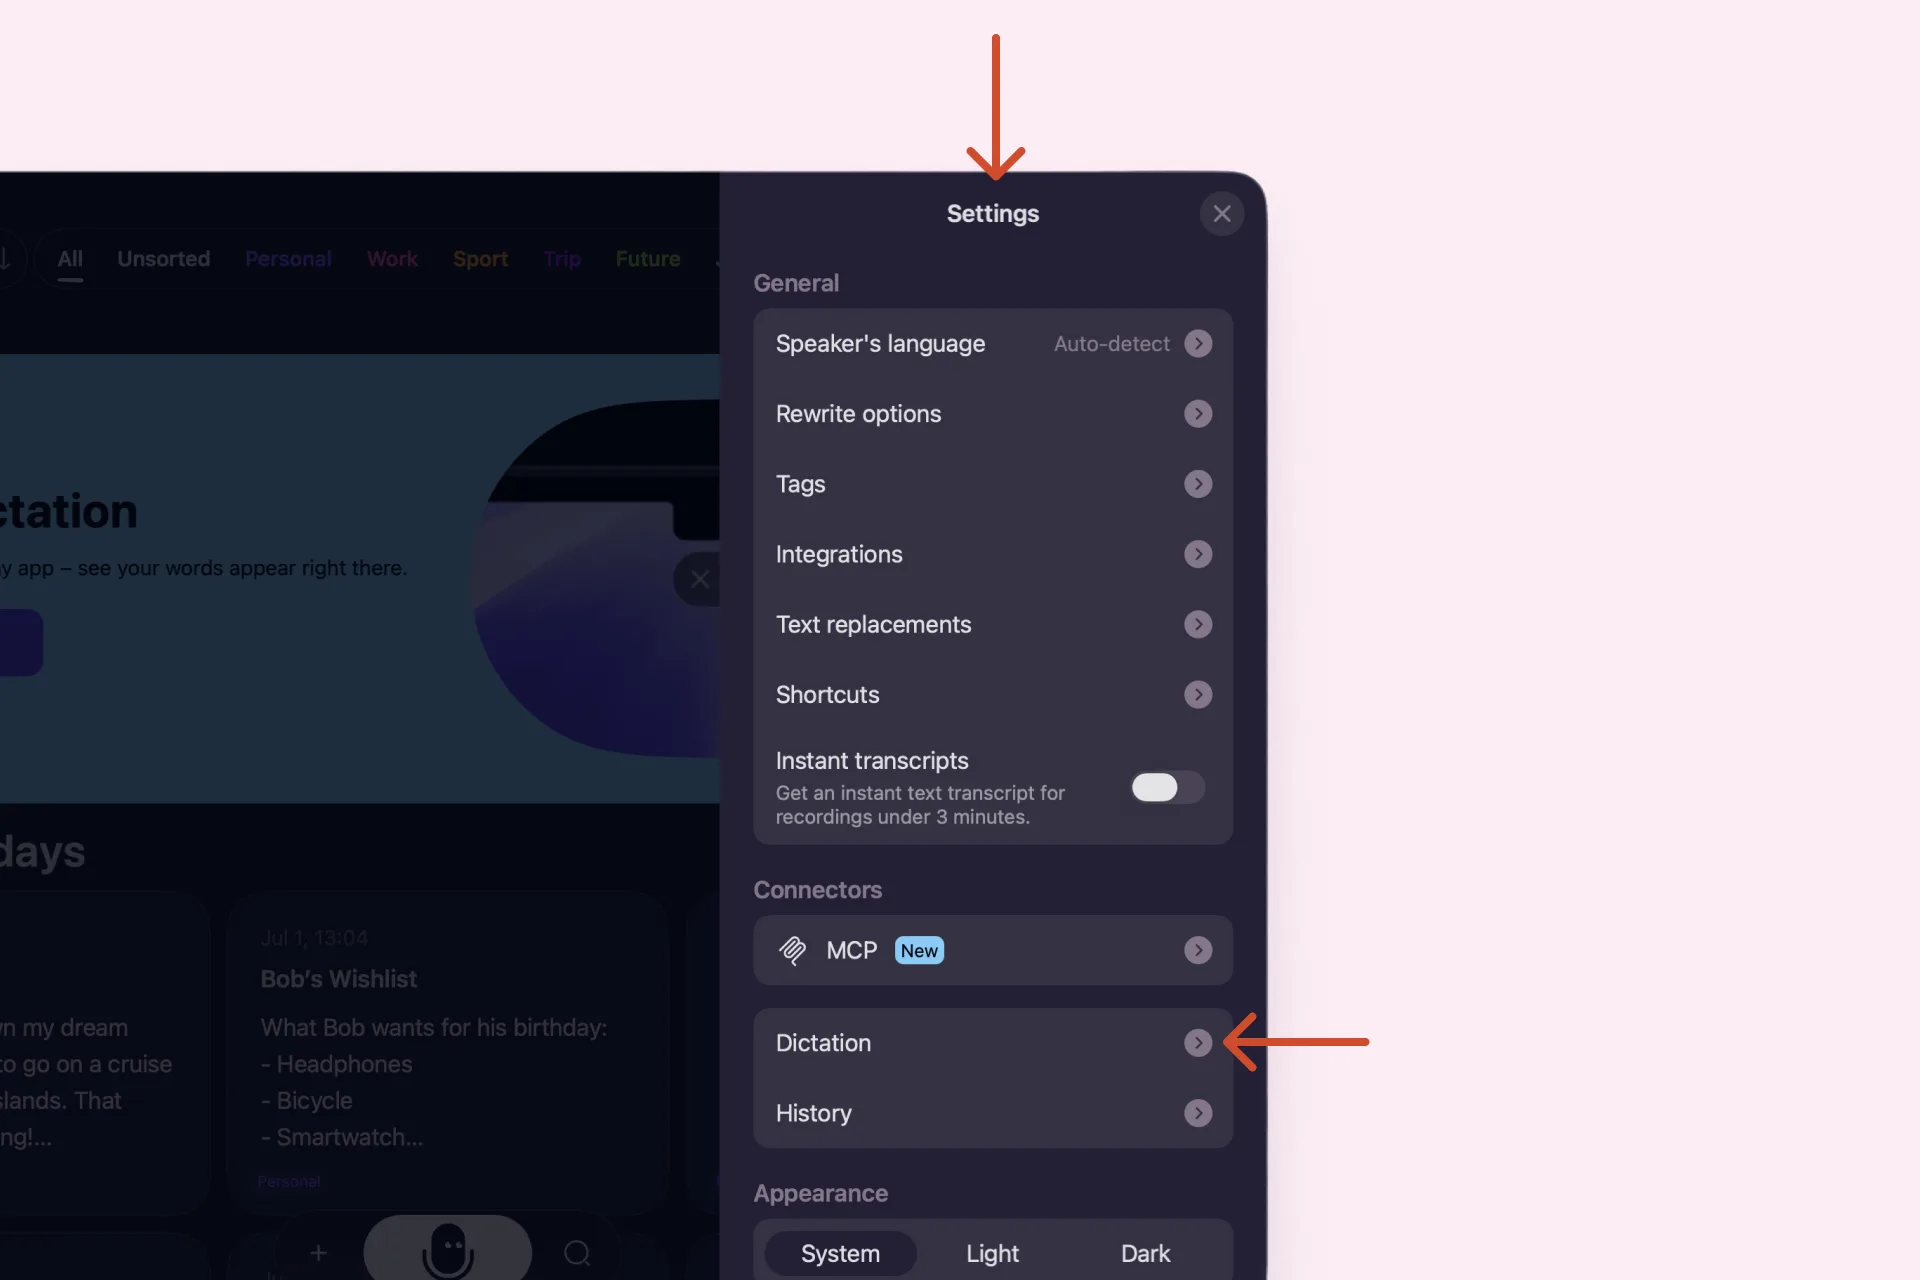
Step 2. Find Dictation
In Settings, open the Dictation section.
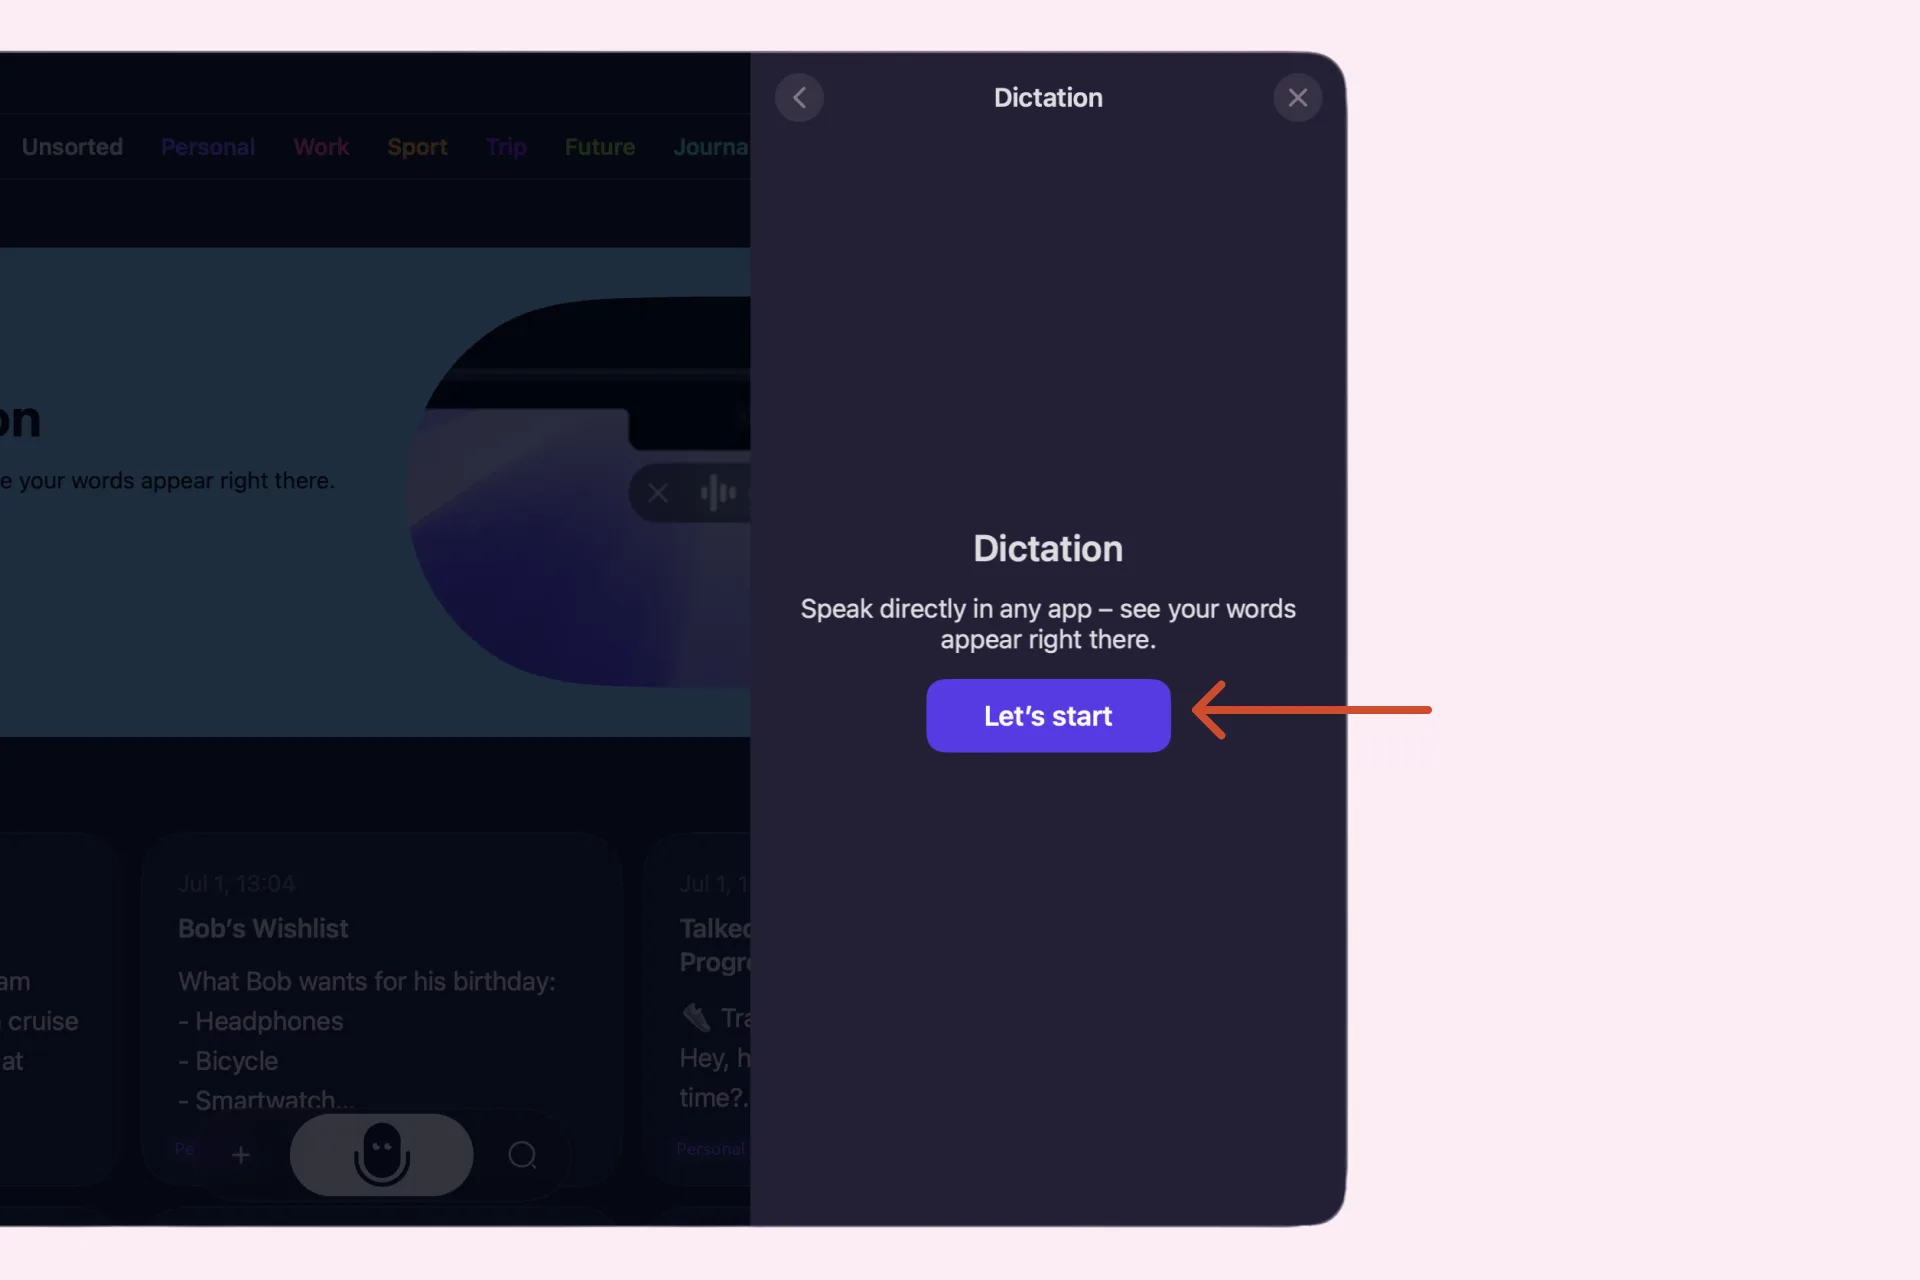
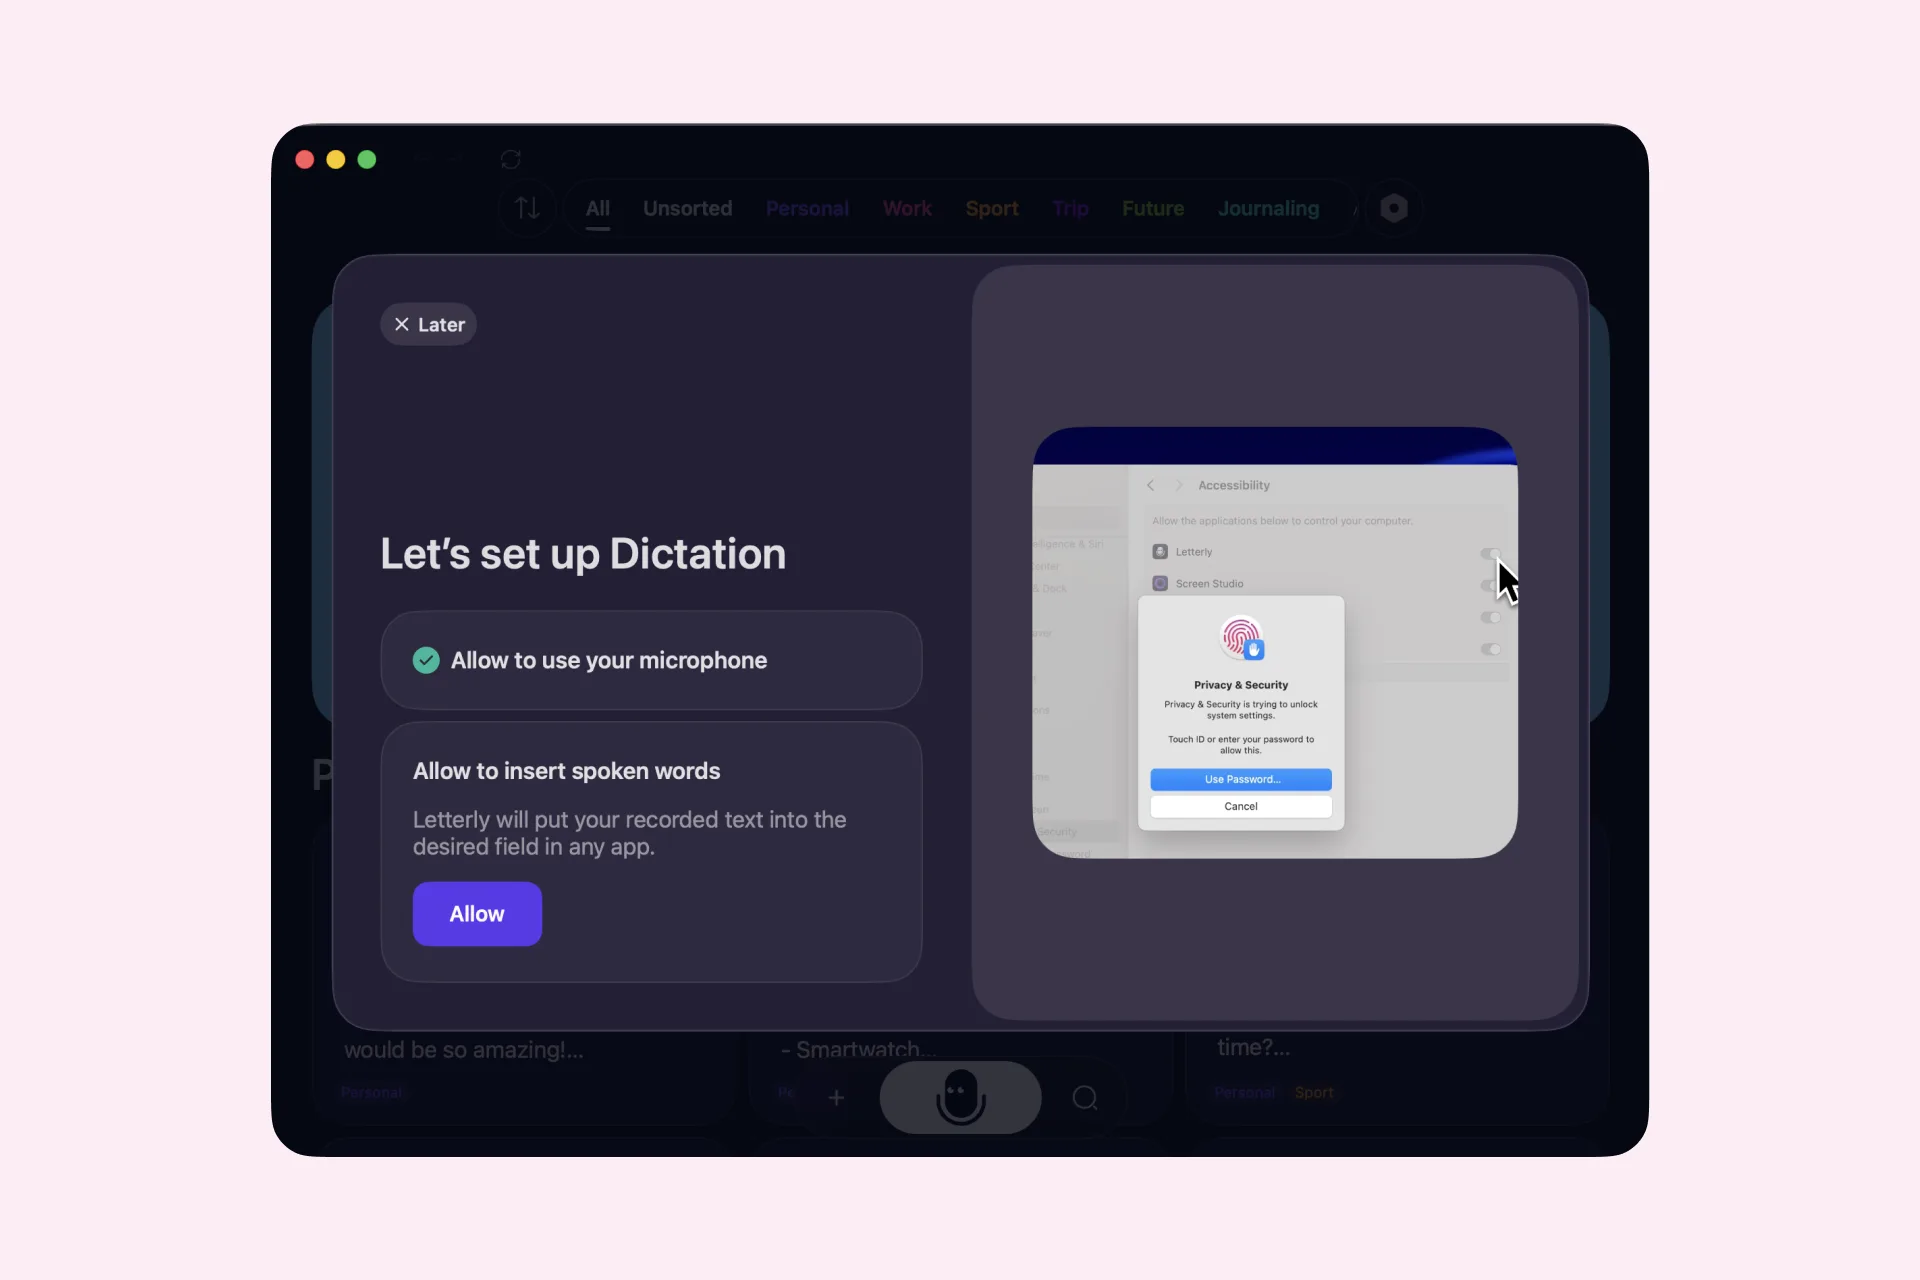
Step 3. Allow the required permissions
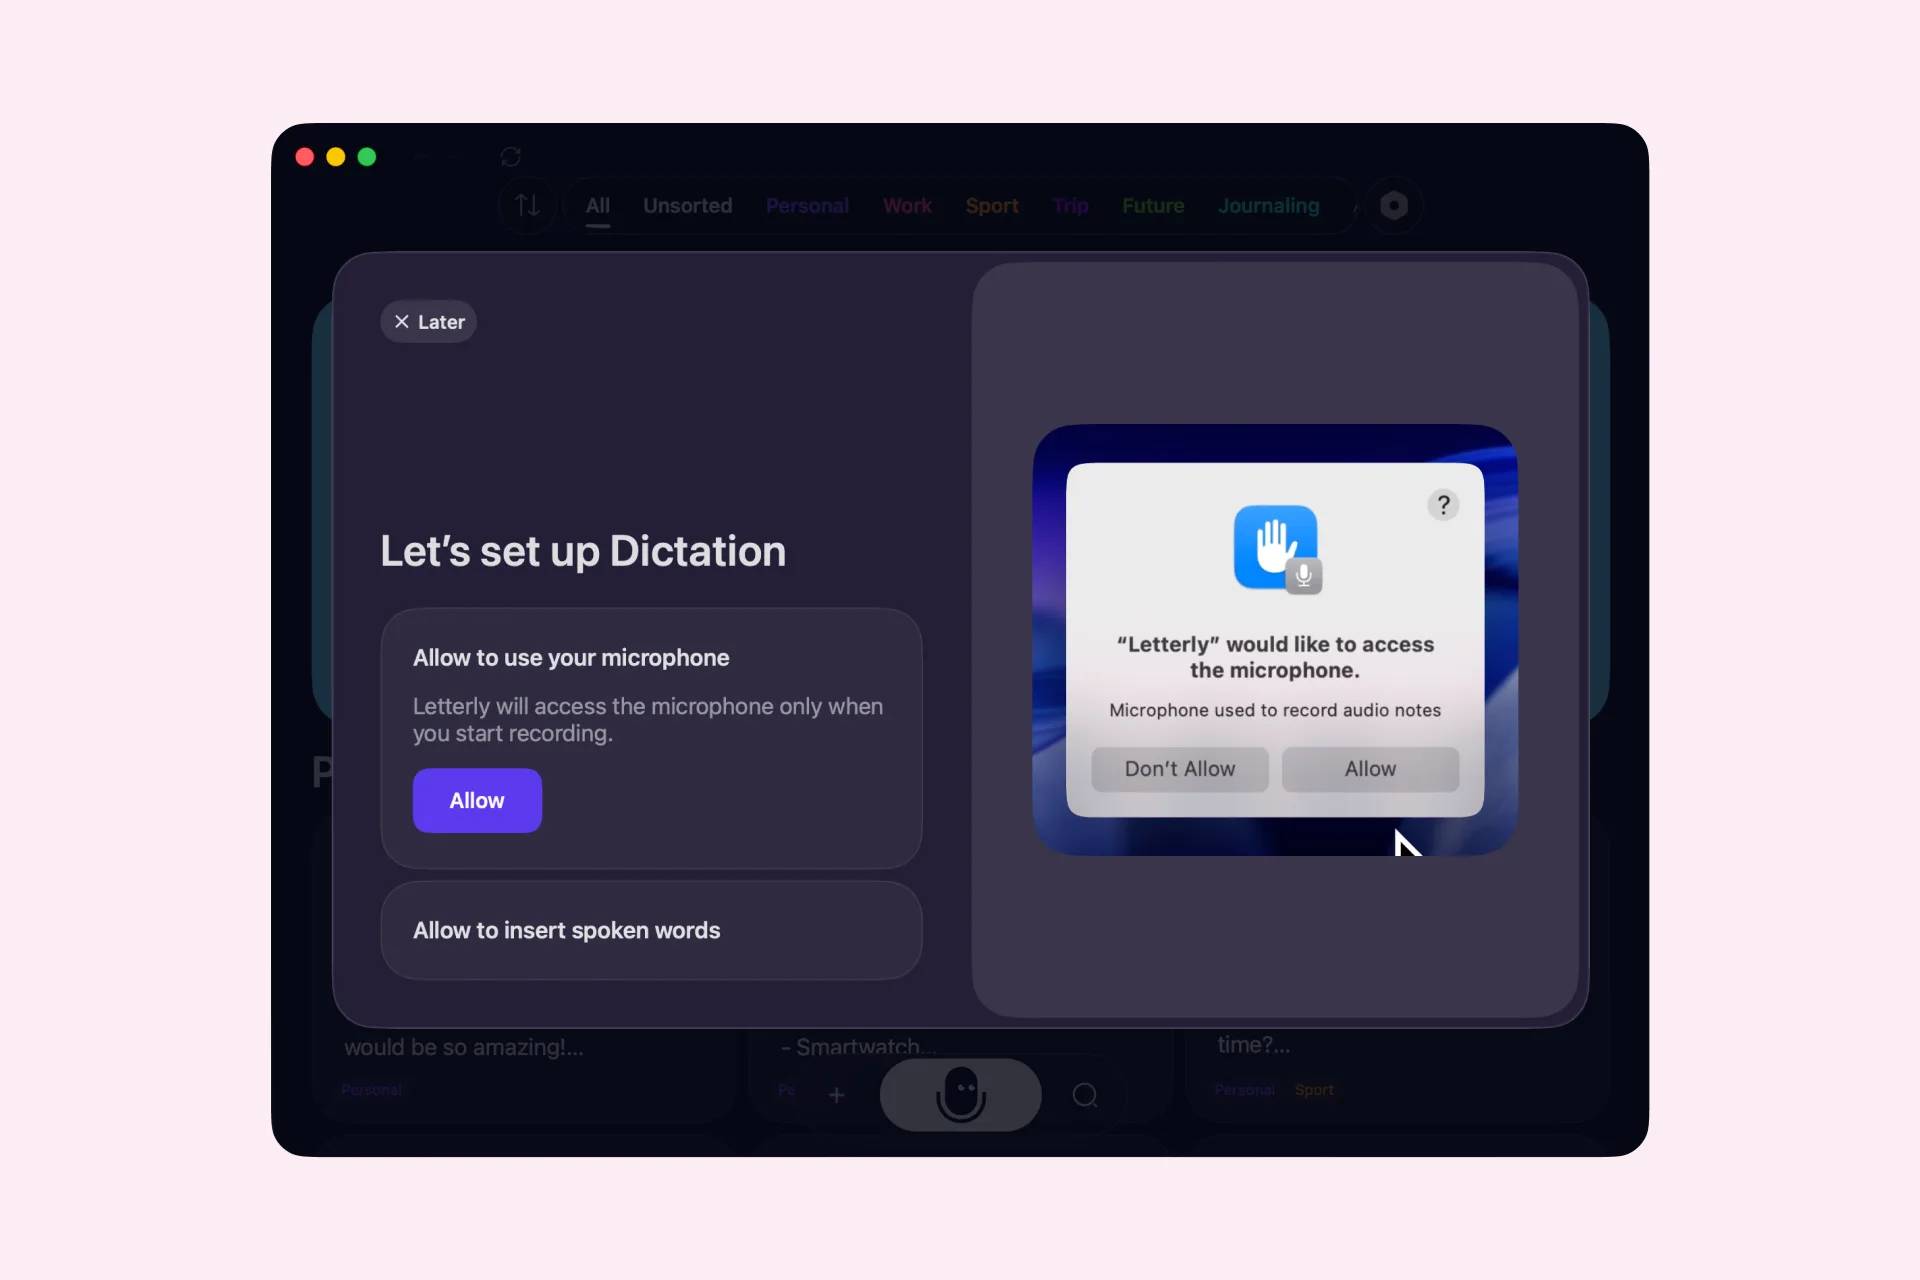
Letterly guides you through two permissions: Microphone access, so it can hear what you dictate, and Accessibility access, so it can insert the finished text into the active text field.
Microphone access
If you have used Letterly before, microphone access may already be enabled — this step is skipped automatically.
- Click Allow in Letterly.
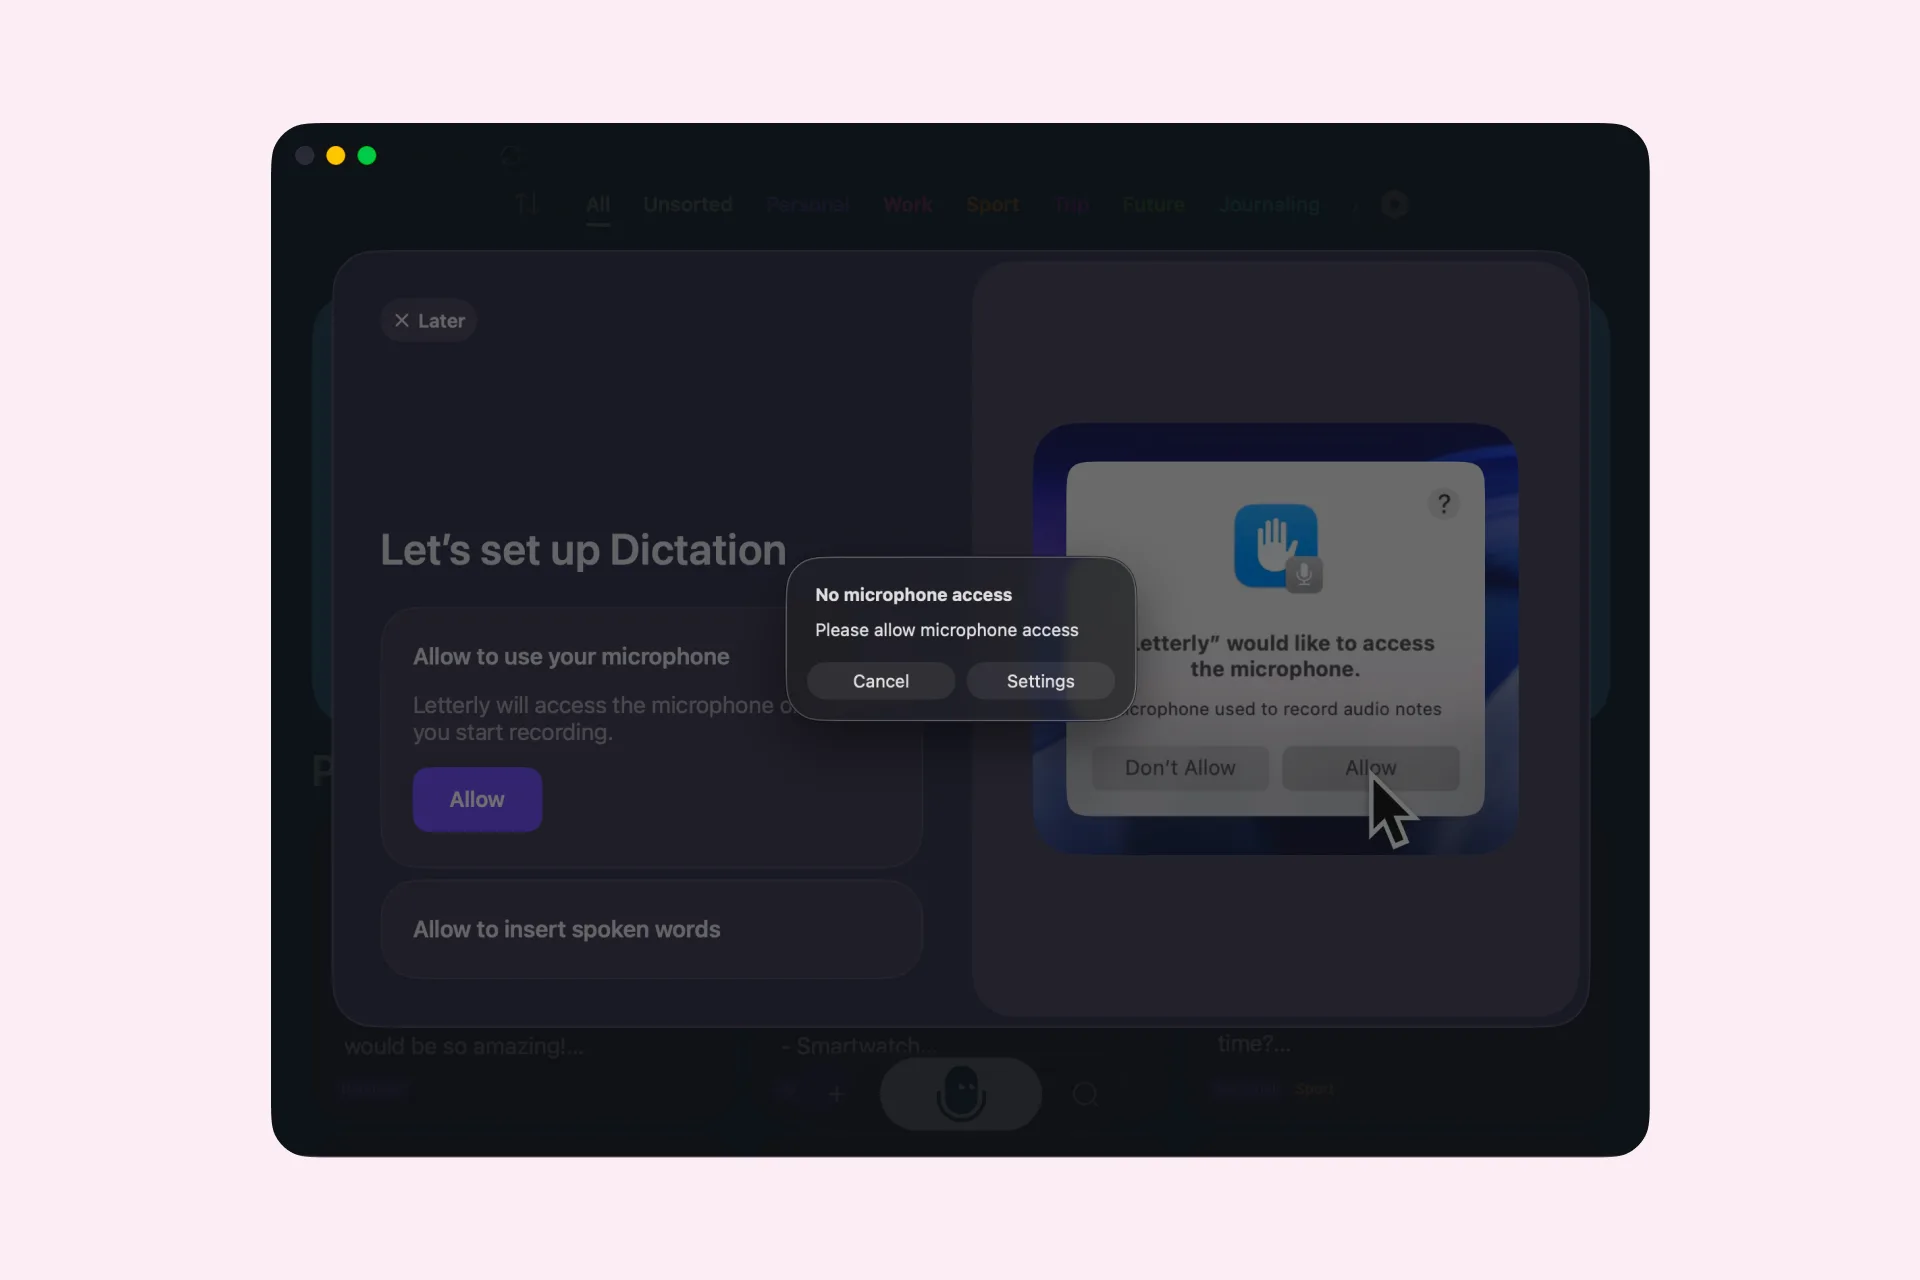
- When the No microphone access message appears, click Settings.
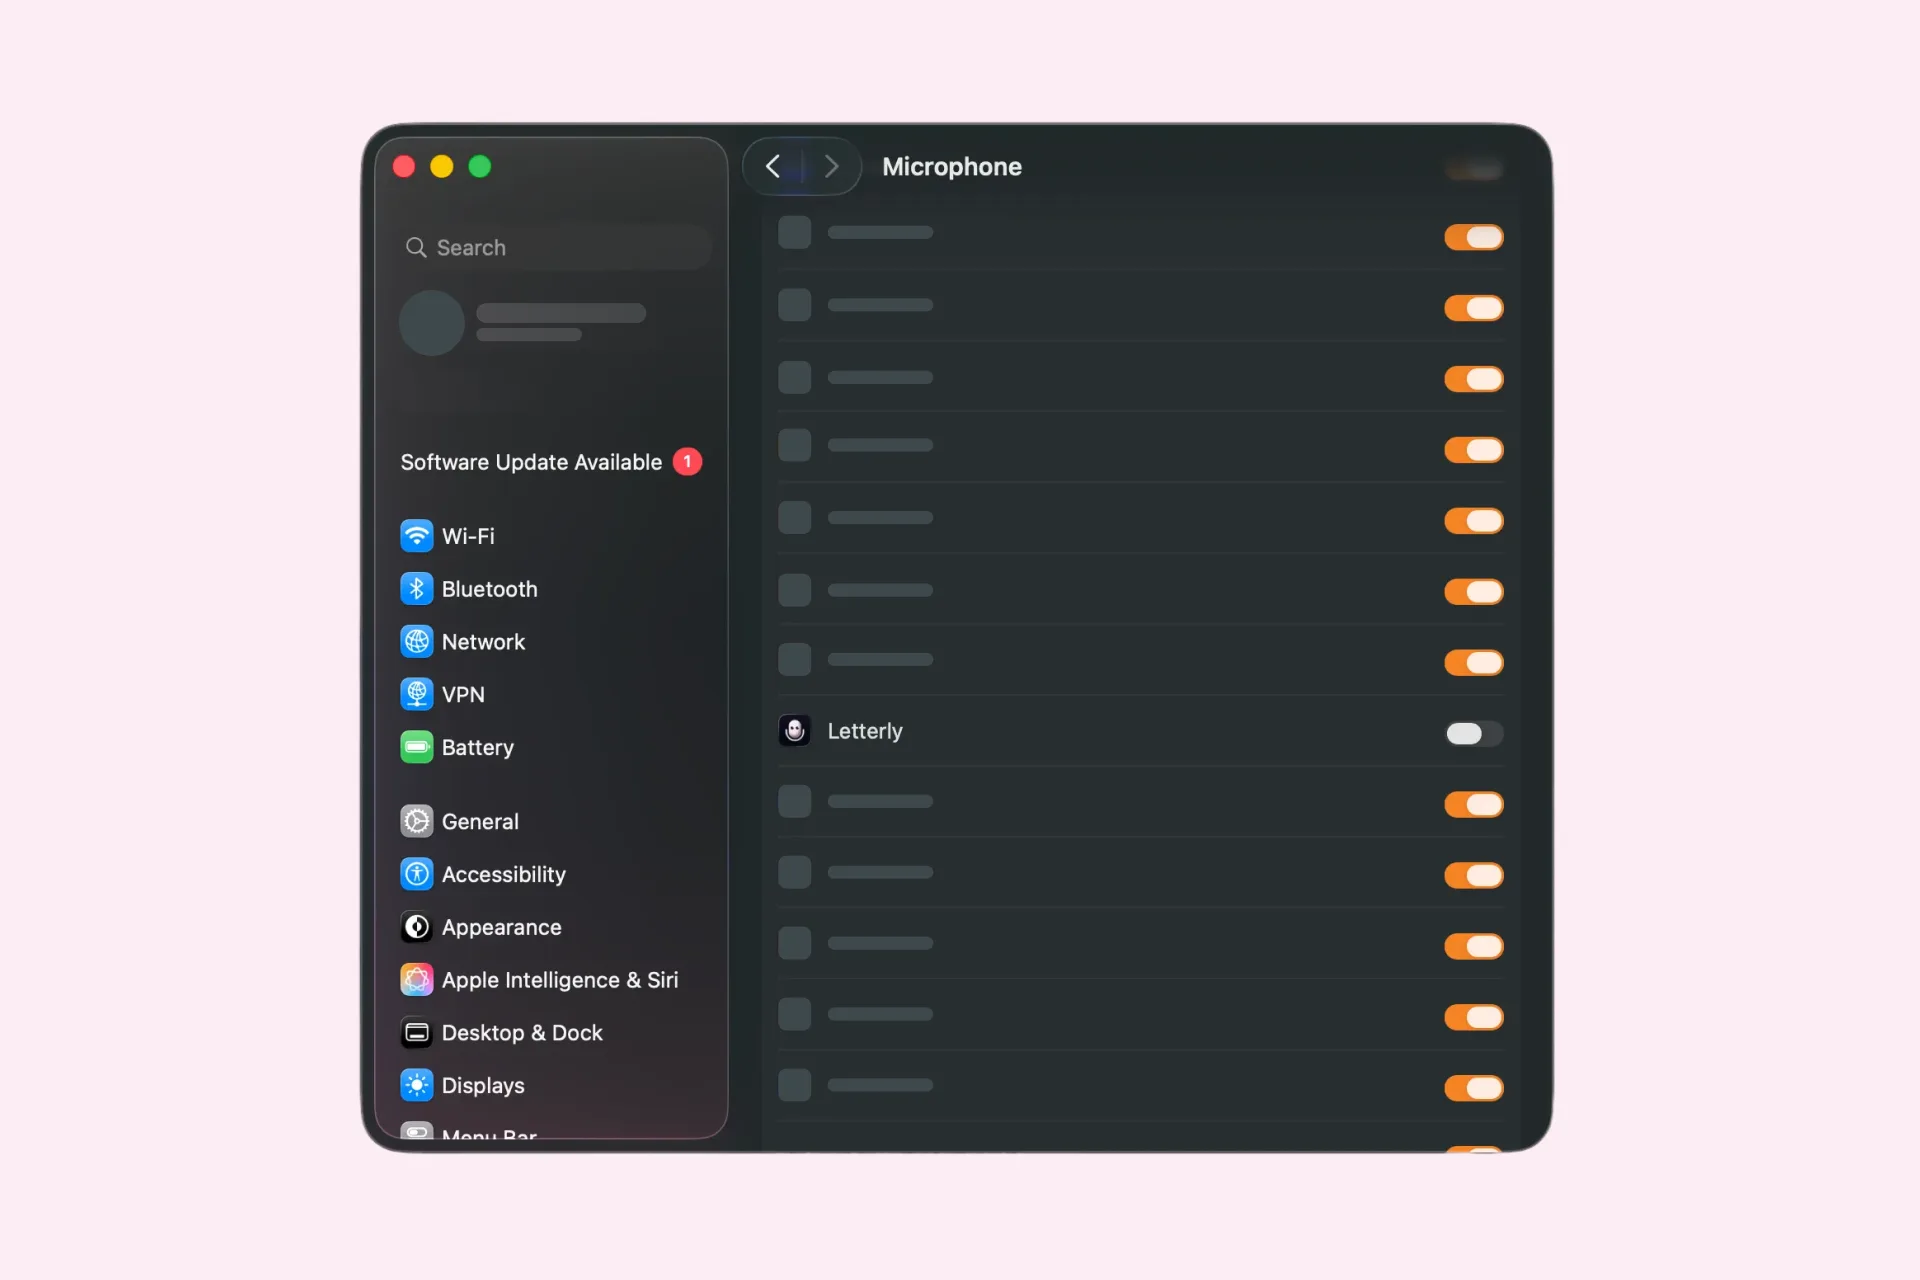
- Enable Letterly under Microphone.
- Return to Letterly to continue the setup.
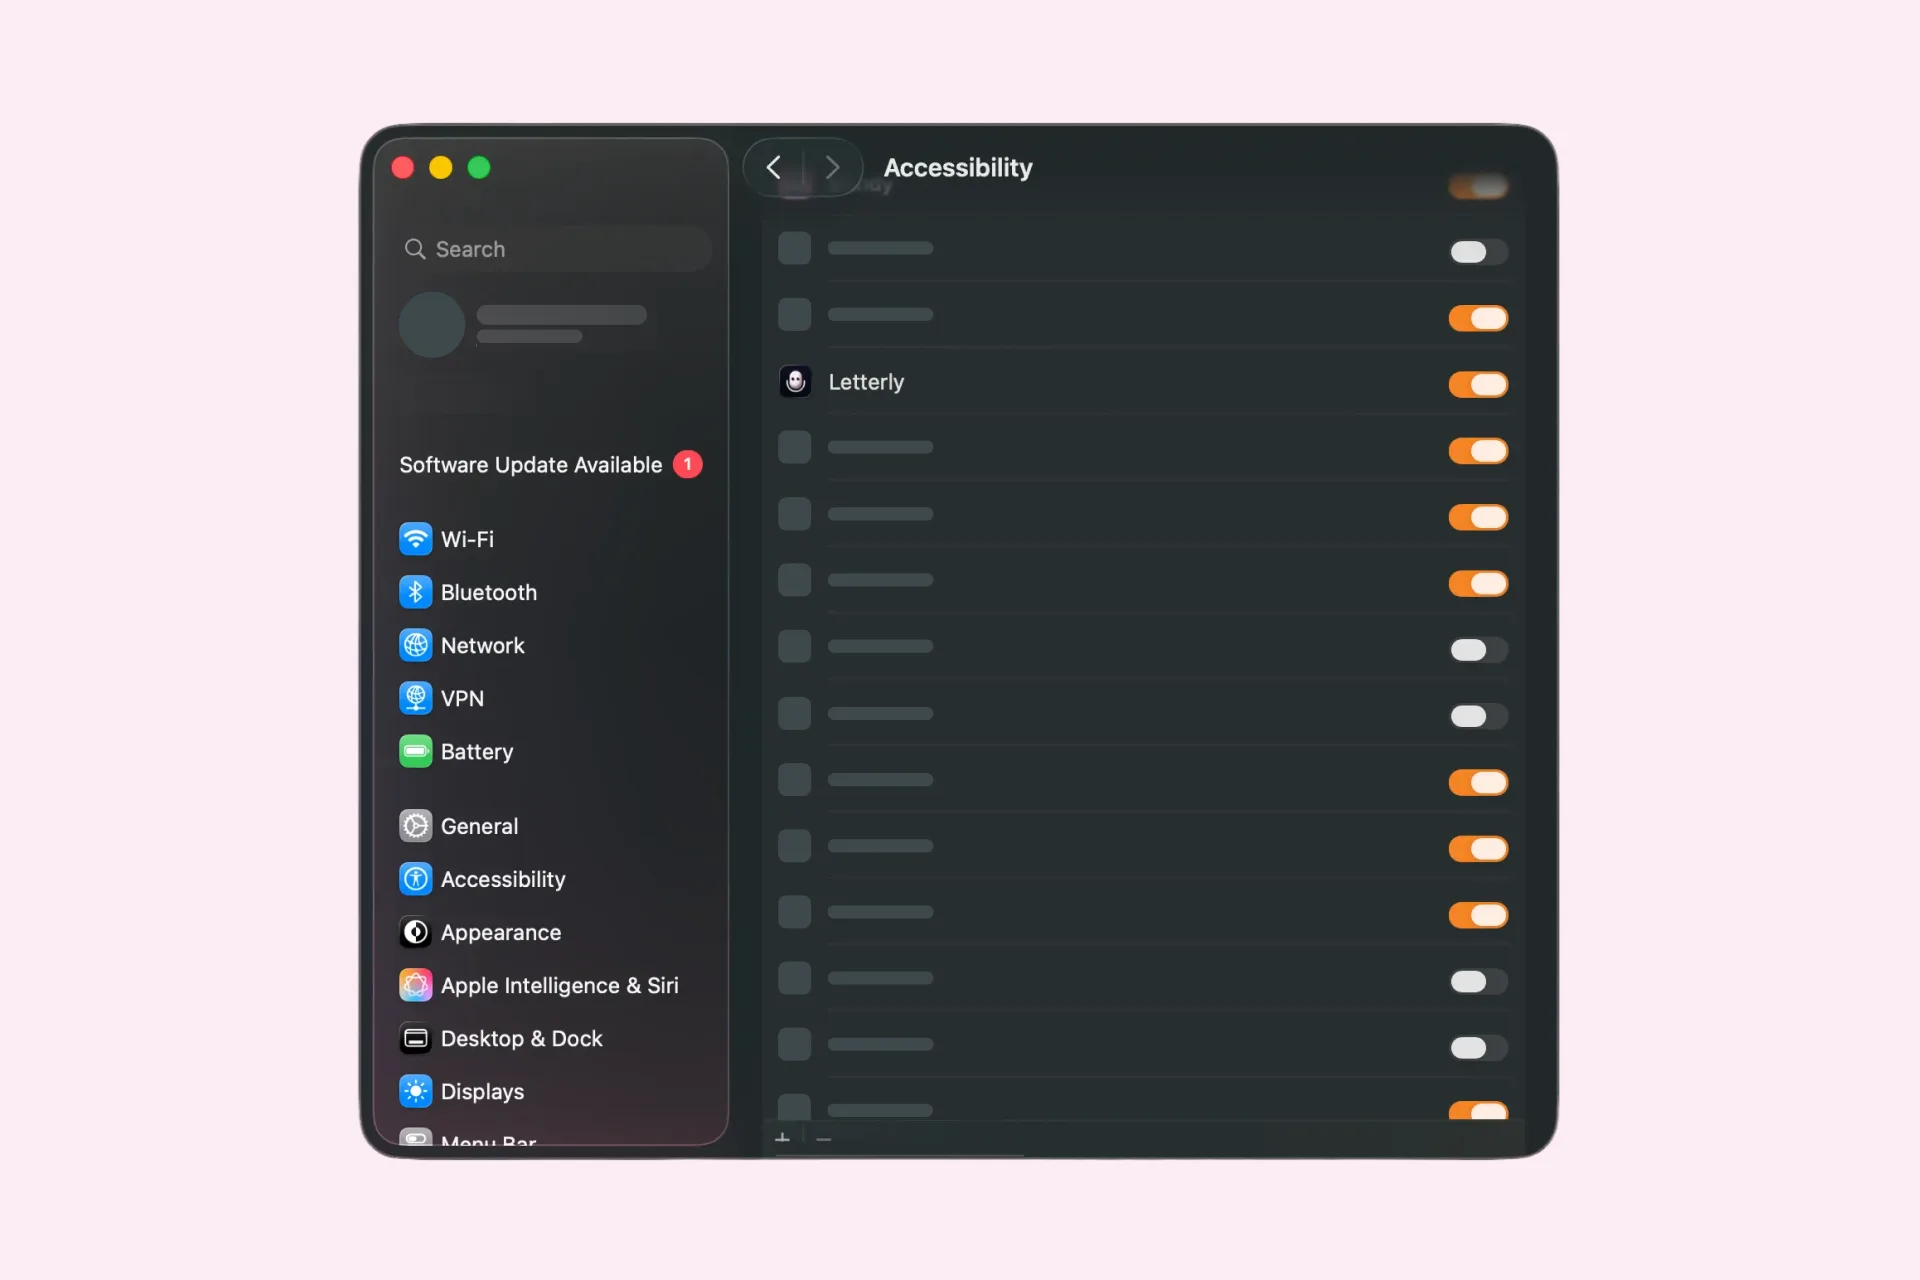
Accessibility access
- Click Allow in Letterly.
- Enable Letterly under Accessibility.
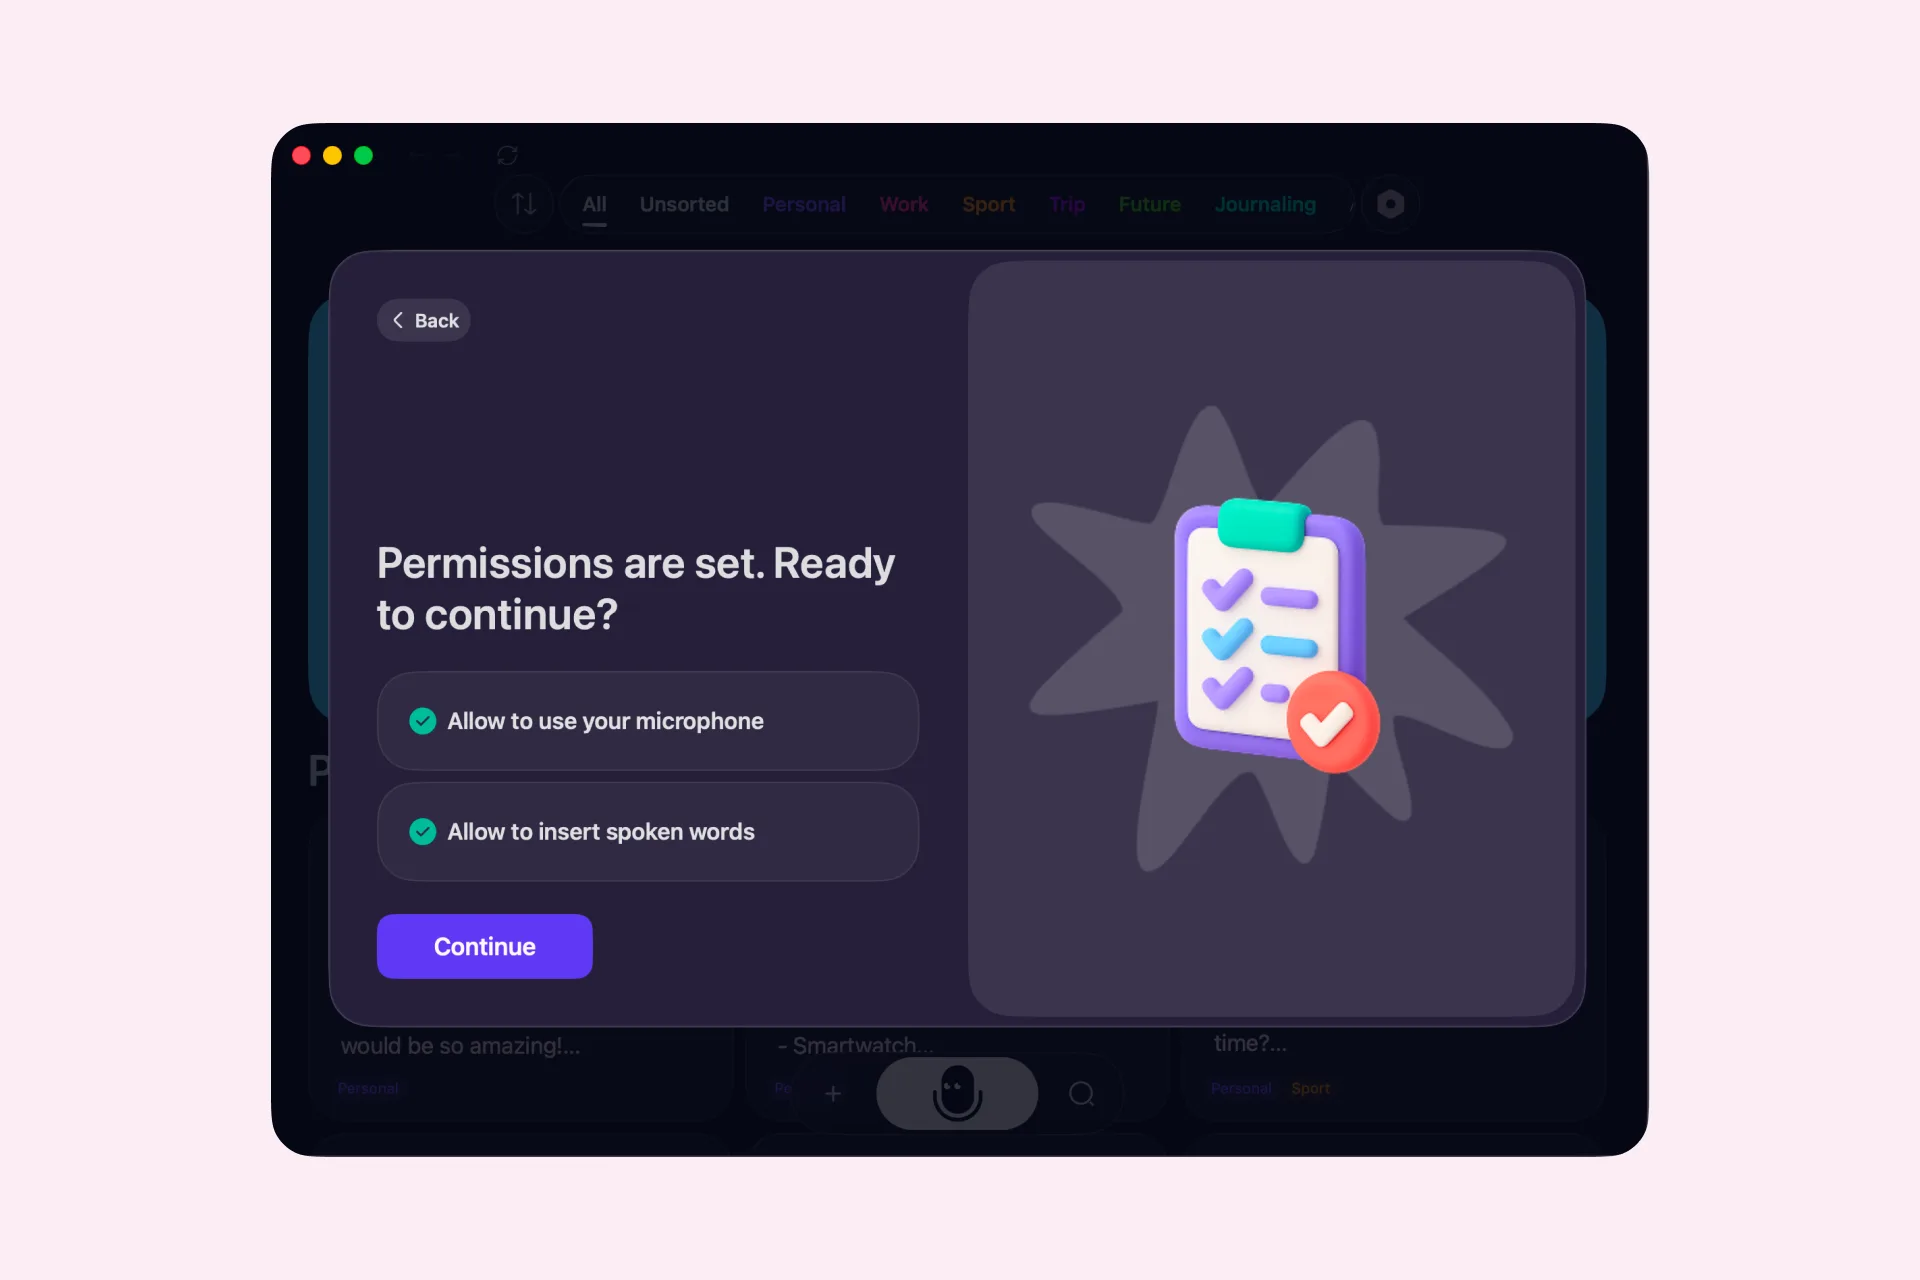
- If macOS asks you to, quit and reopen Letterly.
On Windows you dictate with a shortcut or by clicking the floating bar.
Step 1. Install Letterly
Get the app from the Microsoft Store and open it. Full details: Download & install.
Step 2. Sign in
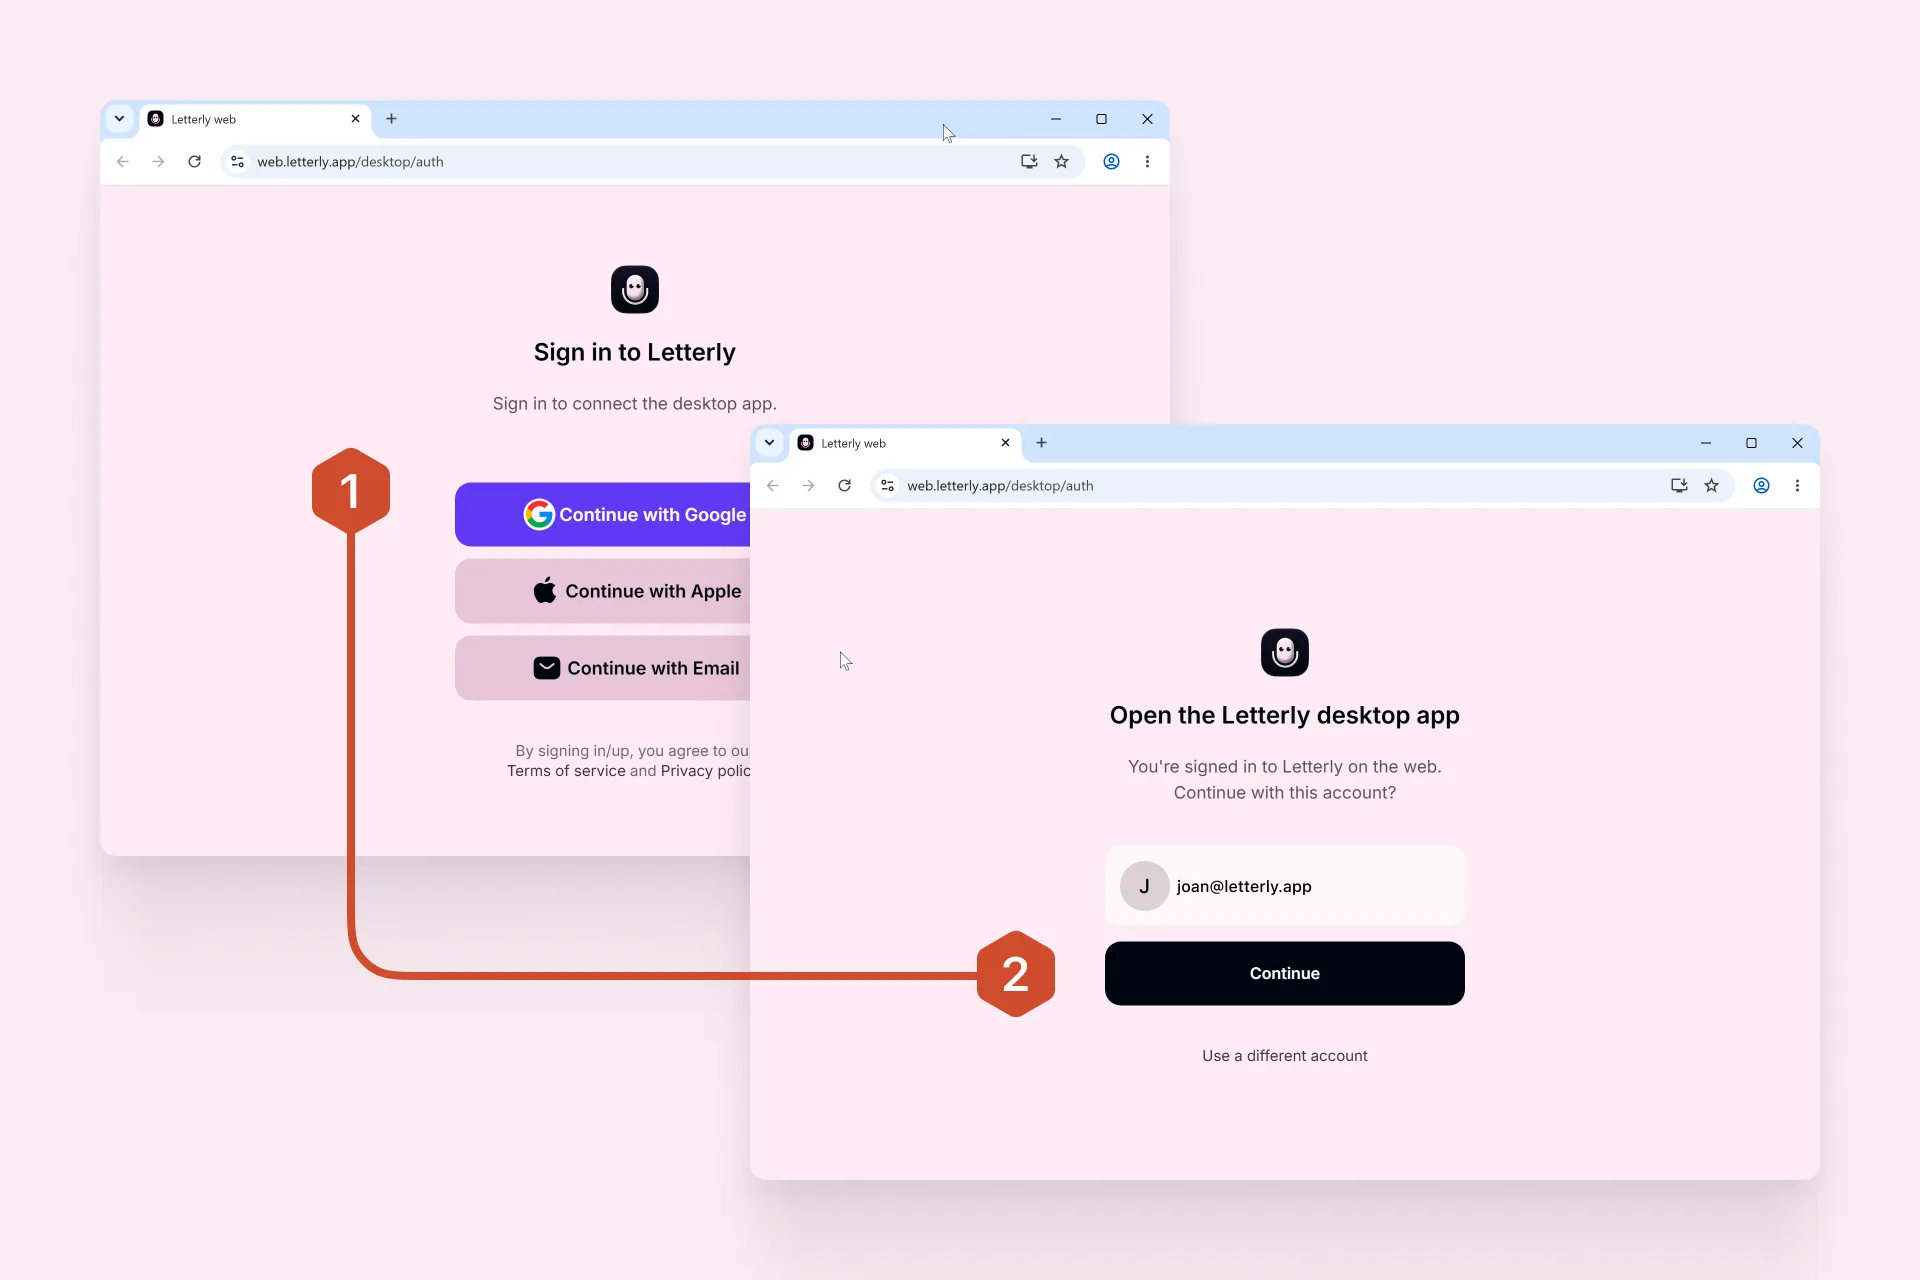
Letterly on Windows works only with an account, so signing in is the first thing that happens. The app opens the sign-in page in your web browser.
- Choose Continue with Google, Continue with Apple, or Continue with Email.
- On the Open the Letterly desktop app screen, check the account and click Continue.
- The desktop app opens on its own and takes you to the Dictation setup.
If you already have a subscription, sign in with the email you bought it with. Otherwise you start on the Free plan.
Learn more about plans →Step 3. Open Dictation
After signing in, the app takes you straight to the Dictation setup. If you closed it, open Settings → Dictation.
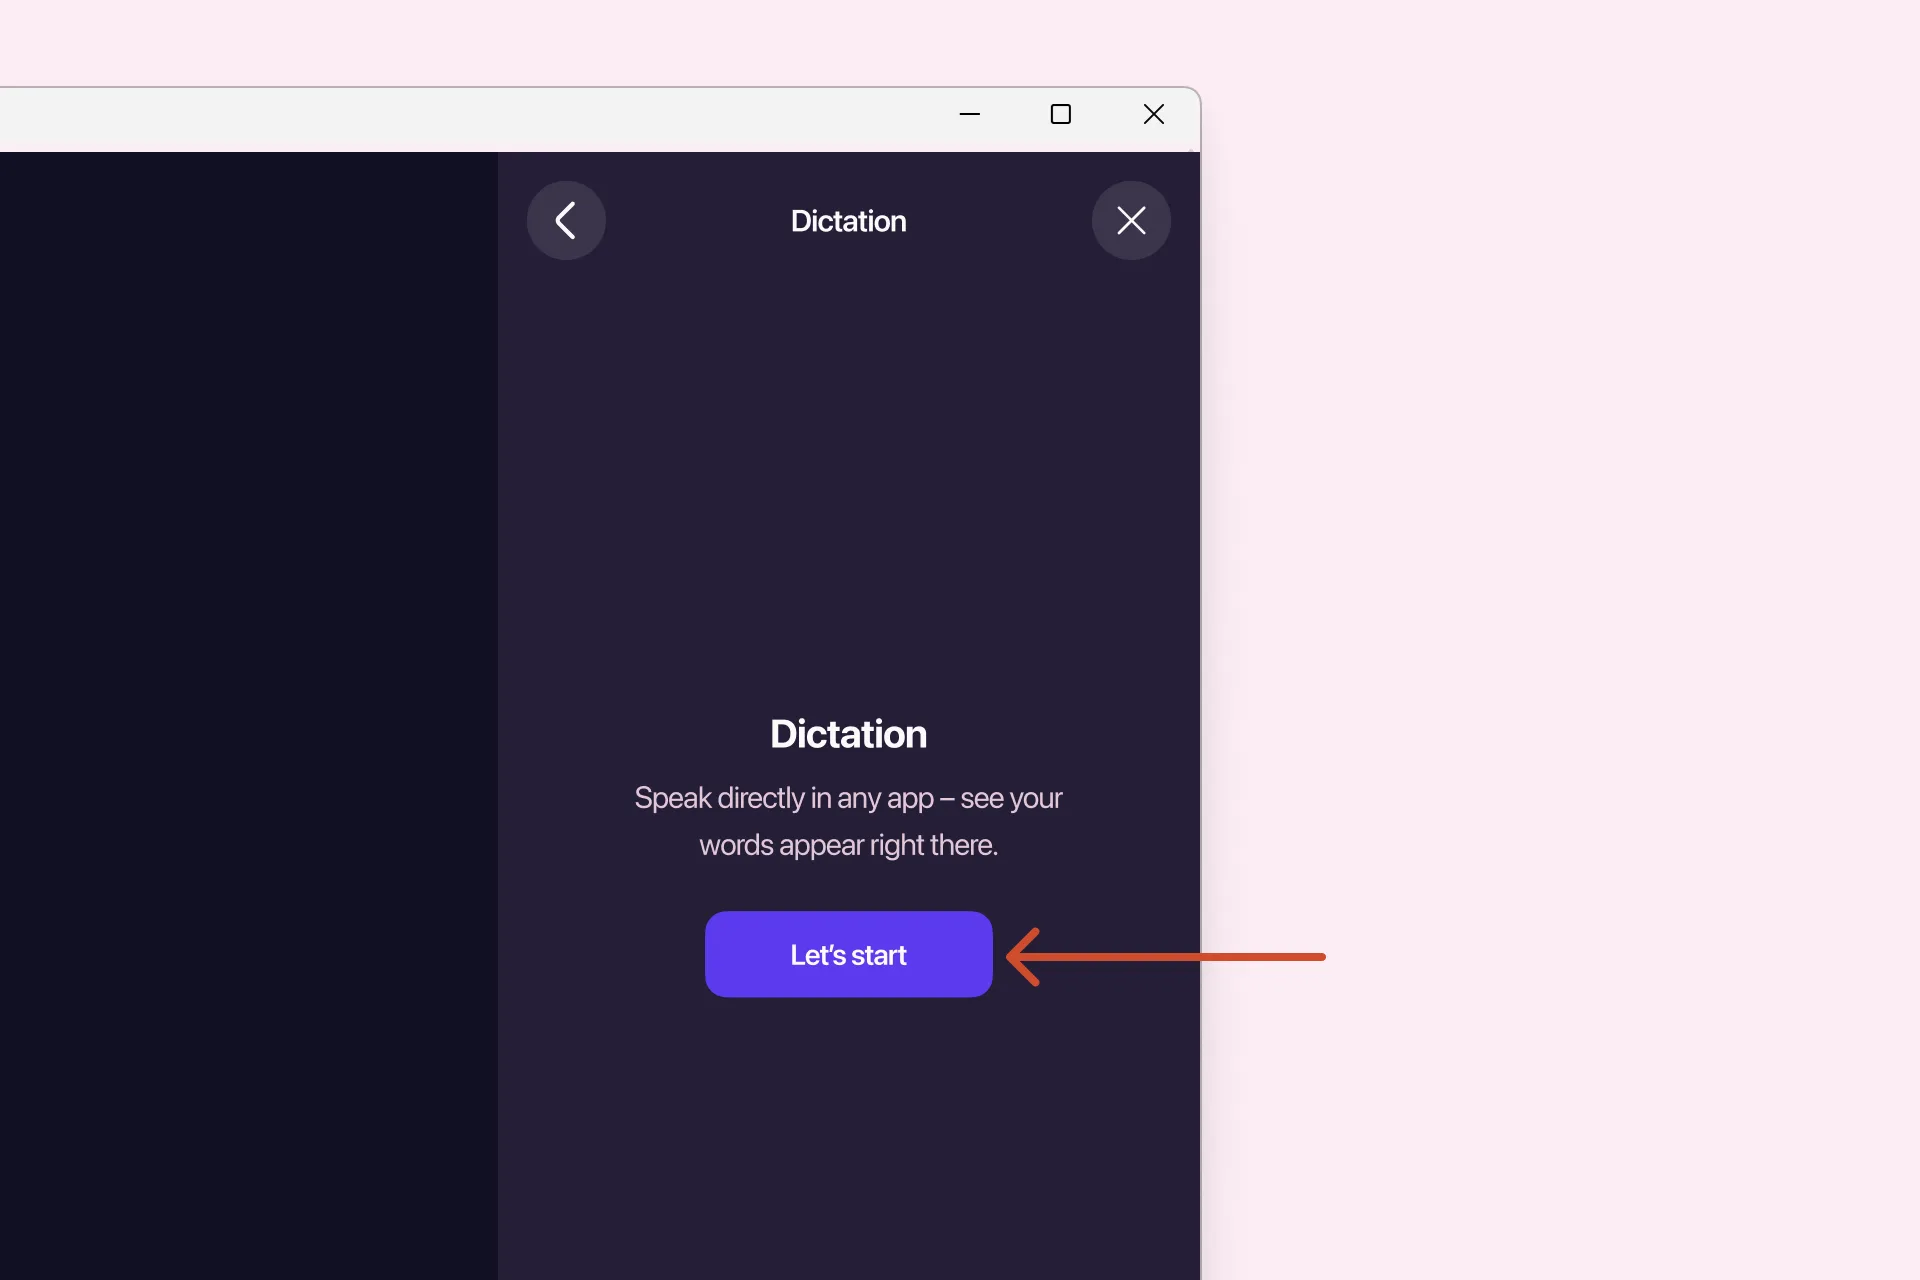
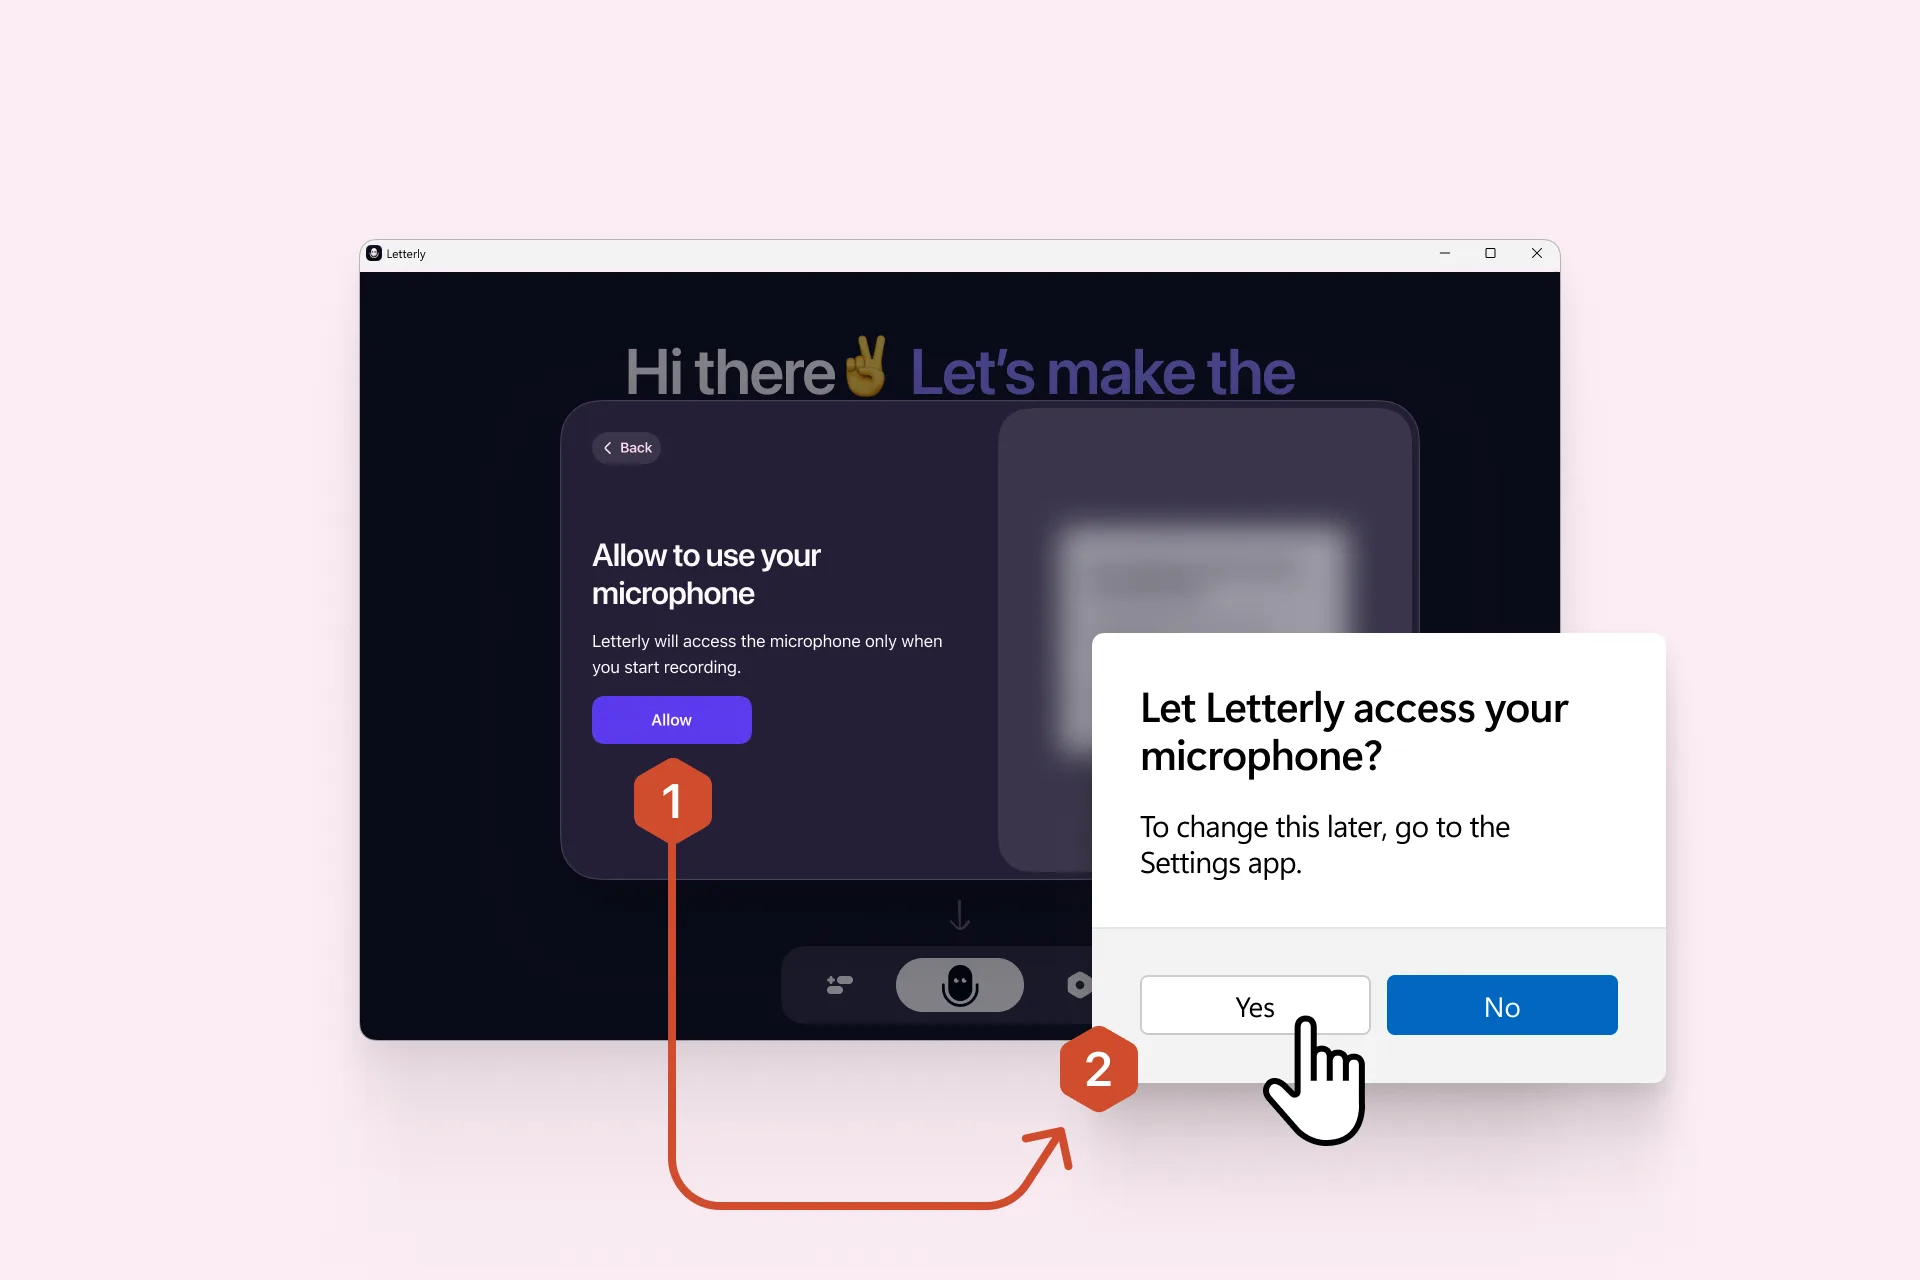
Step 4. Allow microphone access
If you have used Letterly before, microphone access may already be enabled — this step is skipped automatically.
- Click Allow in Letterly.
- When the Windows permission window appears, click Yes.
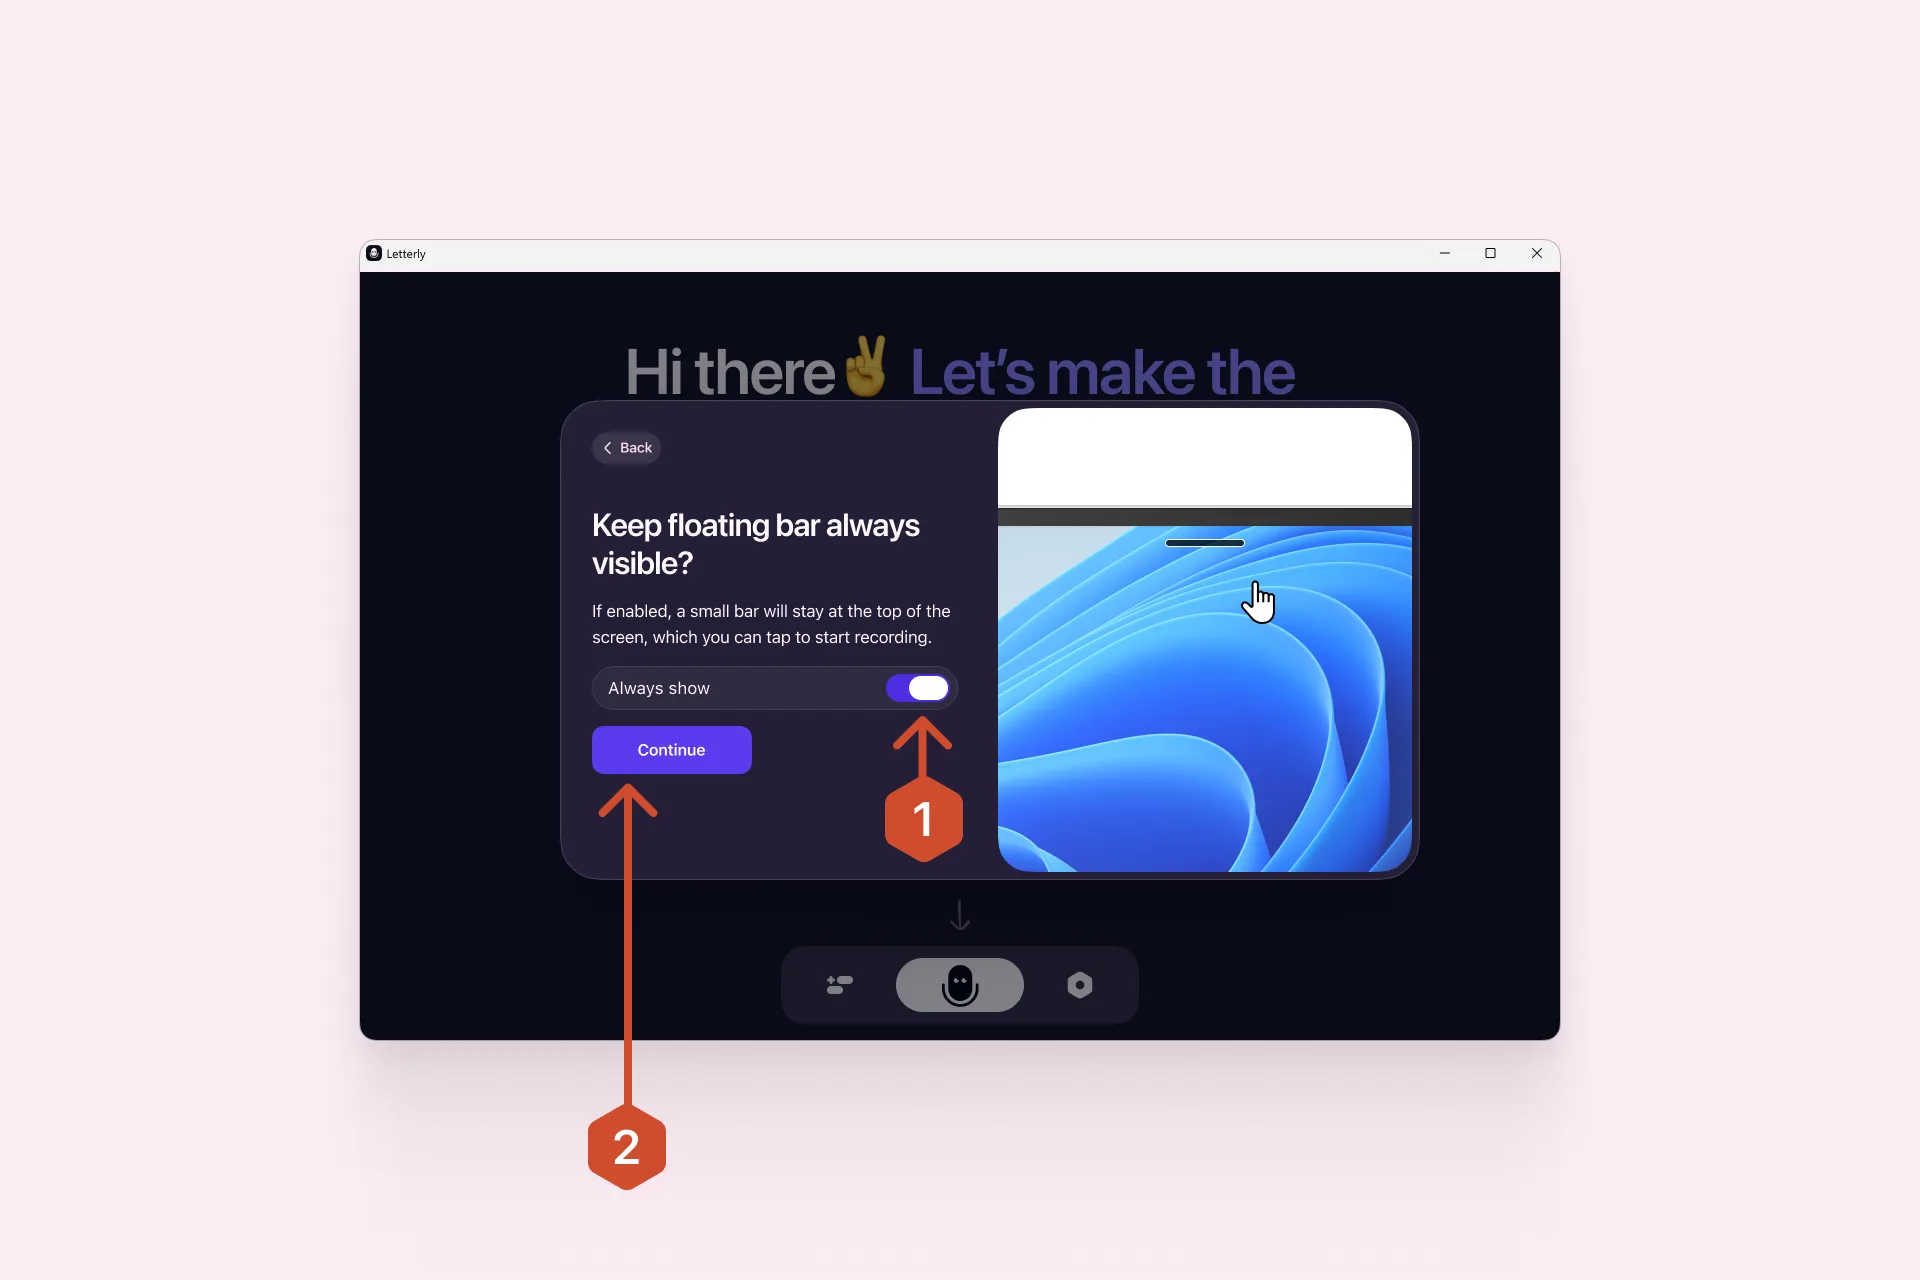
Step 5. Choose your floating bar setting
The floating bar is a small on-screen control you can click to start recording at any time, even when Letterly is not in focus.
- Turn on Always show if you want it visible at all times.
- Click Continue.
You can change this later in Settings → Dictation → Floating bar.
Step 6. Check your shortcut
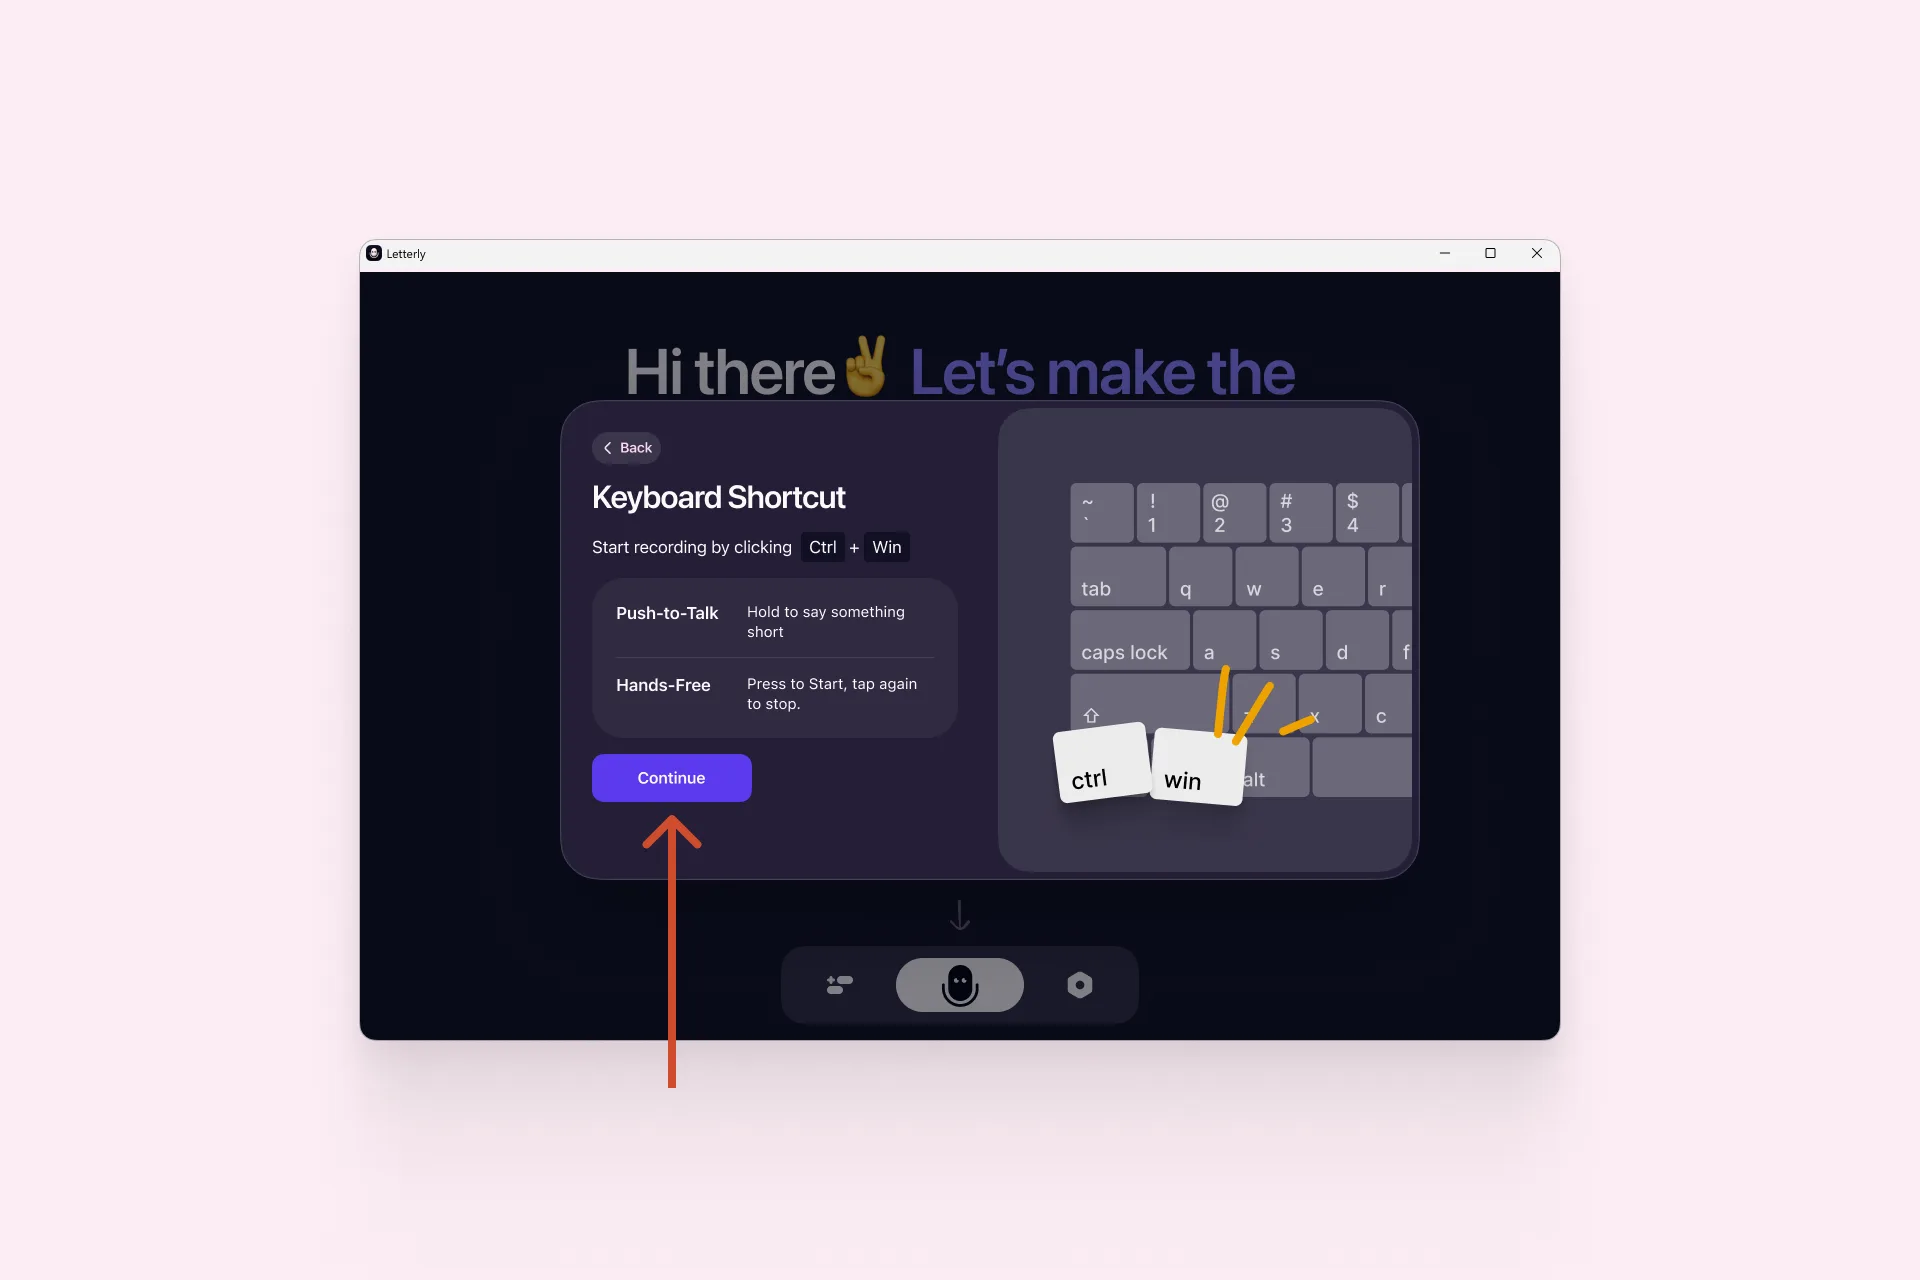
Your default shortcut is Ctrl + Win. It works two ways: hold to talk for something short, or press once to start and again to stop. Click Continue.
Change it any time in Settings → Dictation → Floating bar → Shortcut, or in Settings → Shortcuts → Dictation. See Shortcuts.